HP Pavilion 7700 HP Pavilion Home PC - (English) Upgrading and Servicing the P - Page 19
on the optical
 |
View all HP Pavilion 7700 manuals
Add to My Manuals
Save this manual to your list of manuals |
Page 19 highlights
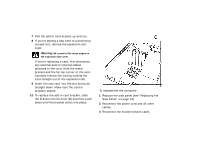
1 Turn off the computer and all peripherals. 2 Disconnect the modem/phone cable. 3 Disconnect the power cord and all other attached cables (such as the keyboard, mouse, and monitor). 4 Remove the side panel (see "Removing the Side Panel" on page 3). 5 Remove the fan duct (see "Removing the Fan Duct" on page 5). 6 Locate the screws (B and C) on the optical drive. 7 If you are removing the bottom optical drive, remove the two screws (C) on the drive and push the drive part way out through the front of the computer. Or
-
 1
1 -
2
-
3
-
4
-
5
-
6
-
7
-
8
-
9
-
10
-
11
-
12
-
13
-
 14
14 -
 15
15 -
 16
16 -
 17
17 -
 18
18 -
 19
19 -
 20
20 -
 21
21 -
 22
22 -
 23
23 -
 24
24 -
25
-
26
-
27
-
28
-
29
-
30
-
31
-
32
-
33
-
34
-
35
-
36
-
37
-
38
-
39
-
40
-
41
-
42
-
43
-
44
-
45
 |
 |

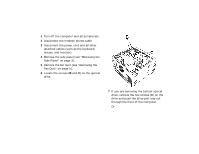
1
Turn off the computer and all peripherals.
2
Disconnect the modem/phone cable.
3
Disconnect the power cord and all other
attached cables (such as the keyboard,
mouse, and monitor).
4
Remove the side panel (see “Removing the
Side Panel” on page 3).
5
Remove the fan duct (see “Removing the
Fan Duct” on page 5).
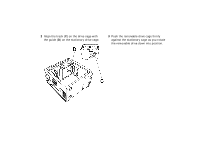
6
Locate the screws (
B
and
C
) on the optical
drive.
7
If you are removing the bottom optical
drive, remove the two screws (
C
) on the
drive and push the drive part way out
through the front of the computer.
Or