HP Pro 2080 Maintenance & Service Guide: HP Pro 2000/2080 Business PC - Page 67
Slide the power supply toward the front/bottom of the computer, then lift the power supply out
 |
View all HP Pro 2080 manuals
Add to My Manuals
Save this manual to your list of manuals |
Page 67 highlights
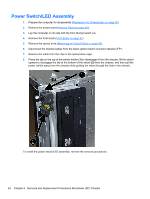
5. Remove the four screws that secure the power supply to the chassis. 6. Inside of the unit, press the power supply release latch on the chassis base, and then lift up the rear of the power supply to disengage it from the chassis. NOTE: System board appearance may vary. 7. Slide the power supply toward the front/bottom of the computer, then lift the power supply out of the computer. To install the power supply, reverse the removal procedure. Power Supply 59
-
 1
1 -
2
-
3
-
4
-
5
-
6
-
7
-
8
-
9
-
10
-
11
-
12
-
13
-
14
-
15
-
16
-
17
-
18
-
19
-
20
-
21
-
22
-
23
-
24
-
25
-
26
-
27
-
28
-
29
-
30
-
31
-
32
-
33
-
34
-
35
-
36
-
37
-
38
-
39
-
40
-
41
-
42
-
43
-
44
-
45
-
46
-
47
-
48
-
49
-
50
-
51
-
52
-
53
-
54
-
55
-
56
-
57
-
58
-
59
-
60
-
61
-
 62
62 -
 63
63 -
 64
64 -
 65
65 -
 66
66 -
 67
67 -
 68
68 -
 69
69 -
 70
70 -
 71
71 -
 72
72 -
73
-
74
-
75
-
76
-
77
-
78
-
79
-
80
-
81
-
82
-
83
-
84
-
85
-
86
-
87
-
88
-
89
-
90
-
91
-
92
-
93
-
94
-
95
-
96
-
97
-
98
-
99
-
100
-
101
-
102
-
103
-
104
-
105
-
106
-
107
-
108
-
109
-
110
-
111
-
112
-
113
-
114
-
115
-
116
-
117
-
118
-
119
-
120
-
121
-
122
-
123
-
124
-
125
 |
 |
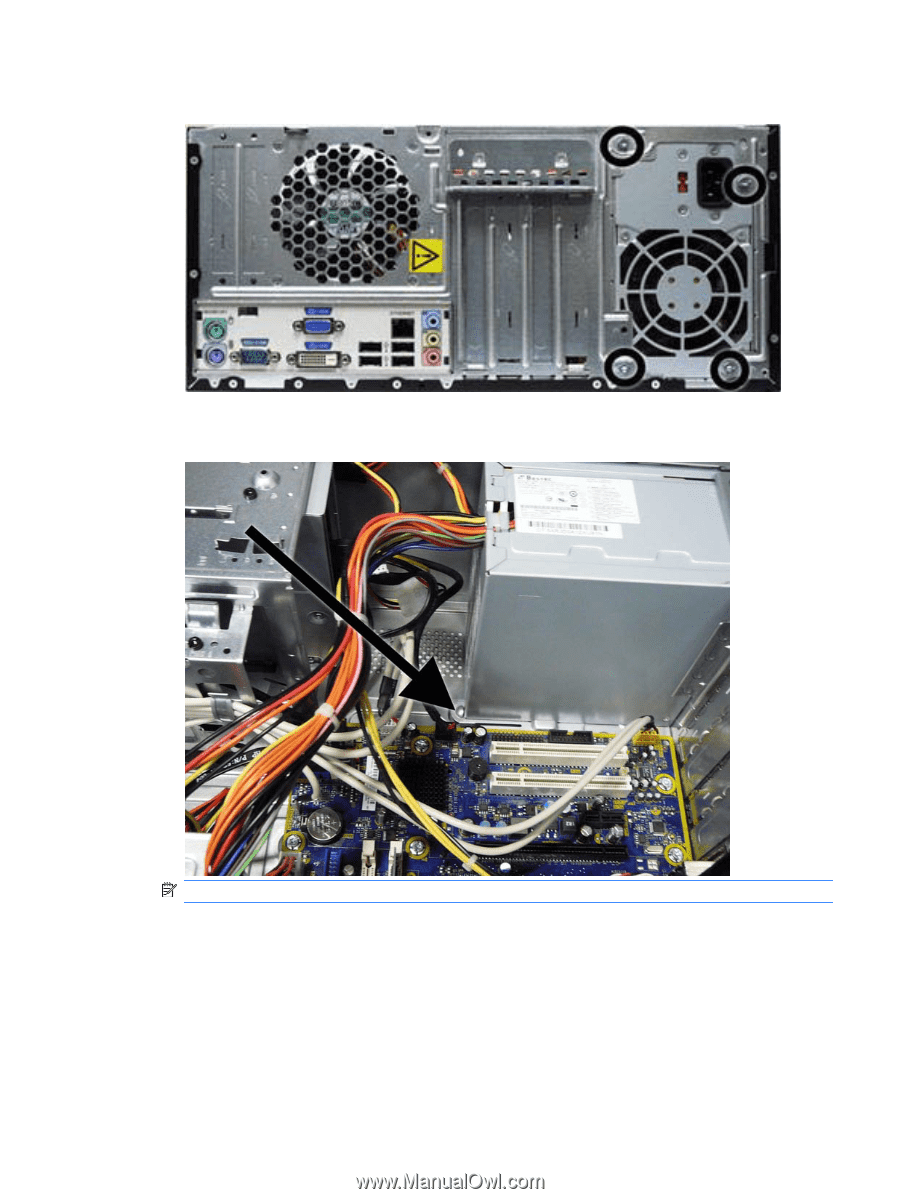
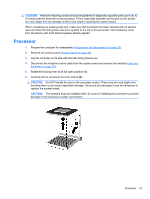
5.
Remove the four screws that secure the power supply to the chassis.
6.
Inside of the unit, press the power supply release latch on the chassis base, and then lift up the
rear of the power supply to disengage it from the chassis.
NOTE:
System board appearance may vary.
7.
Slide the power supply toward the front/bottom of the computer, then lift the power supply out of
the computer.
To install the power supply, reverse the removal procedure.
Power Supply
59