HP ProLiant DL320e HP Intelligent Provisioning User Guide - Page 14
Step 1: Hardware Settings, Balanced Power and Performance, Minimum Power Usage, Maximum Performance
 |
View all HP ProLiant DL320e manuals
Add to My Manuals
Save this manual to your list of manuals |
Page 14 highlights
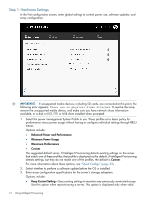
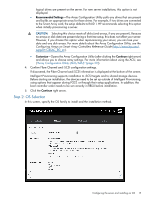
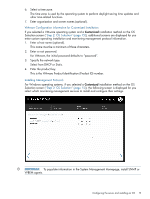
Step 1: Hardware Settings In the first configuration screen, enter global settings to control power use, software updates, and array configuration. IMPORTANT: If unsupported media devices, including SD cards, are connected at this point, the following error appears: There are no physical disks attached. To resolve the issue, remove the unsupported media device, and make sure you have network share information available, or a disk or ISO, FTP, or USB drive installed when prompted. 1. Select the power management System Profile to use. These profiles set a basic policy for performance versus power usage without having to configure individual settings through RBSU menus. Options include: • Balanced Power and Performance • Minimum Power Usage • Maximum Performance • Custom The suggested default varies. If Intelligent Provisioning detects existing settings on the server that match one of these profiles, that profile is displayed as the default; if Intelligent Provisioning detects settings, but they do not match one of the profiles, the default is Custom. For more information about these options, see "Quick Configs" (page 33). 2. Select whether to perform a software update before the OS is installed. 3. Enter array configuration specifications for the server's storage subsystem. Options include: • Keep Current Setting-Uses existing settings to maintain any previously constructed arrays. Use this option when reprovisioning a server. This option is displayed only when valid 14 Using Intelligent Provisioning
-
 1
1 -
2
-
3
-
4
-
5
-
6
-
7
-
8
-
 9
9 -
 10
10 -
 11
11 -
 12
12 -
 13
13 -
 14
14 -
 15
15 -
 16
16 -
 17
17 -
 18
18 -
 19
19 -
20
-
21
-
22
-
23
-
24
-
25
-
26
-
27
-
28
-
29
-
30
-
31
-
32
-
33
-
34
-
35
-
36
-
37
-
38
-
39
-
40
-
41
-
42
-
43
-
44
-
45
-
46
-
47
-
48
-
49
-
50
-
51
-
52
-
53
-
54
-
55
-
56
 |
 |
