HP ProLiant SL2500 HP ROM-Based Setup Utility User Guide - Page 211
Boot options, Operating System Installation, In Gen8 environments, boot the server and press
 |
View all HP ProLiant SL2500 manuals
Add to My Manuals
Save this manual to your list of manuals |
Page 211 highlights
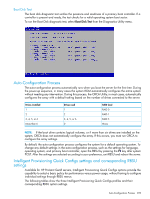
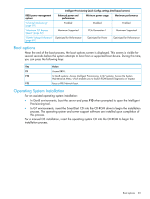
Intelligent Provisioning Quick Configs settings (Intel-based servers) RBSU power management options Balanced power and performance Minimum power usage Maximum performance "Channel Interleaving" (page 59) Enabled Disabled Enabled "Maximum PCI Express Speed" (page 63) Maximum Supported PCIe Generation 1 Maximum Supported "DIMM Voltage Preference" Optimized for Performance (page 69) Optimized for Power Optimized for Performance Boot options Near the end of the boot process, the boot options screen is displayed. This screen is visible for several seconds before the system attempts to boot from a supported boot device. During this time, you can press the following keys: Key Action F9 Access RBSU. F10 In Gen8 systems: Access Intelligent Provisioning. In G7 systems: Access the System Maintenance Menu, which enables you to launch ROM-based Diagnostics or Inspect. F12 Force a PXE Network boot. Operating System Installation For an assisted operating system installation: • In Gen8 environments, boot the server and press F10 when prompted to open the Intelligent Provisioning tool. • In G7 environments, insert the SmartStart CD into the CD-ROM drive to begin the installation process. The operating system and server support software are installed upon completion of this process. For a manual OS installation, insert the operating system CD into the CD-ROM to begin the installation process. Boot options 211
-
 1
1 -
2
-
3
-
4
-
5
-
6
-
7
-
8
-
9
-
10
-
11
-
12
-
13
-
14
-
15
-
16
-
17
-
18
-
19
-
20
-
21
-
22
-
23
-
24
-
25
-
26
-
27
-
28
-
29
-
30
-
31
-
32
-
33
-
34
-
35
-
36
-
37
-
38
-
39
-
40
-
41
-
42
-
43
-
44
-
45
-
46
-
47
-
48
-
49
-
50
-
51
-
52
-
53
-
54
-
55
-
56
-
57
-
58
-
59
-
60
-
61
-
62
-
63
-
64
-
65
-
66
-
67
-
68
-
69
-
70
-
71
-
72
-
73
-
74
-
75
-
76
-
77
-
78
-
79
-
80
-
81
-
82
-
83
-
84
-
85
-
86
-
87
-
88
-
89
-
90
-
91
-
92
-
93
-
94
-
95
-
96
-
97
-
98
-
99
-
100
-
101
-
102
-
103
-
104
-
105
-
106
-
107
-
108
-
109
-
110
-
111
-
112
-
113
-
114
-
115
-
116
-
117
-
118
-
119
-
120
-
121
-
122
-
123
-
124
-
125
-
126
-
127
-
128
-
129
-
130
-
131
-
132
-
133
-
134
-
135
-
136
-
137
-
138
-
139
-
140
-
141
-
142
-
143
-
144
-
145
-
146
-
147
-
148
-
149
-
150
-
151
-
152
-
153
-
154
-
155
-
156
-
157
-
158
-
159
-
160
-
161
-
162
-
163
-
164
-
165
-
166
-
167
-
168
-
169
-
170
-
171
-
172
-
173
-
174
-
175
-
176
-
177
-
178
-
179
-
180
-
181
-
182
-
183
-
184
-
185
-
186
-
187
-
188
-
189
-
190
-
191
-
192
-
193
-
194
-
195
-
196
-
197
-
198
-
199
-
200
-
201
-
202
-
203
-
204
-
205
-
 206
206 -
 207
207 -
 208
208 -
 209
209 -
 210
210 -
 211
211 -
 212
212 -
 213
213 -
 214
214 -
 215
215 -
 216
216 -
217
-
218
-
219
-
220
-
221
 |
 |
