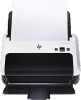
HP ScanJet Pro 3000 User Guide - Page 24
HP Every Ultrasonic, Mac software, Scan documents
 |
View all HP ScanJet Pro 3000 manuals
Add to My Manuals
Save this manual to your list of manuals |
Page 24 highlights
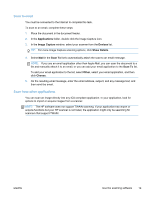
3. On the Image Processing tab, select the desired background filter option. 4. Click Save. HP EveryPage Ultrasonic HP EveryPage Ultrasonic stops the scan process if it senses that multiple pages are fed into the scanner at one time. This feature is enabled by default. You might want to disable this feature if you are scanning: ● Multipart forms (a use that HP does not recommend). ● Documents which have labels or sticky notes attached to them. To disable HP EveryPage Ultrasonic, follow these steps: 1. Open HP Easy Scan and select the shortcut for which you want to disable misfeed detection. 2. From the Shortcuts menu, click Edit. 3. On the Shortcut Editor dialog, click the Properties tab. 4. Clear the Misfeed (multipick) detection check box. For detailed information on this feature and its options, see the HP Easy Scan Help. NOTE: Use the ISIS or TWAIN user interface to enable misfeed detection when scanning from nonHP software. Mac software The following topics describe how to scan using Mac software. Scan documents You can use the Image Capture application to scan documents from the document feeder. NOTE: Integrated optical character recognition (OCR) functionality is only available via the Scan ( ) button, and the shortcut assigned to the button must specify OCR output. However, you can initiate a scan through the optional I.R.I.S. ReadIris Pro software and then save the OCR-processed scan results to a file. To scan from Image Capture, complete these steps: 1. Place the document in the document feeder. 2. In the Applications folder, double click the Image Capture icon. 3. In the Image Capture window, select your scanner from the Devices list. TIP: For more Image Capture scanning options, click Show Details. 4. Select a file format and scan destination in the Scan To list, and then click Scan. 18 Chapter 2 Use the scanner ENWW
-
 1
1 -
2
-
3
-
4
-
5
-
6
-
7
-
8
-
9
-
10
-
11
-
12
-
13
-
14
-
15
-
16
-
17
-
18
-
 19
19 -
 20
20 -
 21
21 -
 22
22 -
 23
23 -
 24
24 -
 25
25 -
 26
26 -
 27
27 -
 28
28 -
 29
29 -
30
-
31
-
32
-
33
-
34
-
35
-
36
-
37
-
38
-
39
-
40
-
41
-
42
-
43
-
44
-
45
-
46
-
47
-
48
-
49
-
50
-
51
-
52
-
53
-
54
-
55
-
56
-
57
-
58
-
59
-
60
 |
 |