HP Surestore 64 fw 05.01.00 and sw 07.01.00 - Director Product Manager - User - Page 135
Configuring Ports in the FICON Management Style
 |
View all HP Surestore 64 manuals
Add to My Manuals
Save this manual to your list of manuals |
Page 135 highlights
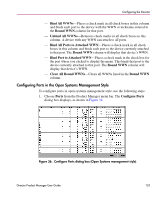
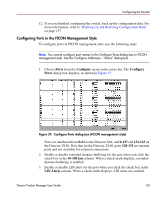
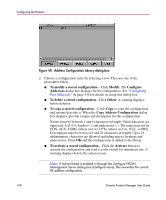
Configuring the Director 12. If you are finished configuring the switch, back up the configuration data. For more information, refer to "Backing Up and Restoring Configuration Data" on page 157. Configuring Ports in the FICON Management Style To configure ports in FICON management style, use the following steps: Note: You cannot configure port names in the Configure Ports dialog box in FICON management style. Use the Configure Addresses - "Active" dialog box. 1. Choose Ports from the Configure menu on the menu bar. The Configure Ports dialog box displays, as shown in Figure 37. Figure 37: Configure Ports dialog box (FICON management style) Ports are numbered from 0-63 on the Director 2/64, and 0-127 and 132-143 on the Director 2/140. Note that for the Director 2/140, ports 128-131 are internal ports and not available for external connections. 2. Enable or disable extended distance buffering for the port when you click the check box in the 10-100 km column. When a check mark displays, extended distance buffering is enabled. 3. Enable or disable LIN alerts for the port when you click the check box in the LIN Alerts column. When a check mark displays, LIN alerts are enabled. Director Product Manager User Guide 135
-
 1
1 -
2
-
3
-
4
-
5
-
6
-
7
-
8
-
9
-
10
-
11
-
12
-
13
-
14
-
15
-
16
-
17
-
18
-
19
-
20
-
21
-
22
-
23
-
24
-
25
-
26
-
27
-
28
-
29
-
30
-
31
-
32
-
33
-
34
-
35
-
36
-
37
-
38
-
39
-
40
-
41
-
42
-
43
-
44
-
45
-
46
-
47
-
48
-
49
-
50
-
51
-
52
-
53
-
54
-
55
-
56
-
57
-
58
-
59
-
60
-
61
-
62
-
63
-
64
-
65
-
66
-
67
-
68
-
69
-
70
-
71
-
72
-
73
-
74
-
75
-
76
-
77
-
78
-
79
-
80
-
81
-
82
-
83
-
84
-
85
-
86
-
87
-
88
-
89
-
90
-
91
-
92
-
93
-
94
-
95
-
96
-
97
-
98
-
99
-
100
-
101
-
102
-
103
-
104
-
105
-
106
-
107
-
108
-
109
-
110
-
111
-
112
-
113
-
114
-
115
-
116
-
117
-
118
-
119
-
120
-
121
-
122
-
123
-
124
-
125
-
126
-
127
-
128
-
129
-
 130
130 -
 131
131 -
 132
132 -
 133
133 -
 134
134 -
 135
135 -
 136
136 -
 137
137 -
 138
138 -
 139
139 -
 140
140 -
141
-
142
-
143
-
144
-
145
-
146
-
147
-
148
-
149
-
150
-
151
-
152
-
153
-
154
-
155
-
156
-
157
-
158
-
159
-
160
-
161
-
162
-
163
-
164
-
165
-
166
-
167
-
168
-
169
-
170
-
171
-
172
-
173
-
174
-
175
-
176
-
177
-
178
-
179
-
180
-
181
-
182
-
183
-
184
-
185
-
186
-
187
-
188
-
189
-
190
-
191
-
192
-
193
-
194
-
195
-
196
-
197
-
198
-
199
-
200
-
201
-
202
-
203
-
204
-
205
-
206
-
207
-
208
-
209
-
210
-
211
-
212
-
213
-
214
-
215
-
216
-
217
-
218
-
219
-
220
-
221
-
222
-
223
-
224
-
225
-
226
-
227
-
228
-
229
-
230
-
231
-
232
-
233
-
234
-
235
-
236
-
237
-
238
-
239
-
240
-
241
-
242
-
243
-
244
 |
 |
