HP Xw460c Hardware and Software Supported by HP ProLiant Blade Workstations - - Page 24
Two Quadro FX 5600, power receptacles, PCIe card cage, Graphics adapter, PCIe card, retainer clip
 |
View all HP Xw460c manuals
Add to My Manuals
Save this manual to your list of manuals |
Page 24 highlights
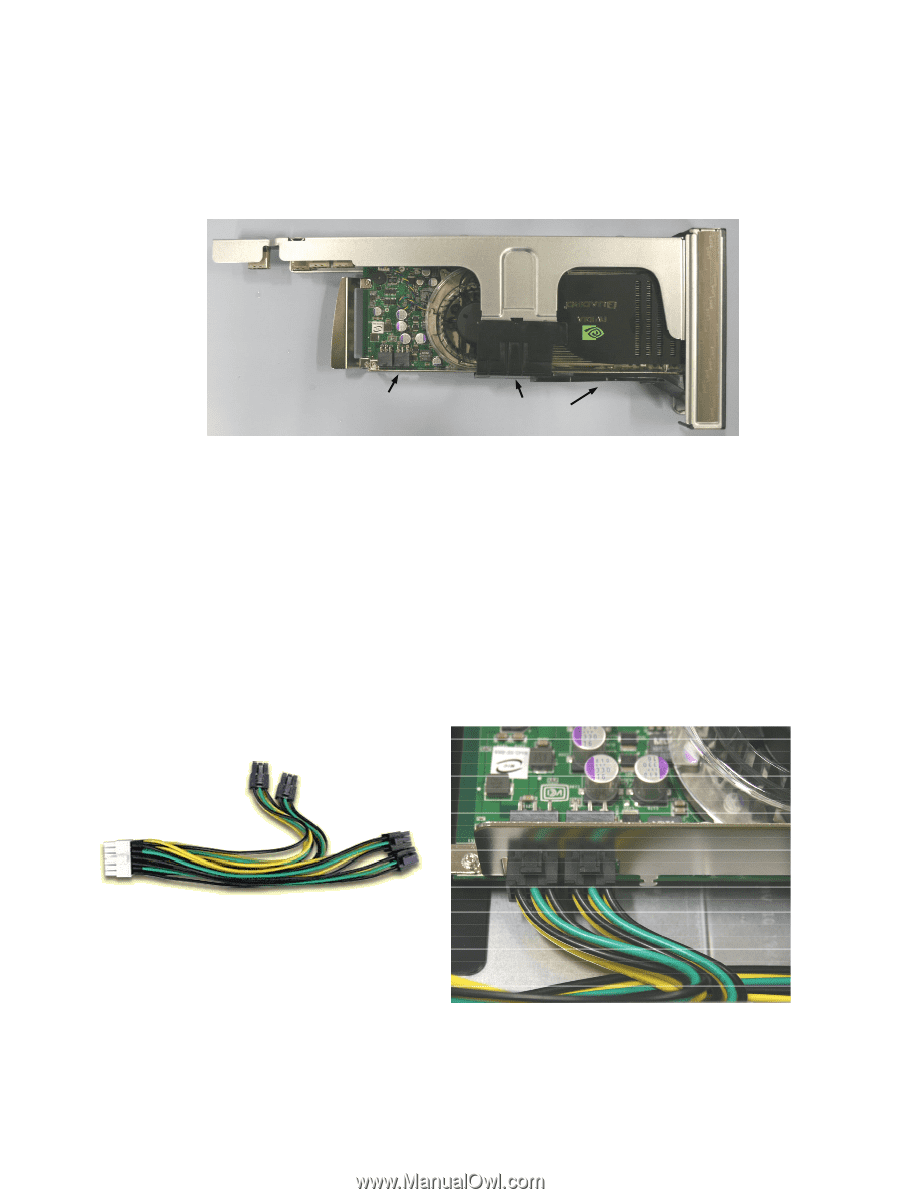
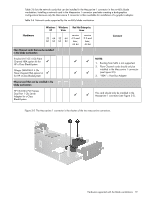
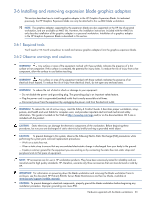
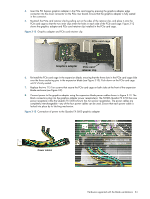
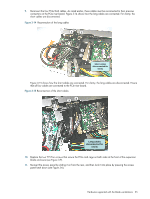
4. Insert the PCI Express graphics adapter in the PCIe card cage by pressing the graphics adapter edge connector into the lower connector on the PCIe riser board. Ensure that the graphics adapter is fully seated in the connector. 5. Re-attach the PCIe card retainer clip by pulling out on the sides of the retainer clip, and place it onto the PCIe card cage so that the two inner clips enter the holes in each side of the PCIe card cage. Figure 3-12 shows the graphics adapter and PCIe card retainer clip installed in the PCIe card cage. Figure 3-12 Graphics adapter and PCIe card retainer clip PCIe card cage Graphics adapter PCIe card retainer clip 6. Re-install the PCIe card cage in the expansion blade, ensuring that the three slots in the PCIe card cage slide over the three anchoring pins in the expansion blade (see Figure 3-10). Push down on the PCIe card cage until it's firmly seated. 7. Replace the two T15 Torx screws that secure the PCIe card cage on both sides at the front of the expansion blade enclosure (see Figure 3-9). 8. Connect power to the graphics adapter using the expansion blade power cables shown in Figure 3-13. The black connectors plug into the graphics adapter power receptacle(s). The NVIDIA Quadro FX 3700 has one power receptacle while the Quadro FX 5600 (shown) has two power receptacles. The power cables are completely interchangeable-any of the four power cables can be used. Ensure that each power cable is locked into place by its latching mechanism. Figure 3-13 Connection of power to the Quadro FX 5600 graphics adapter Power cables Two Quadro FX 5600 power receptacles Hardware supported with the blade workstations 24
-
 1
1 -
2
-
3
-
4
-
5
-
6
-
7
-
8
-
9
-
10
-
11
-
12
-
13
-
14
-
15
-
16
-
17
-
18
-
 19
19 -
 20
20 -
 21
21 -
 22
22 -
 23
23 -
 24
24 -
 25
25 -
 26
26 -
 27
27 -
 28
28 -
 29
29 -
30
-
31
-
32
-
33
-
34
-
35
 |
 |