HP dc73 Altiris Deployment Solution Guide for Workstation Clients using Embedd - Page 15
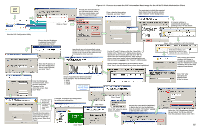
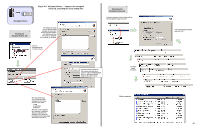
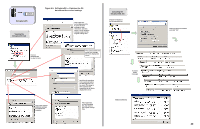
Process to create the PXE Automation Boot Image for the HP dc73 Blade Workstation Client - blade drivers
 |
View all HP dc73 manuals
Add to My Manuals
Save this manual to your list of manuals |
Page 15 highlights
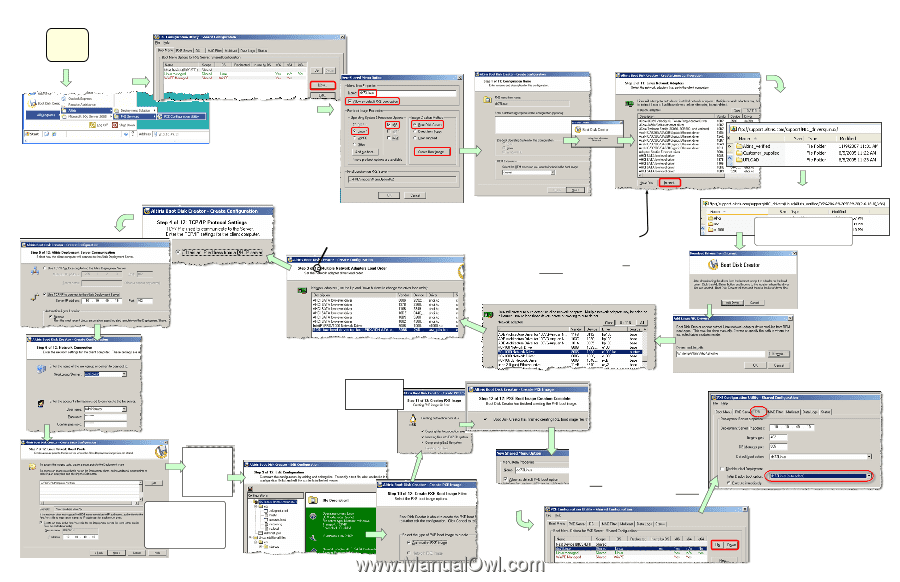
start here Click on "New" Figure 4-1: Process to create the PXE Automation Boot Image for the HP dc73 Blade Workstation Client Provide the desired name for the PXE boot option, select the items shown below, and click "Create Boot Image". Enter a detailed description if desired, and click "Next". The next step is to fetch the required boot drivers from the Altiris website. Click "Internet" on the dialog below. A browser window is automatically brought up pointing to the FTP site below: Start the PXE Configuration Utility Ensure that the IP address is obtained from a DHCP server and click "Next". Enter the IP address of the Altiris Deployment Server, select Remote, and click "Next". Immediately upon selecting multiple custom drivers, the number of steps is incremented to 12 (was 11) to account for this additional step of changing the driver load order. For the 2nd and 3rd drivers, click the "Have Disk..." button in the "Step 2 of 11" dialog shown above. Specify the driver module path and click "OK" for each of the two remaining drivers. After all three drivers have been loaded, select (highlight) all drivers that are noted as custom in the "Source" column below. Shown below is highlighting of the e1000.ko driver. Click "Next" after all custom drivers have been highlighted. Enter the Workgroup or Domain name, enter the User name and Password of the Altiris file server, then click "Next". Step 3 of 12 allows the driver load order to be changed. Set the following order: 1. SCSI 2. SATA 3. e1000 This is where the PXE image is created. SStetepp88oof f1122: : RReevvieiewwththee ccoonnfifgiguuraratitoionn ssuummmmaaryry, , cclilcickk""NNeexxt"t" ififOOKK. . Provide the information required by the client to access the image files on the server, then click "Next". If needed, customize the configuration by adding and editing files. Click "Next" Click "Finish" Click "Next" Click "OK" when the above dialog re-appears Ensure that "Next Device (BIOS/EFI)" is first in the list. Use the Up/Down keys to position "dc73Linux" second in the list, then click "OK". Select: Altiris_verified/DS 6.8 SP2 (2.6.18.8)/x86 From these 3 folders, save the ahci.ko, ata_piix.ko, and e1000.ko files to a local folder. After closing the browser window, this dialog is brought up automatically. Use the "Add Driver" button to add the first of the three required Linux drivers Click "OK" after specifying the path/file name of the 1st driver. Select the "DS" (Deployment Server) tab and select "dc73Linux (32-bit)" from the pull-down menu. Click "OK". 15
-
 1
1 -
2
-
3
-
4
-
5
-
6
-
7
-
8
-
9
-
 10
10 -
 11
11 -
 12
12 -
 13
13 -
 14
14 -
 15
15 -
 16
16 -
 17
17 -
 18
18 -
 19
19 -
 20
20 -
21
-
22
-
23
-
24
-
25
-
26
-
27
-
28
-
29
-
30
-
31
-
32
-
33
-
34
-
35
-
36
 |
 |