Figures
4
Figures
Figure 2-1
Download of Altiris image to the eXpress directory
...........................................................................
6
Figure 2-2
Image capture
.............................................................................................................................
7
Figure 2-3
Image deployment
.......................................................................................................................
7
Figure 2-4
Cloning an OS image
...................................................................................................................
8
Figure 2-5
Downloading and deploying an OS image
......................................................................................
8
Figure 3-1
File Download dialog for Altiris Deployment Solution 6.8 SP2
............................................................
9
Figure 3-2
Download menu
.........................................................................................................................
10
Figure 3-3
Downloading of the .frm file
........................................................................................................
10
Figure 3-4
Contents of the zip file
................................................................................................................
11
Figure 3-5
Embedded OS 9.xx sample jobs
..................................................................................................
12
Figure 3-6
Client computer boot order
.........................................................................................................
13
Figure 4-1
Process to create the PXE automate boot image for the HP dc73 Blade Workstation Client
...................
15
Figure 5-1
Download to eXpress directory
.....................................................................................................
16
Figure 5-2
Downloading the Altiris image file to the eXpress directory
..............................................................
17
Figure 5-3
OS image capture
.....................................................................................................................
18
Figure 5-4
Capturing Embedded OS version 9.xx using 9xCaptureClone
..........................................................
19
Figure 5-5
Capturing Embedded OS version 9.xx using 9xCaptureOS
.............................................................
20
Figure 5-6
Image deployment
.....................................................................................................................
21
Figure 5-7
The 9xDeploy sample job
............................................................................................................
22
Figure 5-8
The 9xDeployKeepSettings sample job
..........................................................................................
23
Figure 5-9
The 9xApplySiteSettings job
.........................................................................................................
24
Figure 5-10
Modifying Embedded OS 9.xx settings
.......................................................................................
25
Figure A-1
Selection of the 9.45 USB key image
............................................................................................
29
Figure A-2
Downloading of softpaq sp38209.exe is complete—click Run to continue
.........................................
30
Figure A-3
Softpaq screen for the 9.45 USB key image
..................................................................................
30
Figure A-4
Contents of the softpaq folder
......................................................................................................
31
Figure A-5
Determining the ID of the USB key
................................................................................................
31
Figure A-6
Copying of the 9.45 image file to the USB key
..............................................................................
32
Figure A-7
Keyboard language selection
......................................................................................................
33
Figure A-8
Select Install Cleanly
...................................................................................................................
33
Figure A-9
Select No for site-wide default settings
..........................................................................................
34
Figure A-10
Select Yes to set local, system-specific settings
..............................................................................
34
Figure A-11
Local Settings screen
.................................................................................................................
34
Figure A-12
Selection of networking protocol
................................................................................................
35
Figure A-13
Setting local client network parameters
.......................................................................................
35
Figure A-14
Installation of the Embedded OS
................................................................................................
36
Figure A-15
Installation complete screen
.......................................................................................................
36

 1
1 2
2 3
3 4
4 5
5 6
6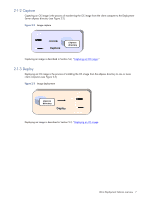 7
7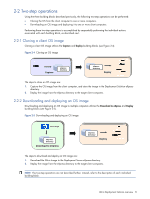 8
8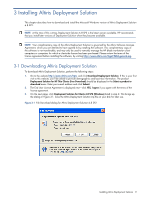 9
9 10
10