IBM 88772ru User Guide - Page 37
Installing, replacing, hot-swap
 |
UPC - 000435948922
View all IBM 88772ru manuals
Add to My Manuals
Save this manual to your list of manuals |
Page 37 highlights
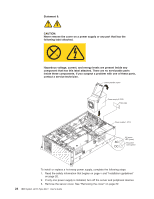
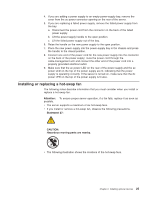
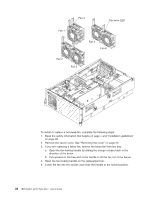
4. If you are adding a power supply to an empty power-supply bay, remove the cover from the ac power connector opening on the rear of the server. 5. If you are replacing a failed power supply, remove the failed power supply from the bay: a. Disconnect the power cord from the connector on the back of the failed power supply. b. Lift the power-supply handle to the open position. c. Lift the failed power supply out of the bay. 6. Raise the handle on the new power supply to the open position. 7. Place the new power supply into the power-supply bay in the chassis and press the handle to the closed position. 8. Connect one end of the power cord for the new power supply into the connector on the back of the power supply; route the power cord through the cable-management arm and connect the other end of the power cord into a properly grounded electrical outlet. 9. Make sure that the ac power LED on the rear of the power supply and the ac power LED on the top of the power supply are lit, indicating that the power supply is operating correctly. If the server is turned on, make sure that the dc power LED on the top of the power supply is lit also. Installing or replacing a hot-swap fan The following notes describe information that you must consider when you install or replace a hot-swap fan. Attention: To ensure proper server operation, if a fan fails, replace it as soon as possible. v The server supports a maximum of six hot-swap fans. v If you install or remove a hot-swap fan, observe the following precautions. Statement 27: CAUTION: Hazardous moving parts are nearby. v The following illustration shows the locations of the hot-swap fans. Chapter 2. Installing optional devices 25
-
 1
1 -
2
-
3
-
4
-
5
-
6
-
7
-
8
-
9
-
10
-
11
-
12
-
13
-
14
-
15
-
16
-
17
-
18
-
19
-
20
-
21
-
22
-
23
-
24
-
25
-
26
-
27
-
28
-
29
-
30
-
31
-
 32
32 -
 33
33 -
 34
34 -
 35
35 -
 36
36 -
 37
37 -
 38
38 -
 39
39 -
 40
40 -
 41
41 -
 42
42 -
43
-
44
-
45
-
46
-
47
-
48
-
49
-
50
-
51
-
52
-
53
-
54
-
55
-
56
-
57
-
58
-
59
-
60
-
61
-
62
-
63
-
64
-
65
-
66
-
67
-
68
-
69
-
70
-
71
-
72
-
73
-
74
-
75
-
76
-
77
-
78
-
79
-
80
-
81
-
82
-
83
-
84
-
85
-
86
-
87
-
88
-
89
-
90
-
91
-
92
-
93
-
94
-
95
-
96
 |
 |
