IBM 88772ru User Guide - Page 41
Attention
 |
UPC - 000435948922
View all IBM 88772ru manuals
Add to My Manuals
Save this manual to your list of manuals |
Page 41 highlights
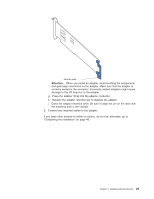
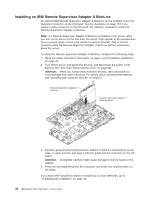
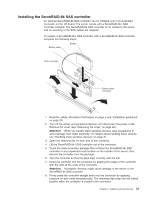
Adapter guide Attention: When you install an adapter, avoid touching the components and gold-edge connectors on the adapter. Make sure that the adapter is correctly seated in the connector. Incorrectly seated adapters might cause damage to the I/O board or to the adapter. g. Press the adapter firmly into the adapter connector. h. Replace the adapter retention bar to stabilize the adapter. i. Close the adapter retention latch. Be sure to align the pin on the latch with the matching hole in the chassis. 6. Connect any required cables to the adapter. If you have other devices to install or remove, do so now; otherwise, go to "Completing the installation" on page 40. Chapter 2. Installing optional devices 29
-
 1
1 -
2
-
3
-
4
-
5
-
6
-
7
-
8
-
9
-
10
-
11
-
12
-
13
-
14
-
15
-
16
-
17
-
18
-
19
-
20
-
21
-
22
-
23
-
24
-
25
-
26
-
27
-
28
-
29
-
30
-
31
-
32
-
33
-
34
-
35
-
 36
36 -
 37
37 -
 38
38 -
 39
39 -
 40
40 -
 41
41 -
 42
42 -
 43
43 -
 44
44 -
 45
45 -
 46
46 -
47
-
48
-
49
-
50
-
51
-
52
-
53
-
54
-
55
-
56
-
57
-
58
-
59
-
60
-
61
-
62
-
63
-
64
-
65
-
66
-
67
-
68
-
69
-
70
-
71
-
72
-
73
-
74
-
75
-
76
-
77
-
78
-
79
-
80
-
81
-
82
-
83
-
84
-
85
-
86
-
87
-
88
-
89
-
90
-
91
-
92
-
93
-
94
-
95
-
96
 |
 |

Adapter guide
Attention:
When
you
install
an
adapter,
avoid
touching
the
components
and
gold-edge
connectors
on
the
adapter.
Make
sure
that
the
adapter
is
correctly
seated
in
the
connector.
Incorrectly
seated
adapters
might
cause
damage
to
the
I/O
board
or
to
the
adapter.
g.
Press
the
adapter
firmly
into
the
adapter
connector.
h.
Replace
the
adapter
retention
bar
to
stabilize
the
adapter.
i.
Close
the
adapter
retention
latch.
Be
sure
to
align
the
pin
on
the
latch
with
the
matching
hole
in
the
chassis.
6.
Connect
any
required
cables
to
the
adapter.
If
you
have
other
devices
to
install
or
remove,
do
so
now;
otherwise,
go
to
“Completing
the
installation”
on
page
40.
Chapter
2.
Installing
optional
devices
29