IBM 88772ru User Guide - Page 39
Installing, adapter
 |
UPC - 000435948922
View all IBM 88772ru manuals
Add to My Manuals
Save this manual to your list of manuals |
Page 39 highlights
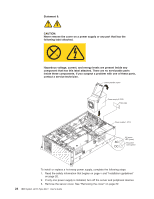
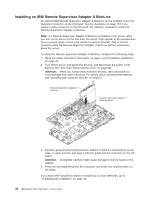
Installing an adapter The following notes describe the types of adapters that the server supports and other information that you must consider when you install an adapter: v Locate the documentation that comes with the adapter and follow those instructions in addition to the instructions in this section. If you must change the switch setting or jumper settings on the adapter, follow the instructions that come with the adapter. v Avoid touching the components and gold-edge connectors on the adapter. v The server scans devices and adapter slots to assign system resources in the following order: integrated Ethernet controllers 1 and 2, integrated RAID controller, PCI slots 1 through 6, and then the HTX slot. Note: To change the order in which the server scans devices and adapter slots, start the Configuration/Setup Utility program and select Start Options from the main menu. See "Using the Configuration/Setup Utility program" on page 45 for details about using the Configuration/Setup Utility program. v The PCI bus configuration is as follows: - Non-hot-plug, full-length PCI Express x16 (x16 lanes) slot 1. - Non-hot-plug, full-length PCI Express x8 (x8 lanes) slot 2 and slot 3. - Non-hot-plug, full-length PCI Express x4 (x4 lanes) slot 4. - Non-hot-plug, full-length 64-bit/100 MHz or 133 MHz slot 5 and slot 6. See Table 3 for slot speed assignments for slot 5 and slot 6. Table 3. Slot 5 and slot 6 bus speed assignments Slot 5 Slot 6 PCI-X 133 MHz adapter Unpopulated Unpopulated PCI-X 133 MHz adapter PCI-X 133 MHz adapter PCI-X 133 MHz adapter Bus speed 100 MHz 133 MHz 100 MHz - Non-hot-plug, half-length HyperTransport (HTX) slot. Note: At least three microprocessor/memory cards must be installed to support a HyperTransport adapter. To install an adapter, complete the following steps. 1. Read the safety information that begins on page v and "Installation guidelines" on page 20. 2. Turn off the server and peripheral devices, and disconnect the power cords and all external cables. Attention: When you handle static-sensitive devices, take precautions to avoid damage from static electricity. For details about handling these devices, see "Handling static-sensitive devices" on page 21. 3. Remove the server cover (see "Removing the cover" on page 22) and determine which expansion slot you will use for the adapter. Chapter 2. Installing optional devices 27
-
 1
1 -
2
-
3
-
4
-
5
-
6
-
7
-
8
-
9
-
10
-
11
-
12
-
13
-
14
-
15
-
16
-
17
-
18
-
19
-
20
-
21
-
22
-
23
-
24
-
25
-
26
-
27
-
28
-
29
-
30
-
31
-
32
-
33
-
 34
34 -
 35
35 -
 36
36 -
 37
37 -
 38
38 -
 39
39 -
 40
40 -
 41
41 -
 42
42 -
 43
43 -
 44
44 -
45
-
46
-
47
-
48
-
49
-
50
-
51
-
52
-
53
-
54
-
55
-
56
-
57
-
58
-
59
-
60
-
61
-
62
-
63
-
64
-
65
-
66
-
67
-
68
-
69
-
70
-
71
-
72
-
73
-
74
-
75
-
76
-
77
-
78
-
79
-
80
-
81
-
82
-
83
-
84
-
85
-
86
-
87
-
88
-
89
-
90
-
91
-
92
-
93
-
94
-
95
-
96
 |
 |