IBM 88772ru User Guide - Page 52
Completing, installation
 |
UPC - 000435948922
View all IBM 88772ru manuals
Add to My Manuals
Save this manual to your list of manuals |
Page 52 highlights
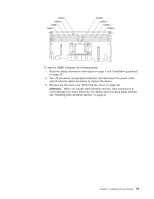
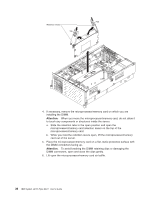
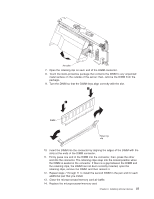
To add a microprocessor/memory card, complete the following steps: 1. Read the safety information that begins on page v and "Installation guidelines" on page 20. 2. Turn off the server and peripheral devices, and disconnect the power cords and all external cables necessary to replace the device. 3. Remove the top cover (see "Removing the cover" on page 22). Attention: When you handle static-sensitive devices, take precautions to avoid damage from static electricity. For details about handling these devices, see "Handling static-sensitive devices" on page 21. 4. Prepare the microprocessor/memory card: a. Touch the static-protective package that contains the microprocessor/ memory card to any unpainted surface on the outside of the server; then, remove the microprocessor/memory card from the package. b. If you are installing DIMMs on the microprocessor/memory card, install the DIMMs (see "Installing memory modules" on page 33). 5. If necessary, close the microprocessor/memory card air baffle. 6. Install the microprocessor/memory card. Attention: When you move the microprocessor/memory card, do not allow it to touch any components or structures inside the server. a. Grasp the microprocessor/memory card by the retention levers and turn the microprocessor/memory card so that the connectors align with the connectors on the I/O board. b. Align the microprocessor/memory card with the guides. c. Press the microprocessor/memory card into the connectors and close the retention levers. Slide the retention tabs to lock the card in place. If you have other devices to install or remove, do so now; otherwise, go to "Completing the installation." Completing the installation To complete the installation, complete the following steps: 1. If you removed the server cover, place the cover-release latch in the open (up) position. Insert the bottom tabs of the top cover into the matching slots in the server chassis. Press down on the cover-release latch to lock the cover in place. 40 IBM System x3755 Type 8877: User's Guide
-
 1
1 -
2
-
3
-
4
-
5
-
6
-
7
-
8
-
9
-
10
-
11
-
12
-
13
-
14
-
15
-
16
-
17
-
18
-
19
-
20
-
21
-
22
-
23
-
24
-
25
-
26
-
27
-
28
-
29
-
30
-
31
-
32
-
33
-
34
-
35
-
36
-
37
-
38
-
39
-
40
-
41
-
42
-
43
-
44
-
45
-
46
-
 47
47 -
 48
48 -
 49
49 -
 50
50 -
 51
51 -
 52
52 -
 53
53 -
 54
54 -
 55
55 -
 56
56 -
 57
57 -
58
-
59
-
60
-
61
-
62
-
63
-
64
-
65
-
66
-
67
-
68
-
69
-
70
-
71
-
72
-
73
-
74
-
75
-
76
-
77
-
78
-
79
-
80
-
81
-
82
-
83
-
84
-
85
-
86
-
87
-
88
-
89
-
90
-
91
-
92
-
93
-
94
-
95
-
96
 |
 |
