IBM 88772ru User Guide - Page 43
Installing, ServeRAID-8k, controller
 |
UPC - 000435948922
View all IBM 88772ru manuals
Add to My Manuals
Save this manual to your list of manuals |
Page 43 highlights
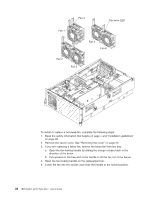
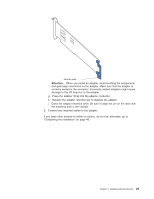
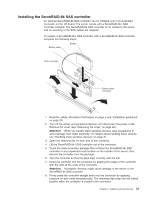
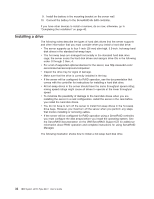
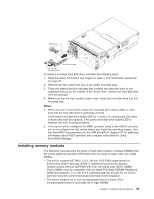
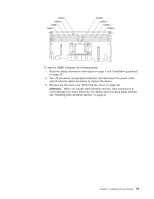
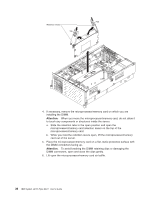
Installing the ServeRAID-8k SAS controller An optional ServeRAID-8k SAS controller can be installed only in its dedicated connector on the I/O board. The server comes with a ServeRAID-8k-l SAS controller installed. The ServeRAID-8k SAS controller is not cabled to the server and no rerouting of the SAS cables are required. To replace a ServeRAID-8k-l SAS controller with a ServeRAID-8k SAS controller, complete the following steps: Battery cable Battery RAID controller Battery cable connector 1. Read the safety information that begins on page v and "Installation guidelines" on page 20. 2. Turn off the server and peripheral devices, and disconnect the power cords. Remove the cover (see "Removing the cover" on page 22). Attention: When you handle static-sensitive devices, take precautions to avoid damage from static electricity. For details about handling these devices, see "Handling static-sensitive devices" on page 21. 3. Open the retaining clip on each end of the connector. 4. Lift the ServeRAID-8k-l SAS controller out of the connector. 5. Touch the static-protective package that contains the ServeRAID-8k SAS controller to any unpainted metal surface on the outside of the server; then, remove the controller from the package. 6. Turn the controller so that the keys align correctly with the slot. 7. Insert the controller into the connector by aligning the edges of the controller with the slots at the ends of the connector. Attention: Incomplete insertion might cause damage to the server or the ServeRAID-8k SAS controller. 8. Firmly press the controller straight down into the connector by applying pressure on both ends simultaneously. The retaining clips snap into the locked position when the controller is seated in the connector. Chapter 2. Installing optional devices 31
-
 1
1 -
2
-
3
-
4
-
5
-
6
-
7
-
8
-
9
-
10
-
11
-
12
-
13
-
14
-
15
-
16
-
17
-
18
-
19
-
20
-
21
-
22
-
23
-
24
-
25
-
26
-
27
-
28
-
29
-
30
-
31
-
32
-
33
-
34
-
35
-
36
-
37
-
 38
38 -
 39
39 -
 40
40 -
 41
41 -
 42
42 -
 43
43 -
 44
44 -
 45
45 -
 46
46 -
 47
47 -
 48
48 -
49
-
50
-
51
-
52
-
53
-
54
-
55
-
56
-
57
-
58
-
59
-
60
-
61
-
62
-
63
-
64
-
65
-
66
-
67
-
68
-
69
-
70
-
71
-
72
-
73
-
74
-
75
-
76
-
77
-
78
-
79
-
80
-
81
-
82
-
83
-
84
-
85
-
86
-
87
-
88
-
89
-
90
-
91
-
92
-
93
-
94
-
95
-
96
 |
 |
