Kenmore 5478 Use and Care Guide - Page 11
Irefrigerator Use
 |
UPC - 883049131900
View all Kenmore 5478 manuals
Add to My Manuals
Save this manual to your list of manuals |
Page 11 highlights
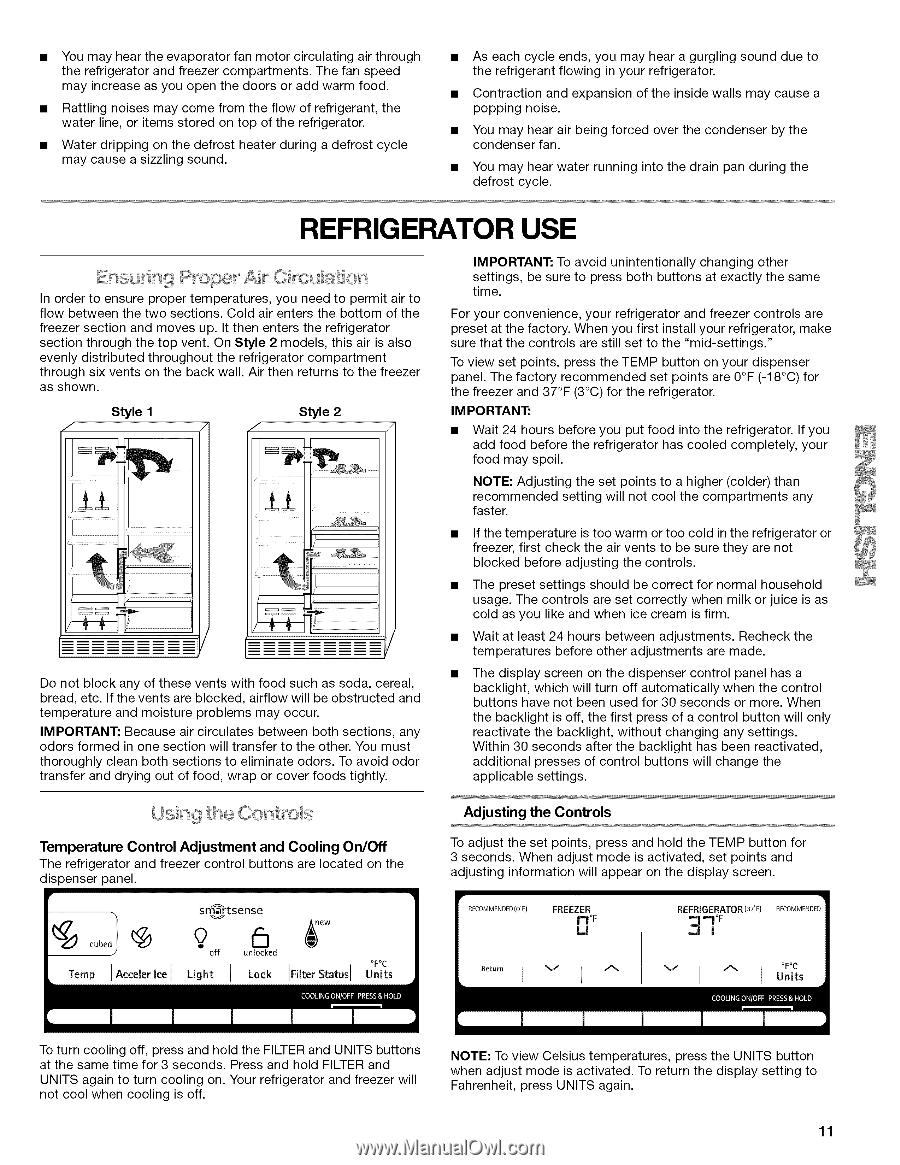
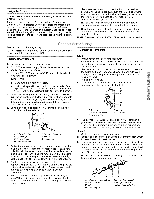
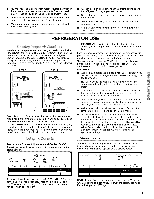
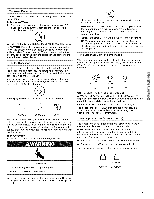
• You may hear the evaporator fan motor circulating air through the refrigerator and freezer compartments. The fan speed may increase as you open the doors or add warm food. • Rattling noises may come from the flow of refrigerant, the water line, or items stored on top of the refrigerator. • Water dripping on the defrost heater during a defrost cycle may cause a sizzling sound. • As each cycle ends, you may hear a gurgling sound due to the refrigerant flowing in your refrigerator. • Contraction and expansion of the inside walls may cause a popping noise. • You may hear air being forced over the condenser by the condenser fan. You may hear water running into the drain pan during the defrost cycle. REFRIGERATOR USE In order to ensure proper temperatures, you need to permit air to flow between the two sections. Cold air enters the bottom of the freezer section and moves up. It then enters the refrigerator section through the top vent. On Style 2 models, this air is also evenly distributed throughout the refrigerator compartment through six vents on the back wall. Air then returns to the freezer as shown. Style 1 f m Style 2 Y Do not block any of these vents with food such as soda, cereal, bread, etc. If the vents are blocked, airflow will be obstructed and temperature and moisture problems may occur. IMPORTANT: Because air circulates between both sections, any odors formed in one section will transfer to the other. You must thoroughly clean both sections to eliminate odors. To avoid odor transfer and drying out of food, wrap or cover foods tightly. IMPORTANT: To avoid unintentionally changing other settings, be sure to press both buttons at exactly the same time. For your convenience, your refrigerator and freezer controls are preset at the factory. When you first install your refrigerator, make sure that the controls are still set to the "mid-settings." To view set points, press the TEMP button on your dispenser panel. The factory recommended set points are 0°F (-18°C) for the freezer and 37°F (3°C) for the refrigerator. IMPORTANT: • Wait 24 hours before you put food into the refrigerator. If you add food before the refrigerator has cooled completely, your food may spoil. NOTE: Adjusting the set points to a higher (colder) than recommended setting will not cool the compartments any faster. • If the temperature is too warm or too cold in the refrigerator or freezer, first check the air vents to be sure they are not blocked before adjusting the controls. • The preset settings should be correct for normal household usage. The controls are set correctly when milk or juice is as cold as you like and when ice cream is firm. • Wait at least 24 hours between adjustments. Recheck the temperatures before other adjustments are made. • The display screen on the dispenser control panel has a backlight, which will turn off automatically when the control buttons have not been used for 30 seconds or more. When the backlight is off, the first press of a control button will only reactivate the backlight, without changing any settings. Within 30 seconds after the backlight has been reactivated, additional presses of control buttons will change the applicable settings. Usn9 t se Co st c÷s Temperature Control Adjustment and Cooling On/Off The refrigerator and freezer control buttons are located on the dispenser panel. Temp ]Aecder IceI smartsense o. off unlocked Light I Lock OFOC ]Filter Status I Units Adjusting the Controls To adjust the set points, press and hold the TEMP button for 3 seconds. When adjust mode is activated, set points and adjusting information will appear on the display screen. RECOMMENDED(OF) FREEZER n!,J °F REFRIGERATOR (JF) 3q°F RECOMMENDED v I ^ I uOF°OiCts To turn cooling off, press and hold the FILTER and UNITS buttons at the same time for 3 seconds. Press and hold FILTER and UNITS again to turn cooling on. Your refrigerator and freezer will not cool when cooling is off. NOTE: To view Celsius temperatures, press the UNITS button when adjust mode is activated. To return the display setting to Fahrenheit, press UNITS again. 11
-
 1
1 -
2
-
3
-
4
-
5
-
 6
6 -
 7
7 -
 8
8 -
 9
9 -
 10
10 -
 11
11 -
 12
12 -
 13
13 -
 14
14 -
 15
15 -
 16
16 -
17
-
18
-
19
-
20
-
21
-
22
-
23
-
24
-
25
-
26
-
27
-
28
-
29
-
30
-
31
-
32
-
33
-
34
-
35
-
36
-
37
-
38
-
39
-
40
-
41
-
42
-
43
-
44
-
45
-
46
-
47
-
48
-
49
-
50
-
51
-
52
-
53
-
54
-
55
-
56
-
57
-
58
-
59
-
60
-
61
-
62
-
63
-
64
-
65
-
66
-
67
-
68
-
69
-
70
-
71
-
72
-
73
-
74
-
75
-
76
-
77
-
78
-
79
-
80
-
81
-
82
-
83
-
84
 |
 |