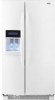
Kenmore 5478 Use and Care Guide - Page 19
©oo Bns
 |
UPC - 883049131900
View all Kenmore 5478 manuals
Add to My Manuals
Save this manual to your list of manuals |
Page 19 highlights
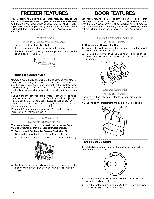
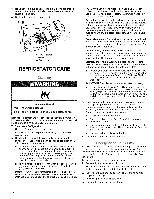
(On The door rails or bins may be removed for easier cleaning. Snap-On Door Rails or Bins To Remove and Replace the Rails or Bins: 1. Remove the rails or bins by pushing in slightly on the front of the bracket while pulling out on the inside tab. Repeat these steps for the other end of the rail or bin. 2. Replace the rails or bins by aligning the ends of the brackets with the buttons on the sides of the door liner. Firmly snap bracket onto the tabs above the shelf as shown. "}It-out Fh::it Bi "s To Remove and Replace the Bin: 1. Remove the bin by lifting it and pulling it straight out. 2. Replace the bin by sliding it in above the desired supports and pushing it down until it stops. Drop-In Door Rails To Remove and Replace the Rails: 1. Remove the rails by pulling straight up on each end of the rail. 2. Replace the rails by sliding the shelf rail into the slots on the door and pushing the rail straight down until it stops. To Remove and Replace the Bin Parts: 1. Press either release button to open the tilt-out portion of the bin. A I ©oo Bns (o_ some _'T_od@e To Remove and Replace the Bins: 1. Remove the bin by lifting it and pulling it straight out. 2. Replace the bin by sliding it in above the desired supports and pushing it down until it stops. rr i_ A. Release buttons 2= To remove the tilt-out portion of the bin, press in on the curved levers on each side of the bin. Pull up and out. NOTES: • The bin cannot be removed if it is tilted out all the way. Tilt it only part of the way before pressing the curved levers to remove it. • Clean the parts as instructed in the "Cleaning" section. A. Curved lever 19
-
 1
1 -
2
-
3
-
4
-
5
-
6
-
7
-
8
-
9
-
10
-
11
-
12
-
13
-
 14
14 -
 15
15 -
 16
16 -
 17
17 -
 18
18 -
 19
19 -
 20
20 -
 21
21 -
 22
22 -
 23
23 -
 24
24 -
25
-
26
-
27
-
28
-
29
-
30
-
31
-
32
-
33
-
34
-
35
-
36
-
37
-
38
-
39
-
40
-
41
-
42
-
43
-
44
-
45
-
46
-
47
-
48
-
49
-
50
-
51
-
52
-
53
-
54
-
55
-
56
-
57
-
58
-
59
-
60
-
61
-
62
-
63
-
64
-
65
-
66
-
67
-
68
-
69
-
70
-
71
-
72
-
73
-
74
-
75
-
76
-
77
-
78
-
79
-
80
-
81
-
82
-
83
-
84
 |
 |
