KitchenAid KDRP407HSS Use and Care Guide
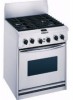
KitchenAid KDRP407HSS - 30" Pro-Style Dual-Fuel Range Manual
 |
View all KitchenAid KDRP407HSS manuals
Add to My Manuals
Save this manual to your list of manuals |
KitchenAid KDRP407HSS manual content summary:
- KitchenAid KDRP407HSS | Use and Care Guide - Page 1
the cycle works 29 Troubleshooting 30 Requesting Assistance or Service 33 Bread Recipes 35 Warranty 38 In the U.S.A. for assistance or service, call the Consumer Assistance center: 1-800-422-1230 In Canada, for assistance or service, see page 34. KITCHENAID® Professional Dual Fuel Range Model - KitchenAid KDRP407HSS | Use and Care Guide - Page 2
in your building. • Immediately call your gas supplier from a neighbor's phone. Follow the gas supplier's instructions. • If you cannot reach your gas supplier, call the fire department. - Installation and service must be performed by a qualified installer, service agency or the gas supplier. 2 - KitchenAid KDRP407HSS | Use and Care Guide - Page 3
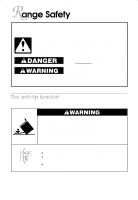
Tip Over Hazard A child or adult can tip the range and be killed. Connect anti-tip bracket to wall behind range. Reconnect the anti-tip bracket, if the range is moved. See the installation instructions for details. Failure to follow these instructions can result in death or serious burns to children - KitchenAid KDRP407HSS | Use and Care Guide - Page 4
or, in the absence of local codes, with the National Electrical Code, ANSI/NFPA 70. Be sure the range is properly installed and grounded by a qualified technician. • Disconnect the electrical supply before servicing the appliance. • Never Use the Range for Warming or Heating the Room. • Injuries - KitchenAid KDRP407HSS | Use and Care Guide - Page 5
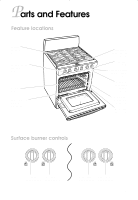
Parts and Features Feature locations Surface burners (p. 7) Surface burner controls (p. 8) Gasket (p. 27) Bake element (hidden) (pp. 15, 16) Electronic oven control (p. 14) Oven vent (p. 6) Model and serial number plate (p. 2) Automatic oven light switch (p. 26) Broil element (not shown) (pp. 15, - KitchenAid KDRP407HSS | Use and Care Guide - Page 6
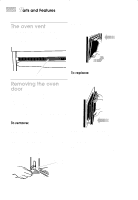
Parts and Features The oven vent Hot air and moisture escape from the oven through vent. The vent is above the oven can remove the door by following the instructions in this section. The oven door is heavy. Use both hands to installed it properly. Repeat Steps 1-4. Insert small end of pin here 6 - KitchenAid KDRP407HSS | Use and Care Guide - Page 7
provide infinite heat control. IMPORTANT: Your cooktop is factory-set for use with Natural Gas. If you wish to use L.P. gas, an L.P. Gas Conversion Kit is included with your new range. See the instructions included with the L.P. conversion kit for details on making this conversion. • Position grate - KitchenAid KDRP407HSS | Use and Care Guide - Page 8
spark ignitor will ignite the gas flowing into the burner. When you hear a clicking sound, you know that the ignitors are working. Gas spark ignitor still fails to operate, call your nearest designated service instructions a guide. range is in use or during the Self-Cleaning cycle, the - KitchenAid KDRP407HSS | Use and Care Guide - Page 9
burner settings in the medium to low range on your cooktop when lower temperatures are required power failure Surface burners can be manually lighted. 1. Hold a lit striker near a the HI position. † To order additional Simmer Plates (Part No. 4455109), call 1-800-422-1230 (in U.S.A.) or - KitchenAid KDRP407HSS | Use and Care Guide - Page 10
settings for long periods of time can cause damage to the cooktop. To protect your range: • Center the canner over the surface burner. Do not extend more than 1 inch levels in a pressure canner. • Refer to your canner manual for specific instructions. • For up-to-date information on canning, contact - KitchenAid KDRP407HSS | Use and Care Guide - Page 11
. Do not clean the burner cap in a dishwasher or self-cleaning oven. 3. If the gas tube opening has become soiled or clogged, use a damp cloth to burner needs to be adjusted, call a qualified technician for service. 5. After cleaning the gas tube opening and ports, replace the burner cap. To replace - KitchenAid KDRP407HSS | Use and Care Guide - Page 12
screw in the center of the valve stem. The valve stem is located directly underneath the control knob. To adjust the flame height follow the instructions below: 1. Turn the control knob to "LO." 2. Remove the control knob. (If there is not an adjustment screw underneath the knob the flame height is - KitchenAid KDRP407HSS | Use and Care Guide - Page 13
, or fire. PART WHAT TO USE oven cleaners. • Wash, rinse and dry with soft cloth. • Non-abrasive plastic • Gently clean around the model oven during self-cleaning cycle. • Do not clean in dishwasher. Surface burners • See "Caring for your cooktop" earlier in this section for cleaning instructions - KitchenAid KDRP407HSS | Use and Care Guide - Page 14
functions controlled by the electronic control. Carefully follow these instructions, along with the cooking tips and cleaning information, for successful use of your range. Using the electronic oven control PREHEAT 0% 100% Oven display (see below) KEEP WARM BROWNING DURATION STOP TIME CLOCK - KitchenAid KDRP407HSS | Use and Care Guide - Page 15
the cooling fan after you press CANCEL. It will shut off automatically when the oven cools. 3. Rotate SET until desired time is shown. 4. Press ENTER to accept time on display. To change current time: Follow steps 2-4. Oven settings This chart tells you when to use each setting. It also explains - KitchenAid KDRP407HSS | Use and Care Guide - Page 16
BAKE Use this setting for delicate foods and for baking breads and cakes. Use also when baking large quantities of food on more than one oven rack. DIAGRAM Bake element (not visible) CONVECTION BROIL Use this setting for broiling thick cuts of meat. CONVECTION ROAST Use this setting for roasting - KitchenAid KDRP407HSS | Use and Care Guide - Page 17
oven oven temperature. • The bottom element and top element heat up. • Oven will remain locked, until the oven oven mitts to protect your hands if rack(s) must be moved while the oven oven oven oven walls. Hot air must circulate around the pans in the oven for even heat to reach all parts of the oven - KitchenAid KDRP407HSS | Use and Care Guide - Page 18
oven rack. Side by side or slightly staggered. In opposite corners on each oven rack. Stagger pans so no pan is directly over another. Rack placement for specific guide from bottom 2nd rack guide from bottom 2nd or 3rd rack guide center of oven. Ovenproof glassware bottom third of oven. • May need - KitchenAid KDRP407HSS | Use and Care Guide - Page 19
will reduce air circulation and overall oven performance. • To catch spillovers from pies or casseroles place foil on the oven rack below. Foil should be last 30 minutes. • Use narrow strips of foil to shield piecrust edges if browning too quickly. Bake 1. Turn SELECTOR to BAKE. The display will - KitchenAid KDRP407HSS | Use and Care Guide - Page 20
read again. If the temperature drops, return the meat to the oven for more cooking. • Check pork and poultry with a thermometer in oven rack. Turn the pan so the long side is parallel to the oven door for the most even heat and the best airflow. 3. Close door. 4. Turn SELECTOR to BROIL. The display - KitchenAid KDRP407HSS | Use and Care Guide - Page 21
operate. 4. Turn SELECTOR to CONVECT BROIL. The display will read "HI". Broiling guidelines • Use only well, do not cover the grid with foil. • Trim excess fat to reduce spattering. Slit the fat on the the oven when removing the food. Drippings will bake on the pan if left in the heated oven, - KitchenAid KDRP407HSS | Use and Care Guide - Page 22
21-23 [13-16] 23-25 [15-18] 27-29 [16-19] 20-22 [12-14] HI 30-33 [18-20] HI 22-26 [11-13] HI [br Poisoning Hazard Do not let food sit in oven more than one hour before or after cooking. , the DURATION LED will blink and "-0:00" is displayed. 6. Rotate SET to set desired cycle length. 7. - KitchenAid KDRP407HSS | Use and Care Guide - Page 23
Press CANCEL. wWARNING Food Poisoning Hazard Do not let food sit in oven more than one hour before or after cooking. Doing so can result WARM. The display will read "100F". 2. Rotate SET to cycle between PROOF or KEEP WARM. PROOF, the display will read "100F" or KEEP WARM, the display will read " - KitchenAid KDRP407HSS | Use and Care Guide - Page 24
reaches preheat, you will hear 1 beep and the oven display will show 40°F (22°C) below preheat temperature setting. For example, to bake at 350°F (176°C) set the preheat temperature to 390°F (198°C). NOTE: See Bread recipes in back of Use and Care guide. For best results, do not bake on more than - KitchenAid KDRP407HSS | Use and Care Guide - Page 25
Using and Caring for Your Oven PART Broiler pan Oven racks Oven door glass Oven cavity WHAT TO USE HOW TO CLEAN Steel-wool pad and warm, soapy water OR • Wash, rinse, and dry thoroughly. OR The Self-Cleaning cycle • Leave in oven during Self-Cleaning cycle. NOTE: Drain excess grease before - KitchenAid KDRP407HSS | Use and Care Guide - Page 26
the surface. • Always wipe dry to avoid water marks. • KitchenAid™ Professional Formula Stainless Steel Cleaner & Polish is the cleaner recommended for cleaning stainless steel surfaces on this product. To order, call our Factory Parts and Accessories Center at 1-800-442-9991, or order on-line at - KitchenAid KDRP407HSS | Use and Care Guide - Page 27
the Self-Cleaning Cycle wWARNING Burn Hazard Do not touch the oven during the Self-Cleaning cycle. Keep children away from oven during Self-Cleaning cycle. Do not use commercial oven cleaners in your oven. Failure to follow these instructions can result in burns, or illness from inhaling dangerous - KitchenAid KDRP407HSS | Use and Care Guide - Page 28
. Air must move freely for best cleaning results. • Do not leave any foil in the oven during the Self-Cleaning cycle. Foil could burn or melt and damage the oven surface. • The oven light will not work during the Self-Cleaning cycle. • Do not use your cooktop during the SelfCleaning cycle. Before - KitchenAid KDRP407HSS | Use and Care Guide - Page 29
. Hand-clean areas noted in "Before you start" earlier in this section. How the cycle works The Self-Cleaning cycle uses very high heat to burn away soil and grease. During the cycle, the oven gets much hotter than it does for normal baking or broiling. This high heat breaks up the - KitchenAid KDRP407HSS | Use and Care Guide - Page 30
DO Wire the unit into a live circuit with proper voltage. (See Installation Instructions.) Replace household fuse or reset circuit breaker. Contact a designated servicing outlet to reconnect range. Refer to the section in this manual describing the function you are operating. Wait for the start time - KitchenAid KDRP407HSS | Use and Care Guide - Page 31
programmed a delayed start time. An "F" code appears on the display. Heating of insulation. No action is needed. Burner operation is not affected and the sparking should end when the knob is moved from LITE. Contact service technician to replace module. Contact a qualified electrician to correct - KitchenAid KDRP407HSS | Use and Care Guide - Page 32
Troubleshooting PROBLEM POSSIBLE CAUSE WHAT TO DO Cookware is not level on the range (Check to see if liquids are level in cookware.) Range is not level Cookware does not have flat bottom. Level range. (See Installation Instructions.) Use cookware with flat bottoms. Excessive heat on cooktop - KitchenAid KDRP407HSS | Use and Care Guide - Page 33
: • Features and specifications on our full line of appliances. • Installation information. • Accessory and repair parts sales. • Specialized customer assistance (Spanish speaking, hearing impaired, limited vision, etc.). • Referrals to service companies and repair parts distributors. KitchenAid - KitchenAid KDRP407HSS | Use and Care Guide - Page 34
Features and specifications on our full line of appliances. • Accessory and repair parts sales. • Specialized customer assistance (French speaking, hearing impaired, limited vision, etc.). • Referrals to local dealers, service companies, and repair parts distributors. KitchenAid designated service - KitchenAid KDRP407HSS | Use and Care Guide - Page 35
30.4 cm) circles. Place on baking sheets lined with nonstick parchment paper. Cover and let rise for 70 minutes or proof in oven 110°F [38-43°C]) 23⁄4 cups (687 mL) rye flour 13⁄4-2 cups (438-500 mL)all-purpose flour 1 T (15 mL . Divide the dough into 5 equal parts and shape into round loaves. Let - KitchenAid KDRP407HSS | Use and Care Guide - Page 36
. Cover and let rise for 60-70 minutes or proof in oven for 30 minutes. Mix together ingredients for glaze. Slash loaves in zigzag pattern 51⁄4 x 23⁄4 in (23.5 x 13.5 x 6.9 cm) loaf pans. Divide the dough into 9 equal pieces and form into ropes about 12 in (30.4 cm) long. Braid 3 ropes together, - KitchenAid KDRP407HSS | Use and Care Guide - Page 37
glaze. Cover and let rise for 70-80 minutes or proof in oven for 50 minutes. Bake using the BREAD setting with preheat temperature set in size or proof in oven for 25-30 minutes. Bake using the BREAD setting with preheat temperature set to 430°F (221°C) for about 25-30 minutes. Remove from pans - KitchenAid KDRP407HSS | Use and Care Guide - Page 38
Dual Fuel Range Warranty LENGTH OF WARRANTY: KITCHENAID WILL PAY FOR: KITCHENAID WILL NOT PAY FOR: ONE-YEAR FULL WARRANTY FROM DATE OF PURCHASE. Replacement parts and repair labor costs to correct defects in materials or workmanship. Service must be provided by a KitchenAid designated servicing - KitchenAid KDRP407HSS | Use and Care Guide - Page 39
..30 Guide de diagnostic 31 Demande d'assistance ou de service 35 Recettes de pain 37 Garantie 42 Pour assistance ou service aux États-Unis, communiquer avec le Centre d'assistance aux consommateurs : 1-800-422-1230 Pour assistance ou service au Canada, se reporter à la page 36. KITCHENAID - KitchenAid KDRP407HSS | Use and Care Guide - Page 40
. • Appeler immédiatement le fournisseur de gaz d'un téléphone voisin. Suivre ses instructions. • À défaut de joindre votre fournisseur de gaz, appeler les pompiers. - L'installation et l'entretien doivent être effectués par un installateur qualifié, une agence de service ou le fournisseur de gaz. 2 - KitchenAid KDRP407HSS | Use and Care Guide - Page 41
se produire en cas de non-respect des instructions. La bride antibasculement Dans les conditions de service normales, la cuisinière ne bascule pas. ère est déplacée. Voir détails dans les instructions d'installation. Le non-respect de ces instructions peut causer un décès ou des brûlures graves - KitchenAid KDRP407HSS | Use and Care Guide - Page 42
S écurité de la cuisinière IMPORTANTES INSTRUCTIONS DE SÉCURITÉ AVERTISSEMENT : Pour réduire le risque • Installation appropriée - La cuisinière, lorsqu'elle est correctement installée, doit être reliée à la terre conformément aux codes électriques locaux ou en l'absence de codes locaux, au Code é - KitchenAid KDRP407HSS | Use and Care Guide - Page 43
Pièces et caractéristiques Emplacements des caractéristiques Brûleurs de surface (p. 7) Boutons de commande des brûleurs (p. 8) Joint (p. 28) Élément de cuisson au four (dissimulé) (pp. 16, 17) Tableau de commandes du four électronique (p. 15) Évent du four (p. 6) Plaque signalétique des numéros - KitchenAid KDRP407HSS | Use and Care Guide - Page 44
du four, il n'est pas nécessaire d'enlever la porte. Toutefois, on peut enlever la porte en suivant les instructions dans cette section. La porte du four est lourde. Utiliser les deux mains pour enlever et réinstaller la porte. Ne pas soulever et transporter la porte par la poignée. Pour enlever et - KitchenAid KDRP407HSS | Use and Care Guide - Page 45
de gaz naturel. Pour utiliser du gaz propane, un équipement de conversion au gaz propane est compris avec la cuisinière. Voir les instructions comprises avec la trousse de conversion au gaz propane pour les détails concernant l'exécution de cette conversion. • Positionner les pieds des grilles - KitchenAid KDRP407HSS | Use and Care Guide - Page 46
fonctionne toujours pas, contacter le centre de service agréé le plus près. Une mise à la cuisson est terminée. Le non-respect de ces instructions peut causer un décès ou un incendie. Réglage n'est pas atteint, utiliser le tableau ci-dessous comme guide. DEGRÉ USAGE RECOMMANDÉ LITE • Pour allumer le - KitchenAid KDRP407HSS | Use and Care Guide - Page 47
(pièce n° 4455109), composer le 1-800-422-1230 (aux É.-U.) ou le 1-800461-5681 (au Canada). Vous entendrez un message enregistré. Suivez les instructions pour soumettre votre commande. En cas de panne d'électricité prolongée Les brûleurs à la surface peuvent être allumés manuellement. 1. Tenir un - KitchenAid KDRP407HSS | Use and Care Guide - Page 48
ensuite la chaleur pour maintenir l'ébullition ou les niveaux de pression requis dans un autoclave. • Se reporter au manuel de l'autoclave pour des instructions précises. • Pour obtenir des informations récentes sur la préparation de conserves, aux ÉtatsUnis contacter le bureau local du ministère - KitchenAid KDRP407HSS | Use and Care Guide - Page 49
émaillé en porcelaine. Céramique ou vitrocéramique • Chauffe lentement et inégalement. • S'utilise pour les réglages bas à moyen. • Suivre les instructions du fabricant. Cuivre • Chauffe très rapidement et également. • Utilisé comme base dans les ustensiles de cuisson pour fournir un chauffage - KitchenAid KDRP407HSS | Use and Care Guide - Page 50
tre ajusté, faire venir un technicien qualifié pour l'entretien. 5. Après le nettoyage du tube d'arrivée de gaz et des orifices, réinstaller le chapeau du brûleur. Pour réinstaller le chapeau du brûleur, s'assurer que les tiges d'aligne- ment sur le chapeau du brûleur sont bien alignées avec - KitchenAid KDRP407HSS | Use and Care Guide - Page 51
passer le bouton de LO (basse) à HI (haute). Flamme basse Orifice de brûleur Flamme haute Vis d'ajustement Tige de soupape Orifice de brûleur 13 - KitchenAid KDRP407HSS | Use and Care Guide - Page 52
de cuisson AVERTISSEMENT Risque d'explosion Ne jamais garder de matériaux combustibles telle que l'essence près de cet appareil. Le non-respect de cette instruction peut causer un décès, une explosion ou un incendie. PIÈCE ARTICLES UTILISÉS MODE DE NETTOYAGE La table de • Savon et eau cuisson de - KitchenAid KDRP407HSS | Use and Care Guide - Page 53
par étape dans cette section comment utiliser toutes les fonctions du four contrôlées par les commandes électroniques. L'observation minutieuse de ces instructions de même que les conseils de cuisson et les renseignements de nettoyage aideront à utiliser cette cuisinière avec succès. Utilisation du - KitchenAid KDRP407HSS | Use and Care Guide - Page 54
U tilisation et entretien du four Mise en marche d'une fonction Après avoir programmé une fonction, on doit appuyer sur la touche ENTER (entrer). REMARQUE : On peut entendre le ventilateur de refroidissement après avoir appuyer sur CANCEL. Le ventilateur s'arrêtera automatiquement lorsque le four - KitchenAid KDRP407HSS | Use and Care Guide - Page 55
U tilisation et entretien du four RÉGLAGE SCHÉMA CUISSON PAR CONVECTION Utiliser ce réglage pour les aliments qui demandent un chauffage doux, et pour la cuisson de pains et gâteaux. Utiliser aussi cette fonction pour la cuisson d'une grande quantité d'aliments, sur plusieurs grilles. Élément de - KitchenAid KDRP407HSS | Use and Care Guide - Page 56
U tilisation et entretien du four RÉGLAGE SCHÉMA LEVÉE DU PAIN Utiliser ce réglage pour faire lever le pain. RENSEIGNEMENTS SUR LES RÉGLAGES • Seul l'élément supérieur chauffe durant la fonction de levée du pain. • L'élément s'allumera et s'éteindra pour maintenir la température du four. GARDER - KitchenAid KDRP407HSS | Use and Care Guide - Page 57
inoxydable • Croûtes dorées, légères • Brunissement inégal • Peut exiger d'augmenter le temps de cuisson. Plat en terre cuite • Croûtes croustillantes • Suivre les instructions du fabricant. 19 - KitchenAid KDRP407HSS | Use and Care Guide - Page 58
tente pour recouvrir la viande ou la volaille pour ralentir le brunissement de la surface lors du rôtissage prolongé. Enlever le papier d'aluminium pendant les 30 dernières minutes. • Utiliser des lisières étroites de papier d'aluminium pour protéger le contour des croûtes à tarte si le brunissement - KitchenAid KDRP407HSS | Use and Care Guide - Page 59
U tilisation et entretien du four 3. Appuyer sur ENTER pour la mise en marche. 4. À la fin de la rôtissage par convection, tourner le SÉLECTEUR à RESET. • Il est possible de réduire les durées et températures de cuisson pour la plupart des recettes ordinaires lors de l'utilisation du réglage de rô - KitchenAid KDRP407HSS | Use and Care Guide - Page 60
U tilisation et entretien du four Cuisson au gril par convection La cuisson au gril par convection est en fait le rôtissage par convection à haute température. Utiliser ce réglage lors de la cuisson au gril de morceaux épais de viande. Les résultats sont semblables à ceux obtenus lors de l' - KitchenAid KDRP407HSS | Use and Care Guide - Page 61
de porc, 2,5 cm (1 po) d'épaisseur 4 HI 30-33 [18-20] Côtelettes d'agneau, 2,5 cm (1 po) d'épaisseur 4 HI 22-26 [11-13] Poulet morceaux avec os poitrines désossées 3 HI [ ou après la cuisson. Le non-respect de cette instruction peut causer un empoisonnement alimentaire ou une maladie. 1. Ré - KitchenAid KDRP407HSS | Use and Care Guide - Page 62
Risque d'empoisonnement alimentaire Ne pas laisser des aliments dans un four plus d'une heure avant ou après la cuisson. Le non-respect de cette instruction peut causer un empoisonnement alimentaire ou une maladie. Proof/Keep Warm (levée du pain/garder au chaud) sont en fait deux fonctions séparées - KitchenAid KDRP407HSS | Use and Care Guide - Page 63
Former la pâte lorsqu'elle est levée. Suivre les instructions de la recette pour former la pâte. 6. À REMARQUE : Voir les recettes de pain à l'arrière du guide d'utilisation et d'entretien. Pour les meilleurs résultats, ne pas la finition des boutons. • Réinstaller les boutons. S'assurer que chaque - KitchenAid KDRP407HSS | Use and Care Guide - Page 64
U tilisation et entretien du four PIÈCE Plat de cuisson au gril ARTICLES UTILISÉS Tampon en laine d'acier et eau savonneuse tiède MODE DE NETTOYAGE • Laver, rincer et sécher à fond. OU Le programme d'autonettoyage Grilles du four Tampon de laine d'acier et eau savonneuse tiède OU le programme - KitchenAid KDRP407HSS | Use and Care Guide - Page 65
U tilisation et entretien du four Nettoyage des surfaces en acier inoxydable • Ne pas utiliser des tampons en laine d'acier ou des tampons à récurer garnis de savon. • Frotter dans le sens de la ligne du grain pour éviter de marquer la surface. • Toujours bien sécher pour éviter les marques d'eau. - KitchenAid KDRP407HSS | Use and Care Guide - Page 66
de nettoyage de four dans le four. Le non-respect de ces instructions peut causer des brûlures ou une maladie provenant de la respiration et le cadre. • Enlever la lèchefrite et sa grille, et tout autre ustensile rangé dans le four. • Essuyer les surfaces pour éliminer les saletés ou la graisse - KitchenAid KDRP407HSS | Use and Care Guide - Page 67
U tilisation du programme d'autonettoyage IMPORTANT : La santé de certains oiseaux est très sensible aux émanations qui existent lors du programme d'autonettoyage. L'exposition à ces émanations peut faire mourir certains oiseaux. Déplacer toujours les oiseaux dans une autre pièce bien aérée. - KitchenAid KDRP407HSS | Use and Care Guide - Page 68
normale de cuisson au gril) LA PORTE SE DÉVERROUILLE (le ventilateur continue de fonctionner) LA PORTE SE VERROUILLE MISE EN MARCHE 1 2 3 Durée en Heures ARRÊT 30 - KitchenAid KDRP407HSS | Use and Care Guide - Page 69
reliée à la terre. Relier l'appareil à un circuit actif avec voltage approprié. (Voir instructions d'installation.) Remplacer le fusible ou remettre le disjoncteur en fonction. Contacter un centre de service désigné pour rebrancher l'appareil. Le four ne fonctionne pas La commande électronique - KitchenAid KDRP407HSS | Use and Care Guide - Page 70
Guide le bouton est déplacé de LITE. Contacter un technicien de service pour remplacer le module. Contacter un électricien qualifié pour corriger le câblage au fonctionne pas On a programmé une heure de mise en marche différée. Un code " F " apparaît sur l'afficheur. Attendre l'heure de mise en - KitchenAid KDRP407HSS | Use and Care Guide - Page 71
Guide de diagnostic PROBLÈME L'ustensile n'est pas d'aplomb sur la four. Le mélange n'est pas d'aplomb dans le plat. QUOI FAIRE Mettre la cuisinière d'aplomb. (Voir Instructions d'installation.) Utiliser un ustensile à fond plat. Choisir un ustensile de cuisson de la même taille ou un peu plus - KitchenAid KDRP407HSS | Use and Care Guide - Page 72
Guide de diagnostic PROBLÈME Le bord de la croûte brunit avant que la tarte ne soit prête CAUSE POSSIBLE La garniture né message "PF" Régler de nouveau l'horloge. (Voir page 16.) Si aucune de ces situations ne cause votre problème, voir "Demande d'assistance ou de service" aux pages 35-36. 34 - KitchenAid KDRP407HSS | Use and Care Guide - Page 73
". Ce guide peut vous faire économiser le coût d'une visite de service. Si vous avez encore besoin d'aide, suivre les instructions suivantes. Si vous avez besoin d'assistance ou de service aux É.-U. Téléphoner au Centre d'assistance aux • Vente de pièces de rechange et consommateurs KitchenAid - KitchenAid KDRP407HSS | Use and Care Guide - Page 74
ou de service au Canada : Téléphoner au Centre d'assistance aux consommateurs KitchenAid sans frais d'interurbain, entre 8 h 30 et 18 installées et fonctionneront bien parce qu'elles sont fabriquées avec la même précision utilisée dans la fabrication de chaque nouvel appareil ménager KITCHENAID - KitchenAid KDRP407HSS | Use and Care Guide - Page 75
rement saupoudrée de farine, rouler les pains en cercles de 12 po (30,4 cm). Déposer sur des tôles à cuisson recouvertes de papier parcheminé 417 mL) d'eau (100-110°F [38-43°C]) 23⁄4 tasses (687 mL) de farine de seigle 13⁄4-2 tasses (438-500 mL) de farine tout-usage 1 c. à soupe (15 mL) de sel Verser - KitchenAid KDRP407HSS | Use and Care Guide - Page 76
cuire au réglage BREAD à une température de préchauffage de 430°F (220°C) pendant 30-35 minutes. Donne 5 pains de 10 oz (285 g). Pain viennois INGRÉDIENTS : 1 laisser lever pendant 60 à 70 minutes ou faire lever au four pendant 30 minutes. Mélanger les ingrédients du glaçage. Entailler le pain - KitchenAid KDRP407HSS | Use and Care Guide - Page 77
érature ambiante pendant 15 à 20 minutes. Graisser 3 moules à pain de 91⁄4 x 51⁄4 x 23⁄4 po (23,5 x 13,5 x 6,9 cm). Partager la pâte en 9 morceaux égaux et former des cordons d'environ 12 po (30,4 cm) de longueur. Tresser 3 cordons ensemble, en collant les extrémités. Replier les bouts légèrement - KitchenAid KDRP407HSS | Use and Care Guide - Page 78
minutes ou jusqu'à ce que la pâte double de volume ou faire lever au four pendant 25 à 30 minutes. Faire cuire au réglage BREAD à une température de préchauffage de 430°F (220°C) pendant 25 à 30 minutes. Sortir des moules et laisser refroidir sur des grilles en broche. Donne 2 pains de 1 lb - KitchenAid KDRP407HSS | Use and Care Guide - Page 79
N otes 41 - KitchenAid KDRP407HSS | Use and Care Guide - Page 80
personnel d'une compagnie de service désignée par KitchenAid. Pièces de rechange installation de la cuisinière. 2. Donner des instructions concernant l'utilisation de la cuisinière. 3. Remplacer les fusibles ou rectifier l'installation mauvaise installation ou i.nstallation non conforme aux codes é
-
 1
1 -
 2
2 -
 3
3 -
 4
4 -
 5
5 -
 6
6 -
 7
7 -
8
-
9
-
10
-
11
-
12
-
13
-
14
-
15
-
16
-
17
-
18
-
19
-
20
-
21
-
22
-
23
-
24
-
25
-
26
-
27
-
28
-
29
-
30
-
31
-
32
-
33
-
34
-
35
-
36
-
37
-
38
-
39
-
40
-
41
-
42
-
43
-
44
-
45
-
46
-
47
-
48
-
49
-
50
-
51
-
52
-
53
-
54
-
55
-
56
-
57
-
58
-
59
-
60
-
61
-
62
-
63
-
64
-
65
-
66
-
67
-
68
-
69
-
70
-
71
-
72
-
73
-
74
-
75
-
76
-
77
-
78
-
79
-
80
 |
 |
KITCHENAID
®
Professional Dual Fuel Range
Model:
KDRP407H
TO THE INSTALLER: PLEASE LEAVE THIS
INSTRUCTION BOOK WITH THE UNIT.
TO THE CONSUMER: PLEASE READ
AND KEEP THIS BOOK FOR FUTURE
REFERENCE.
4452761A
U
se and Care Guide
®
®
A Note to You
......................................................
2
Range Safety
........................................................
3
Parts and Features
..............................................
5
Using and Caring for Your Cooktop
..................
7
Using the surface burners
.................................
7
Cookware tips
..................................................
10
Characteristics of cookware materials
............
10
Caring for your cooktop
...................................
11
Cleaning your cooktop
....................................
13
Using and Caring for Your Oven
......................
14
Using the electronic oven control
....................
14
Setting the clock
..............................................
15
Oven settings
..................................................
15
Positioning racks and pans
.............................
17
Bakeware choices
...........................................
18
Using aluminum foil
.........................................
19
Bake
................................................................
19
Convection Bake
.............................................
19
Convection baking tips
....................................
19
Convection Roast
............................................
19
Convection roasting tips
..................................
20
Broil
.................................................................
20
Convection Broil
..............................................
21
Broiling chart
...................................................
22
Timed cooking
.................................................
22
Proof/Keep Warm
............................................
23
Bread
...............................................................
24
Cleaning your oven and controls
....................
24
Using and replacing the oven lights
................
26
Using the Self-Cleaning Cycle
.........................
27
Before you start
...............................................
27
Before setting the controls
..............................
28
Setting the controls
.........................................
28
For best cleaning results
.................................
29
How the cycle works
.......................................
29
Troubleshooting
................................................
30
Requesting Assistance or Service
..................
33
Bread Recipes
...................................................
35
Warranty
.............................................................
38
In the U.S.A. for assistance or service,
call the Consumer Assistance center:
1-800-422-1230
In Canada, for assistance or service,
see page 34.
www.kitchenaid.com