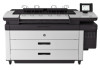
Konica Minolta HP PageWide XL 4500 MFP User Guide - Page 25
Con a scan-to-network or scan-to-FTP folder
 |
View all Konica Minolta HP PageWide XL 4500 MFP manuals
Add to My Manuals
Save this manual to your list of manuals |
Page 25 highlights
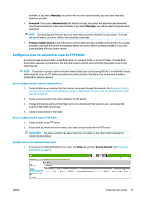
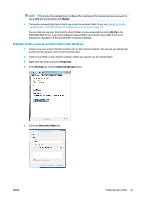
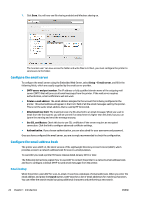
available. If you select Manually, the printer will not check automatically; you can check manually whenever you like. ● Download: If you select Automatically (the default setting), the printer will automatically download new firmware whenever it becomes available. If you select Manually, you will be asked to approve each download. NOTE: Downloading the firmware does not mean that you have installed it in your printer. To install the new firmware, you must confirm the installation manually. ● Firmware update history: A list of firmware versions that have been installed in the printer. It is usually possible to reinstall the version immediately before the version that is currently installed, if you have some problem with the current version. Configure a scan-to-network or scan-to-FTP folder A scanned image may be saved in a USB flash drive, in a network folder, or in an FTP folder. The USB flash drive option requires no preparation, but the other options will not work until they have been set up in the following way. NOTE: The printer accesses scan-to-network shared folders (as a client) using NTLMv1- and NHLMv2-based authentication. Scan-to-FTP folder uses plain text authentication. Therefore scan-to-network should be preferred for security reasons. Server configuration for scan-to-network folder 1. Create a folder on a computer that the scanner can access through the network. See Example: Create a scan-to-network folder under Windows on page 21 or Example: Create a scan-to-network folder under Mac OS on page 22. 2. Create a user account on the same computer for the printer. 3. Change the sharing options of the folder so that it is shared with the 'scanner user', and assign full control of the folder to that user. 4. Create a share name for the folder. Server configuration for scan-to-FTP folder 1. Create a folder on an FTP server. 2. Ensure that you know the server name, user name, and password for the FTP server. IMPORTANT: You must complete the above steps for one option or the other before starting the remaining steps below. Configuration in the Embedded Web Server 1. In the printer's Embedded Web Server, select the Setup tab and then Scan to network. See Embedded Web Server on page 11. ENWW Preparing your printer 19
-
 1
1 -
2
-
3
-
4
-
5
-
6
-
7
-
8
-
9
-
10
-
11
-
12
-
13
-
14
-
15
-
16
-
17
-
18
-
19
-
 20
20 -
 21
21 -
 22
22 -
 23
23 -
 24
24 -
 25
25 -
 26
26 -
 27
27 -
 28
28 -
 29
29 -
 30
30 -
31
-
32
-
33
-
34
-
35
-
36
-
37
-
38
-
39
-
40
-
41
-
42
-
43
-
44
-
45
-
46
-
47
-
48
-
49
-
50
-
51
-
52
-
53
-
54
-
55
-
56
-
57
-
58
-
59
-
60
-
61
-
62
-
63
-
64
-
65
-
66
-
67
-
68
-
69
-
70
-
71
-
72
-
73
-
74
-
75
-
76
-
77
-
78
-
79
-
80
-
81
-
82
-
83
-
84
-
85
-
86
-
87
-
88
-
89
-
90
-
91
-
92
-
93
-
94
-
95
-
96
-
97
-
98
-
99
-
100
-
101
-
102
-
103
-
104
-
105
-
106
-
107
-
108
-
109
-
110
-
111
-
112
-
113
-
114
-
115
-
116
-
117
-
118
-
119
-
120
-
121
-
122
-
123
-
124
-
125
-
126
-
127
-
128
-
129
-
130
-
131
-
132
-
133
-
134
-
135
-
136
-
137
-
138
-
139
-
140
-
141
-
142
-
143
-
144
-
145
-
146
-
147
-
148
-
149
-
150
-
151
-
152
-
153
-
154
-
155
-
156
-
157
-
158
-
159
-
160
-
161
-
162
-
163
-
164
-
165
-
166
-
167
-
168
-
169
-
170
 |
 |
