Konica Minolta HP PageWide XL 4500 MFP User Guide - Page 27
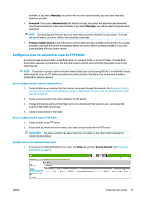
Example: Create a scan-to-network folder under Windows, Modify, Verify, Properties, Sharing
 |
View all Konica Minolta HP PageWide XL 4500 MFP manuals
Add to My Manuals
Save this manual to your list of manuals |
Page 27 highlights
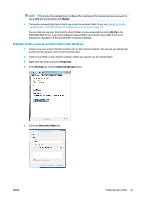
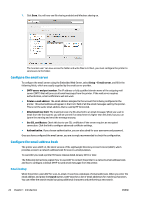
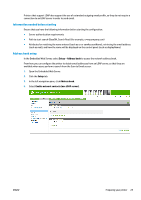
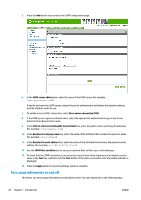
NOTE: If the product has already been configured for scanning to the network and you now want to use a different shared folder, click Modify. 4. The printer automatically checks that it can access the network folder. If not, see Cannot access the network folder or HP SmartStream (if installed as an accessory) on page 111. You can check at any later time that the shared folder remains accessible by clicking Verify in the Embedded Web Server. A correctly configured shared folder can become inaccessible if the user's password is changed, or if the shared folder is moved or deleted. Example: Create a scan-to-network folder under Windows 1. Create a new user account for the 'scanner user' on the remote computer. You can use an existing user account for this purpose, but it is not recommended. 2. Create a new folder on the remote computer, unless you want to use an existing folder. 3. Right-click the folder and select Properties. 4. In the Sharing tab, click the Advanced Sharing button. 5. Check the Share this folder box. ENWW Preparing your printer 21
-
 1
1 -
2
-
3
-
4
-
5
-
6
-
7
-
8
-
9
-
10
-
11
-
12
-
13
-
14
-
15
-
16
-
17
-
18
-
19
-
20
-
21
-
 22
22 -
 23
23 -
 24
24 -
 25
25 -
 26
26 -
 27
27 -
 28
28 -
 29
29 -
 30
30 -
 31
31 -
 32
32 -
33
-
34
-
35
-
36
-
37
-
38
-
39
-
40
-
41
-
42
-
43
-
44
-
45
-
46
-
47
-
48
-
49
-
50
-
51
-
52
-
53
-
54
-
55
-
56
-
57
-
58
-
59
-
60
-
61
-
62
-
63
-
64
-
65
-
66
-
67
-
68
-
69
-
70
-
71
-
72
-
73
-
74
-
75
-
76
-
77
-
78
-
79
-
80
-
81
-
82
-
83
-
84
-
85
-
86
-
87
-
88
-
89
-
90
-
91
-
92
-
93
-
94
-
95
-
96
-
97
-
98
-
99
-
100
-
101
-
102
-
103
-
104
-
105
-
106
-
107
-
108
-
109
-
110
-
111
-
112
-
113
-
114
-
115
-
116
-
117
-
118
-
119
-
120
-
121
-
122
-
123
-
124
-
125
-
126
-
127
-
128
-
129
-
130
-
131
-
132
-
133
-
134
-
135
-
136
-
137
-
138
-
139
-
140
-
141
-
142
-
143
-
144
-
145
-
146
-
147
-
148
-
149
-
150
-
151
-
152
-
153
-
154
-
155
-
156
-
157
-
158
-
159
-
160
-
161
-
162
-
163
-
164
-
165
-
166
-
167
-
168
-
169
-
170
 |
 |
