Konica Minolta Kodak i5850 User Guide - Page 13
Front printer access view: all models, Rear printer access view: i5850 Scanner only
 |
View all Konica Minolta Kodak i5850 manuals
Add to My Manuals
Save this manual to your list of manuals |
Page 13 highlights
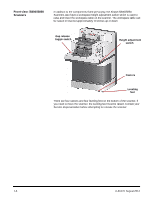
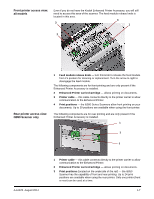
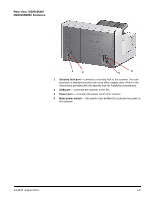
Front printer access view: all models Even if you do not have the Kodak Enhanced Printer Accessory, you will still need to access this area of the scanner. The feed module release knob is located in this area. 4 3 1 2 Rear printer access view: i5850 Scanner only 1 Feed module release knob - turn this knob to release the feed module from it's position for cleaning or replacement. Turn the arrow to right to disengage the feed module. The following components are for front printing and are only present if the Enhanced Printer Accessory is installed. 2 Enhanced Printer carrier/cartridge - allows printing on documents. 3 Printer cable - this cable connects directly to the printer carrier to allow communication to the Enhanced Printer. 4 Print positions - the i5000 Series Scanners allow front printing on your documents. Up to 39 positions are available when using the front printer. The following components are for rear printing and are only present if the Enhanced Printer Accessory is installed. 1 2 3 A-61670 August 2014 1 Printer cable - this cable connects directly to the printer carrier to allow communication to the Enhanced Printer. 2 Enhanced Printer carrier/cartridge - allows printing on documents. 3 Print positions (located on the underside of the rail) - the i5850 Scanner has the capability of front and rear printing. Up to 24 print positions are available when using the rear printer. Only one printer (front or rear) can be used at a time. 1-7
-
 1
1 -
2
-
3
-
4
-
5
-
6
-
7
-
 8
8 -
 9
9 -
 10
10 -
 11
11 -
 12
12 -
 13
13 -
 14
14 -
 15
15 -
 16
16 -
 17
17 -
 18
18 -
19
-
20
-
21
-
22
-
23
-
24
-
25
-
26
-
27
-
28
-
29
-
30
-
31
-
32
-
33
-
34
-
35
-
36
-
37
-
38
-
39
-
40
-
41
-
42
-
43
-
44
-
45
-
46
-
47
-
48
-
49
-
50
-
51
-
52
-
53
-
54
-
55
-
56
-
57
-
58
-
59
-
60
-
61
-
62
-
63
-
64
-
65
-
66
-
67
-
68
-
69
-
70
-
71
-
72
-
73
-
74
-
75
-
76
-
77
-
78
-
79
-
80
-
81
-
82
-
83
-
84
-
85
-
86
-
87
-
88
-
89
-
90
-
91
-
92
-
93
-
94
-
95
-
96
-
97
-
98
-
99
-
100
-
101
-
102
-
103
 |
 |
