Konica Minolta Kodak i5850 User Guide - Page 54
Changing print positions, For the front printer
 |
View all Konica Minolta Kodak i5850 manuals
Add to My Manuals
Save this manual to your list of manuals |
Page 54 highlights
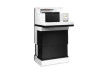
5. Rotate the printer carrier back and snap it in place. Changing print positions 6. Slide the printer carrier into the desired print position. See the section entitled "Changing print positions" later in this chapter. 7. Close the printer access cover and reinstall the output tray or if using the rear printer, reinstall the rear access printer door. 8. Run a print test (see the section entitled, "Performing a print test" in Chapter 3). The horizontal print position must be changed manually. NOTE: If you have an i5850 Scanner, these instructions are the same for the front and rear printers. The illustrations shown are for the front printer. 1. Remove the output tray. 2. Open the printer access cover. NOTES: • The horizontal print positions are visible by a small detent on the printer rail. The front printer has 39 detent positions, and the rear printer has 24 detent positions. • Printing automatically stops approximately 1.27 cm (½-inch) from the trailing edge of the document, even if the information has not been completely printed. 3. Slide the printer carrier to the desired position, so that is aligned with the slot on the printer carrier with the desired horizontal print position. NOTE: For the front printer: The print location indicators at the edge of the input elevator can be used as a guide to verify your horizontal print position. A-61670 August 2014 4-5
-
 1
1 -
2
-
3
-
4
-
5
-
6
-
7
-
8
-
9
-
10
-
11
-
12
-
13
-
14
-
15
-
16
-
17
-
18
-
19
-
20
-
21
-
22
-
23
-
24
-
25
-
26
-
27
-
28
-
29
-
30
-
31
-
32
-
33
-
34
-
35
-
36
-
37
-
38
-
39
-
40
-
41
-
42
-
43
-
44
-
45
-
46
-
47
-
48
-
 49
49 -
 50
50 -
 51
51 -
 52
52 -
 53
53 -
 54
54 -
 55
55 -
 56
56 -
 57
57 -
 58
58 -
 59
59 -
60
-
61
-
62
-
63
-
64
-
65
-
66
-
67
-
68
-
69
-
70
-
71
-
72
-
73
-
74
-
75
-
76
-
77
-
78
-
79
-
80
-
81
-
82
-
83
-
84
-
85
-
86
-
87
-
88
-
89
-
90
-
91
-
92
-
93
-
94
-
95
-
96
-
97
-
98
-
99
-
100
-
101
-
102
-
103
 |
 |
