Konica Minolta Kodak i5850 User Guide - Page 17
Installation, Installing the scanner, Installing the Kodak Driver Software, Contents
 |
View all Konica Minolta Kodak i5850 manuals
Add to My Manuals
Save this manual to your list of manuals |
Page 17 highlights
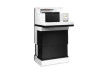
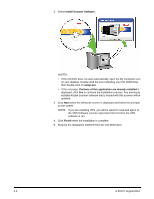
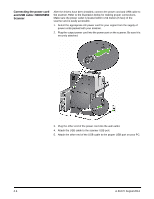
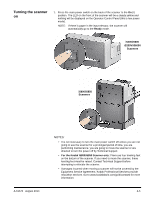
2 Installation Contents Installing the scanner 2-1 Installing the Kodak Driver Software 2-1 Attaching the output tray 2-3 Connecting the power cord and USB cable: i5200/i5600/ i5200V/i5600V Scanners 2-3 Connecting the power cord and USB cable: i5800/i5850 Scanners...... 2-4 Turning the scanner on 2-5 Power modes 2-7 If desired, Kodak Professional Services provides professional installation and user training. Contact your local Service Representative for more details at www.kodakalaris.com/go/disupport. The following installation procedures are for the Kodak i5200/i5600/i5200V/ i5600V Scanners. Installation by a Service Representative is included with the purchase of a Kodak i5800/i5850 Scanner. Installing the scanner This section provides detailed information supporting the Installation Guide that is provided with your scanner. Follow these steps in the order they are provided to install your scanner. NOTES: • Before you begin, verify that your host PC meets the system requirements that are provided in Appendix A, Specifications. • If you have already performed all of the steps in the Installation Guide, skip this section. • Updated drivers may be available at www.kodakalaris.com/go/scanners. Installing the Kodak Driver Software Do not install the USB cable before installing the Kodak Driver Software. NOTE: If you are installing a Kodak i5200/i5600 Scanner, the TWAIN Datasource, ISIS Driver and Scan Validation Tool will be installed. If you are installing a Kodak i5200V/ i5600V Scanner, VRS, the TWAIN Datasource and Scan Validation Tool will be installed. 1. Insert the Kodak i5000 or i5000V Series Scanners Installation CD/DVD in the CD-ROM drive. The installation program starts automatically. A-61670 August 2014 2-1
-
 1
1 -
2
-
3
-
4
-
5
-
6
-
7
-
8
-
9
-
10
-
11
-
 12
12 -
 13
13 -
 14
14 -
 15
15 -
 16
16 -
 17
17 -
 18
18 -
 19
19 -
 20
20 -
 21
21 -
 22
22 -
23
-
24
-
25
-
26
-
27
-
28
-
29
-
30
-
31
-
32
-
33
-
34
-
35
-
36
-
37
-
38
-
39
-
40
-
41
-
42
-
43
-
44
-
45
-
46
-
47
-
48
-
49
-
50
-
51
-
52
-
53
-
54
-
55
-
56
-
57
-
58
-
59
-
60
-
61
-
62
-
63
-
64
-
65
-
66
-
67
-
68
-
69
-
70
-
71
-
72
-
73
-
74
-
75
-
76
-
77
-
78
-
79
-
80
-
81
-
82
-
83
-
84
-
85
-
86
-
87
-
88
-
89
-
90
-
91
-
92
-
93
-
94
-
95
-
96
-
97
-
98
-
99
-
100
-
101
-
102
-
103
 |
 |
