Konica Minolta bizhub 5000i bizhub 5000i/4000i User Guide - Page 199
Error Message, Cause, Action, No Paper Fed T3
 |
View all Konica Minolta bizhub 5000i manuals
Add to My Manuals
Save this manual to your list of manuals |
Page 199 highlights
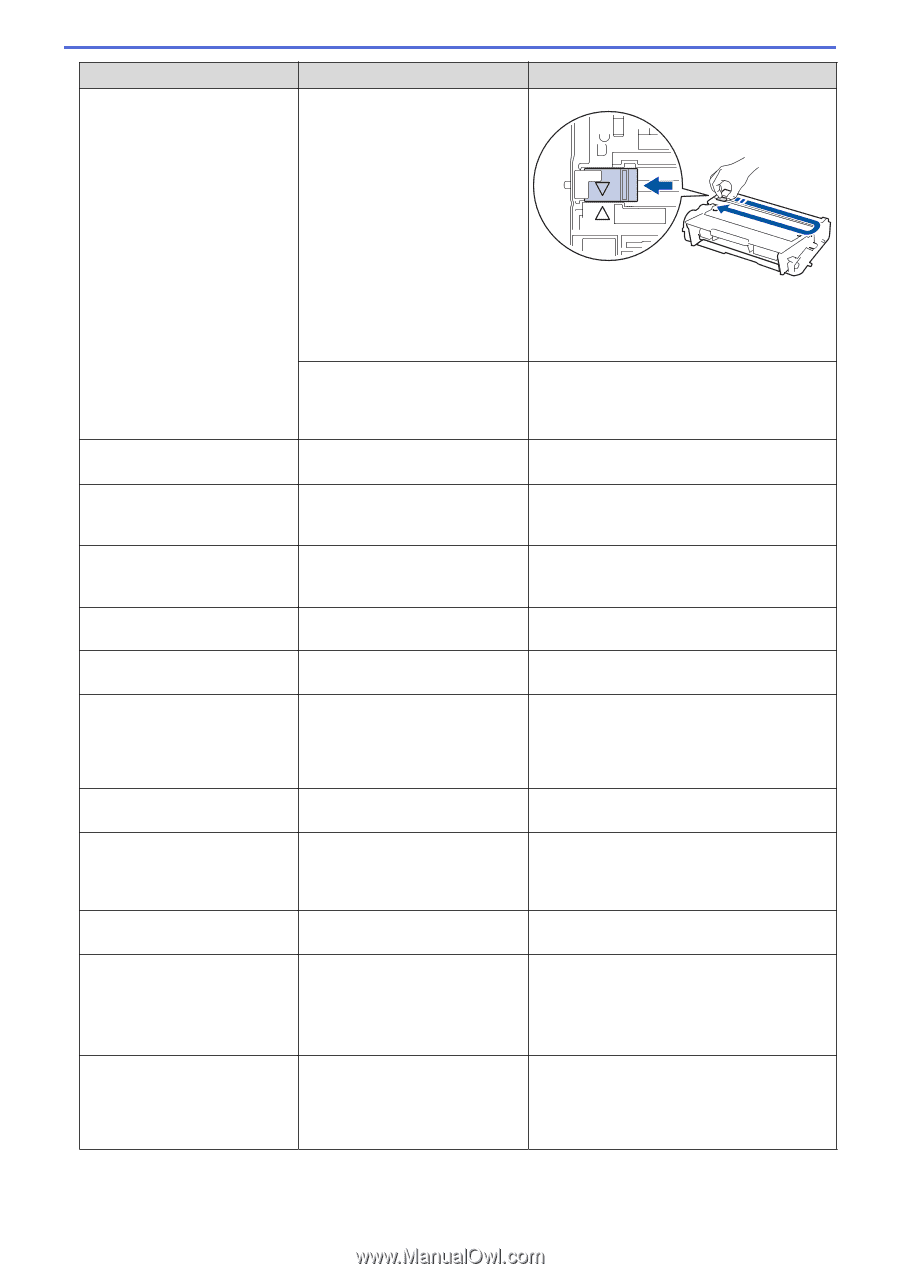
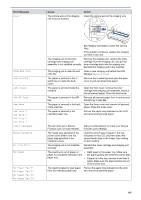
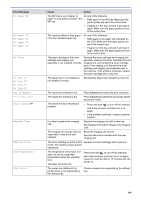
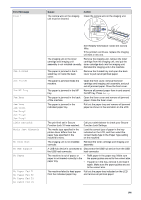
Error Message Drum ! Cause The corona wire on the imaging unit must be cleaned. Action Clean the corona wire on the imaging unit. Drum End Soon Jam 2-sided Jam Inside Jam MP Tray Jam Rear Jam Tray 1 Jam Tray 2 Jam Tray 3 Jam Tray 4 Limit Exceeded Media Mismatch No Drum Unit No Paper No Paper Fed T1 No Paper Fed T2 No Paper Fed T3 No Paper Fed T4 See Related Information: Clean the Corona Wire. If the problem continues, replace the imaging unit with a new one. The imaging unit or the toner cartridge and imaging unit assembly is not installed correctly. Remove the imaging unit, remove the toner cartridge from the imaging unit, and put the toner cartridge back into the imaging unit. Reinstall the imaging unit in the machine. The imaging unit is near the end Order a new imaging unit before the LCD of its life. displays Replace Drum. The paper is jammed in the 2sided tray or inside the back cover. Remove the 2-sided tray and open the back cover to pull out all jammed paper. The paper is jammed inside the machine. Open the front cover, remove the toner cartridge and imaging unit assembly, and pull out all jammed paper. Close the front cover. The paper is jammed in the MP tray. Remove all jammed paper from in and around the MP tray. Press Go. The paper is jammed in the back Open the fuser cover and remove all jammed of the machine. paper. Close the fuser cover. The paper is jammed in the indicated paper tray. Pull out the paper tray indicated on the LCD and remove all jammed paper. The print limit set in Secure Function Lock 3.0 was reached. Call your administrator to check your Secure Function Lock Settings. The media type specified in the printer driver differs from the paper type specified in the machine's menu. Load the correct type of paper in the tray indicated on the LCD, and then select the correct media type in the Paper Type setting on the machine. The imaging unit is not installed correctly. Reinstall the toner cartridge and imaging unit assembly. The machine is out of paper, or • paper is not loaded correctly in the paper tray. • Refill paper in the paper tray. Make sure the paper guides are set to the correct size. If paper is in the tray, remove it and load it again. Make sure the paper guides are set to the correct size. The machine failed to feed paper Pull out the paper tray indicated on the LCD from the indicated paper tray. and remove all jammed paper. 195
-
 1
1 -
2
-
3
-
4
-
5
-
6
-
7
-
8
-
9
-
10
-
11
-
12
-
13
-
14
-
15
-
16
-
17
-
18
-
19
-
20
-
21
-
22
-
23
-
24
-
25
-
26
-
27
-
28
-
29
-
30
-
31
-
32
-
33
-
34
-
35
-
36
-
37
-
38
-
39
-
40
-
41
-
42
-
43
-
44
-
45
-
46
-
47
-
48
-
49
-
50
-
51
-
52
-
53
-
54
-
55
-
56
-
57
-
58
-
59
-
60
-
61
-
62
-
63
-
64
-
65
-
66
-
67
-
68
-
69
-
70
-
71
-
72
-
73
-
74
-
75
-
76
-
77
-
78
-
79
-
80
-
81
-
82
-
83
-
84
-
85
-
86
-
87
-
88
-
89
-
90
-
91
-
92
-
93
-
94
-
95
-
96
-
97
-
98
-
99
-
100
-
101
-
102
-
103
-
104
-
105
-
106
-
107
-
108
-
109
-
110
-
111
-
112
-
113
-
114
-
115
-
116
-
117
-
118
-
119
-
120
-
121
-
122
-
123
-
124
-
125
-
126
-
127
-
128
-
129
-
130
-
131
-
132
-
133
-
134
-
135
-
136
-
137
-
138
-
139
-
140
-
141
-
142
-
143
-
144
-
145
-
146
-
147
-
148
-
149
-
150
-
151
-
152
-
153
-
154
-
155
-
156
-
157
-
158
-
159
-
160
-
161
-
162
-
163
-
164
-
165
-
166
-
167
-
168
-
169
-
170
-
171
-
172
-
173
-
174
-
175
-
176
-
177
-
178
-
179
-
180
-
181
-
182
-
183
-
184
-
185
-
186
-
187
-
188
-
189
-
190
-
191
-
192
-
193
-
 194
194 -
 195
195 -
 196
196 -
 197
197 -
 198
198 -
 199
199 -
 200
200 -
 201
201 -
 202
202 -
 203
203 -
 204
204 -
205
-
206
-
207
-
208
-
209
-
210
-
211
-
212
-
213
-
214
-
215
-
216
-
217
-
218
-
219
-
220
-
221
-
222
-
223
-
224
-
225
-
226
-
227
-
228
-
229
-
230
-
231
-
232
-
233
-
234
-
235
-
236
-
237
-
238
-
239
-
240
-
241
-
242
-
243
-
244
-
245
-
246
-
247
-
248
-
249
-
250
-
251
-
252
-
253
-
254
-
255
-
256
-
257
-
258
-
259
-
260
-
261
-
262
-
263
-
264
-
265
-
266
-
267
-
268
-
269
-
270
-
271
-
272
-
273
-
274
-
275
-
276
-
277
-
278
-
279
-
280
-
281
-
282
-
283
-
284
-
285
-
286
-
287
-
288
-
289
-
290
-
291
-
292
-
293
-
294
-
295
-
296
-
297
-
298
-
299
-
300
-
301
-
302
-
303
-
304
-
305
-
306
-
307
-
308
-
309
-
310
-
311
-
312
-
313
-
314
-
315
-
316
-
317
 |
 |