Konica Minolta bizhub 5000i bizhub 5000i/4000i User Guide - Page 51
Secure Print (Mac
 |
View all Konica Minolta bizhub 5000i manuals
Add to My Manuals
Save this manual to your list of manuals |
Page 51 highlights
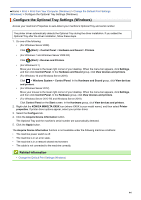
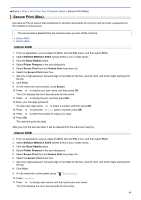
Home > Print > Print from Your Computer (Mac) > Secure Print (Mac) Secure Print (Mac) Use Secure Print to ensure that confidential or sensitive documents do not print until you enter a password on the machine's control panel. • The secure data is deleted from the machine when you turn off the machine. >> bizhub 4000i >> bizhub 5000i bizhub 4000i 1. From an application, such as Apple TextEdit, click the File menu, and then select Print. 2. Select KONICA MINOLTA XXXX (where XXXX is your model name). 3. Click the Show Details button. 4. Select Printer Features in the print dialog box. 5. Select Secure Print from the Feature Sets drop-down list. 6. Select the Secure Print check box. 7. Set a four-digit password. Set each digit in the fields for the first, second, third, and fourth digits starting from the top. 8. Click Print. 9. On the machine's control panel, press Secure. 10. Press a or b to display your user name, and then press OK. The LCD displays the list of secured jobs for that name. 11. Press a or b to display the job, and then press OK. 12. Enter your four-digit password. To enter each digit, press a or b to select a number, and then press OK. 13. Press a or b to select the [Print] option, and then press OK. 14. Press a or b to enter the number of copies you want. 15. Press OK. The machine prints the data. After you print the secured data, it will be cleared from the machine's memory. bizhub 5000i 1. From an application, such as Apple TextEdit, click the File menu, and then select Print. 2. Select KONICA MINOLTA XXXX (where XXXX is your model name). 3. Click the Show Details button. 4. Select Printer Features in the print dialog box. 5. Select Secure Print from the Feature Sets drop-down list. 6. Select the Secure Print check box. 7. Set a four-digit password. Set each digit in the fields for the first, second, third, and fourth digits starting from the top. 8. Click Print. 9. On the machine's control panel, press [Functions]. 10. Press [Secure]. 11. Press a or b to display user names, and then press your user name. The LCD displays the list of secured jobs for that name. 47
-
 1
1 -
2
-
3
-
4
-
5
-
6
-
7
-
8
-
9
-
10
-
11
-
12
-
13
-
14
-
15
-
16
-
17
-
18
-
19
-
20
-
21
-
22
-
23
-
24
-
25
-
26
-
27
-
28
-
29
-
30
-
31
-
32
-
33
-
34
-
35
-
36
-
37
-
38
-
39
-
40
-
41
-
42
-
43
-
44
-
45
-
 46
46 -
 47
47 -
 48
48 -
 49
49 -
 50
50 -
 51
51 -
 52
52 -
 53
53 -
 54
54 -
 55
55 -
 56
56 -
57
-
58
-
59
-
60
-
61
-
62
-
63
-
64
-
65
-
66
-
67
-
68
-
69
-
70
-
71
-
72
-
73
-
74
-
75
-
76
-
77
-
78
-
79
-
80
-
81
-
82
-
83
-
84
-
85
-
86
-
87
-
88
-
89
-
90
-
91
-
92
-
93
-
94
-
95
-
96
-
97
-
98
-
99
-
100
-
101
-
102
-
103
-
104
-
105
-
106
-
107
-
108
-
109
-
110
-
111
-
112
-
113
-
114
-
115
-
116
-
117
-
118
-
119
-
120
-
121
-
122
-
123
-
124
-
125
-
126
-
127
-
128
-
129
-
130
-
131
-
132
-
133
-
134
-
135
-
136
-
137
-
138
-
139
-
140
-
141
-
142
-
143
-
144
-
145
-
146
-
147
-
148
-
149
-
150
-
151
-
152
-
153
-
154
-
155
-
156
-
157
-
158
-
159
-
160
-
161
-
162
-
163
-
164
-
165
-
166
-
167
-
168
-
169
-
170
-
171
-
172
-
173
-
174
-
175
-
176
-
177
-
178
-
179
-
180
-
181
-
182
-
183
-
184
-
185
-
186
-
187
-
188
-
189
-
190
-
191
-
192
-
193
-
194
-
195
-
196
-
197
-
198
-
199
-
200
-
201
-
202
-
203
-
204
-
205
-
206
-
207
-
208
-
209
-
210
-
211
-
212
-
213
-
214
-
215
-
216
-
217
-
218
-
219
-
220
-
221
-
222
-
223
-
224
-
225
-
226
-
227
-
228
-
229
-
230
-
231
-
232
-
233
-
234
-
235
-
236
-
237
-
238
-
239
-
240
-
241
-
242
-
243
-
244
-
245
-
246
-
247
-
248
-
249
-
250
-
251
-
252
-
253
-
254
-
255
-
256
-
257
-
258
-
259
-
260
-
261
-
262
-
263
-
264
-
265
-
266
-
267
-
268
-
269
-
270
-
271
-
272
-
273
-
274
-
275
-
276
-
277
-
278
-
279
-
280
-
281
-
282
-
283
-
284
-
285
-
286
-
287
-
288
-
289
-
290
-
291
-
292
-
293
-
294
-
295
-
296
-
297
-
298
-
299
-
300
-
301
-
302
-
303
-
304
-
305
-
306
-
307
-
308
-
309
-
310
-
311
-
312
-
313
-
314
-
315
-
316
-
317
 |
 |