Konica Minolta bizhub C25 bizhub C25 Facsimile User Guide - Page 50
Specifying a Recipient, Directly Entering a Fax Number
 |
View all Konica Minolta bizhub C25 manuals
Add to My Manuals
Save this manual to your list of manuals |
Page 50 highlights
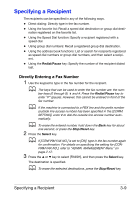
Specifying a Recipient The recipients can be specified in any of the following ways. - Direct dialing: Directly type in the fax number. - Using the favorite list: Recall a speed dial destination or group dial destination registered on the favorite list. - Using the Speed Dial function: Specify a recipient registered with a speed dial. - Using group dial numbers: Recall a registered group dial destination. - Using the address book functions: List or search for recipients registered as speed dial numbers or group dial numbers, and then select a recipient. - Using the Redial/Pause key: Specify the number of the recipient dialed last. Directly Entering a Fax Number 1 Use the keypad to type in the fax number for the recipient. d The keys that can be used to enter the fax number are: the num- ber keys (0 through 9), and #. Press the Redial/Pause key to enter "P" (pause). However, this cannot be entered in front of the fax number. d If the machine is connected to a PBX line and the prefix number (outside line access number) has been specified in the [COMM. SETTING], enter # to dial the outside line access number automatically. d To erase the entered number, hold down the Back key for about one second, or press the Stop/Reset key. 2 Press the Select key. d If [CONFIRM FAX NO.] is set to [ON], type in the fax number again for confirmation. For details on specifying the setting for [CONFIRM FAX NO.], refer to "ADMIN. MANAGEMENT Menu" on page 2-12. 3 Press the + or , key to select [FINISH], and then press the Select key. The destination is specified. d To erase the selected destinations, press the Stop/Reset key. Specifying a Recipient 3-9
-
 1
1 -
2
-
3
-
4
-
5
-
6
-
7
-
8
-
9
-
10
-
11
-
12
-
13
-
14
-
15
-
16
-
17
-
18
-
19
-
20
-
21
-
22
-
23
-
24
-
25
-
26
-
27
-
28
-
29
-
30
-
31
-
32
-
33
-
34
-
35
-
36
-
37
-
38
-
39
-
40
-
41
-
42
-
43
-
44
-
 45
45 -
 46
46 -
 47
47 -
 48
48 -
 49
49 -
 50
50 -
 51
51 -
 52
52 -
 53
53 -
 54
54 -
 55
55 -
56
-
57
-
58
-
59
-
60
-
61
-
62
-
63
-
64
-
65
-
66
-
67
-
68
-
69
-
70
-
71
-
72
-
73
-
74
-
75
-
76
-
77
-
78
-
79
-
80
-
81
-
82
-
83
-
84
-
85
-
86
-
87
-
88
-
89
-
90
-
91
-
92
-
93
-
94
-
95
-
96
-
97
-
98
-
99
-
100
-
101
-
102
-
103
-
104
-
105
-
106
-
107
-
108
-
109
-
110
-
111
-
112
-
113
-
114
-
115
-
116
-
117
-
118
-
119
-
120
-
121
 |
 |
