Konica Minolta bizhub C287 bizhub C287/C227 Security Operations User Manual - Page 105
Setting time/date in machine, 2.15.1 Setting time/date
 |
View all Konica Minolta bizhub C287 manuals
Add to My Manuals
Save this manual to your list of manuals |
Page 105 highlights
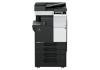
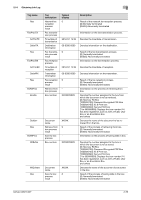
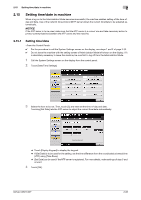
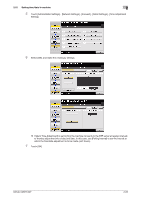
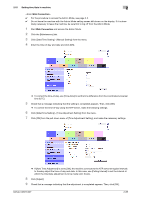
2.15 Setting time/date in machine 2 2.15 Setting time/date in machine When a log-on to the Administrator Mode becomes successful, the machine enables setting of the time-ofday and date. Use of the network time protocol (NTP) server allows the current time/date to be adjusted automatically. NOTICE If the NTP server is to be used, make sure that the NTP server is a correct one and take necessary action to protect communications between the NTP server and the machine. 2.15.1 Setting time/date 0 For the procedure to call the System Settings screen on the display, see steps 1 and 2 of page 2-32. 0 Do not leave the machine with the setting screen of Administrator Mode left shown on the display. If it is absolutely necessary to leave the machine, be sure first to log off from the Administrator Mode. 1 Call the System Settings screen on the display from the control panel. 2 Touch [Date/Time Settings] 3 Select the item to be set. Then, touch [C] and next set the time-of-day and date. Touching [Set Date] lets the NTP server to adjust the current time/date automatically. % Touch [Display Keypad] to display the keypad. % If [Set Date] is to be used for the setting, set the time difference from the coordinated universal time (UTC) using [Time Zone]. % [Set Date] can be used if the NTP server is registered. For more details, make settings of step 5 and onward. 4 Touch [OK]. bizhub C287/C227 2-83
-
 1
1 -
2
-
3
-
4
-
5
-
6
-
7
-
8
-
9
-
10
-
11
-
12
-
13
-
14
-
15
-
16
-
17
-
18
-
19
-
20
-
21
-
22
-
23
-
24
-
25
-
26
-
27
-
28
-
29
-
30
-
31
-
32
-
33
-
34
-
35
-
36
-
37
-
38
-
39
-
40
-
41
-
42
-
43
-
44
-
45
-
46
-
47
-
48
-
49
-
50
-
51
-
52
-
53
-
54
-
55
-
56
-
57
-
58
-
59
-
60
-
61
-
62
-
63
-
64
-
65
-
66
-
67
-
68
-
69
-
70
-
71
-
72
-
73
-
74
-
75
-
76
-
77
-
78
-
79
-
80
-
81
-
82
-
83
-
84
-
85
-
86
-
87
-
88
-
89
-
90
-
91
-
92
-
93
-
94
-
95
-
96
-
97
-
98
-
99
-
 100
100 -
 101
101 -
 102
102 -
 103
103 -
 104
104 -
 105
105 -
 106
106 -
 107
107 -
 108
108 -
 109
109 -
 110
110 -
111
-
112
-
113
-
114
-
115
-
116
-
117
-
118
-
119
-
120
-
121
-
122
-
123
-
124
-
125
-
126
-
127
-
128
-
129
-
130
-
131
-
132
-
133
-
134
-
135
-
136
-
137
-
138
-
139
-
140
-
141
-
142
-
143
-
144
-
145
-
146
-
147
-
148
-
149
-
150
-
151
-
152
-
153
-
154
-
155
-
156
-
157
-
158
 |
 |