Kyocera FS 1100 Service Manual - Page 90
Check the printer gets ready and Ready
 |
View all Kyocera FS 1100 manuals
Add to My Manuals
Save this manual to your list of manuals |
Page 90 highlights
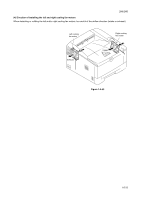
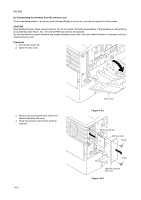
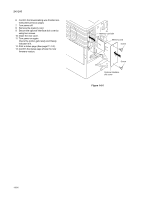
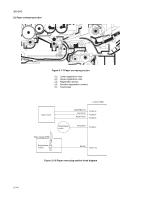
2H5/2HS 6. Confirm that downloading was finished normally (See previous page). 7. Turn power off. 8. Remove the memory card. 9. Secure the optional interface slot cover by using two screws. 10. Close the rear cover. 11. Turn power on again. Check the printer gets ready and Ready indicator is lit. 12. Print a status page (See page P.1-3-2). 13. Confirm the status page shows the new firmware version. Memory card slot Memory card Screw Screw Optional interface slot cover Figure 1-6-5 1-6-4
-
 1
1 -
2
-
3
-
4
-
5
-
6
-
7
-
8
-
9
-
10
-
11
-
12
-
13
-
14
-
15
-
16
-
17
-
18
-
19
-
20
-
21
-
22
-
23
-
24
-
25
-
26
-
27
-
28
-
29
-
30
-
31
-
32
-
33
-
34
-
35
-
36
-
37
-
38
-
39
-
40
-
41
-
42
-
43
-
44
-
45
-
46
-
47
-
48
-
49
-
50
-
51
-
52
-
53
-
54
-
55
-
56
-
57
-
58
-
59
-
60
-
61
-
62
-
63
-
64
-
65
-
66
-
67
-
68
-
69
-
70
-
71
-
72
-
73
-
74
-
75
-
76
-
77
-
78
-
79
-
80
-
81
-
82
-
83
-
84
-
 85
85 -
 86
86 -
 87
87 -
 88
88 -
 89
89 -
 90
90 -
 91
91 -
 92
92 -
 93
93 -
 94
94 -
 95
95 -
96
-
97
-
98
-
99
-
100
-
101
-
102
-
103
-
104
-
105
-
106
-
107
-
108
-
109
-
110
-
111
-
112
-
113
-
114
-
115
-
116
-
117
-
118
-
119
-
120
-
121
-
122
-
123
-
124
 |
 |

2H5/2HS
1-6-4
6.
Confirm that downloading was finished nor-
mally (See previous page).
7.
Turn power off.
8.
Remove the memory card.
9.
Secure the optional interface slot cover by
using two screws.
10. Close the rear cover.
11. Turn power on again.
Check the printer gets ready and Ready
indicator is lit.
12. Print a status page (See page P.1-3-2).
13. Confirm the status page shows the new
firmware version.
Figure 1-6-5
Screw
Optional interface
slot cover
Screw
Memory card
Memory card slot