Kyocera KM-C2230 Fiery X3e 22C-KM User Software Install Guide for KM-C2230 - Page 85
For Fiery Remote Scan, start the supported TWAIN-compliant software., Printing Guide
 |
View all Kyocera KM-C2230 manuals
Add to My Manuals
Save this manual to your list of manuals |
Page 85 highlights
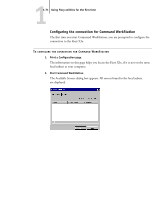
11-69 Using Fiery utilities for the first time TO CONFIGURE THE CONNECTION FOR FIERY UTILITIES 1. Start the utility for which you want to configure a connection. For Fiery Remote Scan, start the supported TWAIN-compliant software. For details, see the Printing Guide. 2. If the No Servers Configured dialog box appears, click OK. If the Choose Printer Device dialog box appears, click Add. 3. Enter the appropriate information for the Fiery X3e. Nickname-Enter a name for the Fiery X3e. This name does not have to match the actual Server Name of the Fiery X3e. NOTE: The nickname cannot contain any of the following seven characters space> Protocol-Choose the type of network protocol you are using from the menu. NOTE: Fiery utilities are not supported over IPX/SPX. Command WorkStation is supported on Windows computers over TCP/IP. Server Name-Enter the IP address (or DNS name) of the Fiery X3e. New Device-Enter the name of the device the Fiery X3e is connected to: 31C-M. NOTE: Type 31C-M exactly as shown because this term is case-sensitive. 4. When you have entered all the information, click Add.
-
 1
1 -
2
-
3
-
4
-
5
-
6
-
7
-
8
-
9
-
10
-
11
-
12
-
13
-
14
-
15
-
16
-
17
-
18
-
19
-
20
-
21
-
22
-
23
-
24
-
25
-
26
-
27
-
28
-
29
-
30
-
31
-
32
-
33
-
34
-
35
-
36
-
37
-
38
-
39
-
40
-
41
-
42
-
43
-
44
-
45
-
46
-
47
-
48
-
49
-
50
-
51
-
52
-
53
-
54
-
55
-
56
-
57
-
58
-
59
-
60
-
61
-
62
-
63
-
64
-
65
-
66
-
67
-
68
-
69
-
70
-
71
-
72
-
73
-
74
-
75
-
76
-
77
-
78
-
79
-
 80
80 -
 81
81 -
 82
82 -
 83
83 -
 84
84 -
 85
85 -
 86
86 -
 87
87 -
 88
88 -
 89
89 -
 90
90 -
91
-
92
-
93
-
94
-
95
-
96
-
97
-
98
-
99
-
100
-
101
-
102
-
103
-
104
-
105
-
106
-
107
-
108
-
109
-
110
-
111
-
112
-
113
-
114
-
115
-
116
-
117
-
118
-
119
-
120
-
121
-
122
-
123
-
124
-
125
-
126
-
127
-
128
-
129
-
130
-
131
-
132
-
133
-
134
-
135
-
136
 |
 |
