Kyocera TASKalfa 4550ci 3050ci/3550ci/4550ci/5550ci/6550ci/7550ci Driver Guide - Page 38
Multiple s per Sheet, Edit Quick Print, Editing Quick Print Options, Hide Edit Quick Print control - reviews
 |
View all Kyocera TASKalfa 4550ci manuals
Add to My Manuals
Save this manual to your list of manuals |
Page 38 highlights
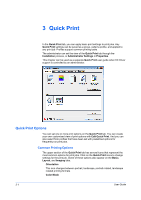
Quick Print 3-3 turns the paper over to allow printing on the reverse side. Print on both sides must be selected to print on both sides of the cover and insert pages. Flip on long edge Turn the long edge of the page to view the content. Flip on short edge Turn the short edge of the page to view the content. Multiple Pages per Sheet Multiple pages per sheet prints several pages on a single sheet of paper for the purpose of reviewing the document and conserving paper. The size and readability of the multiple pages decrease as the number of pages per sheet is increased. You can set the arrangement of the pages from the Layout tab as well as print borders around each of the pages. When Multiple pages per sheet is selected, Poster, Scaling, and Full bleed are unavailable. Edit Quick Print The assortment of icons at the top of the Quick Print tab can be customized to include features that you use most often. Any number of icons from 0 to 5 can be displayed. All icons can be removed from view if you want to use only the Profiles options in the Quick Print tab. The number of available features depends on the printing system model. If a feature, such as Staple, is added to the Quick Print tab but a finishing device is not installed, the icon appears as unavailable. Once the device is installed and selected in Device Settings, the icon becomes active. Note: An administrator can hide the Edit Quick Print button by selecting Hide Edit Quick Print control in Device Settings > Administrator Settings. The Edit Quick Print button is unavailable when the driver is accessed from an application's Print dialog box. Editing Quick Print Options You can select from a limited set of driver features to appear in the Quick Print tab. 1 Click Start and click Devices and Printers (Windows 7), or click Control Panel and double-click Printers (Windows Vista), or Printers and Faxes (Windows XP). 2 Right-click on the desired printing system model and click Printing Preferences. 3 Select the Quick Print tab. 4 Click Edit Quick Print. To add a feature to the Quick Print tab, select the feature under Available controls, and click the right arrow to move the feature to Selected controls. A maximum of 5 features can appear under Selected controls. To remove a feature from the Quick Print tab, select the feature under Selected controls, and click the left arrow to move the feature to Available controls. To use only the Profiles in the Quick Print tab, move all features to Available controls. User Guide
-
 1
1 -
2
-
3
-
4
-
5
-
6
-
7
-
8
-
9
-
10
-
11
-
12
-
13
-
14
-
15
-
16
-
17
-
18
-
19
-
20
-
21
-
22
-
23
-
24
-
25
-
26
-
27
-
28
-
29
-
30
-
31
-
32
-
 33
33 -
 34
34 -
 35
35 -
 36
36 -
 37
37 -
 38
38 -
 39
39 -
 40
40 -
 41
41 -
 42
42 -
 43
43 -
44
-
45
-
46
-
47
-
48
-
49
-
50
-
51
-
52
-
53
-
54
-
55
-
56
-
57
-
58
-
59
-
60
-
61
-
62
-
63
-
64
-
65
-
66
-
67
-
68
-
69
-
70
-
71
-
72
-
73
-
74
-
75
-
76
-
77
-
78
-
79
-
80
-
81
-
82
-
83
-
84
-
85
-
86
-
87
-
88
-
89
-
90
-
91
-
92
-
93
-
94
-
95
-
96
-
97
-
98
-
99
-
100
-
101
-
102
-
103
-
104
-
105
 |
 |