Kyocera TASKalfa 4550ci 3050ci/3550ci/4550ci/5550ci/6550ci/7550ci Driver Guide - Page 70
Adjusting Color Balance, Color Conversion
 |
View all Kyocera TASKalfa 4550ci manuals
Add to My Manuals
Save this manual to your list of manuals |
Page 70 highlights
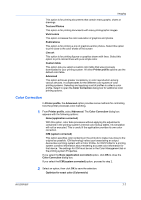
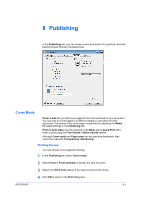
Imaging 6 Adjust the distribution and balance of hues. For coordinated hue adjustment, from the Modify list, select Master. Drag the Hue slider to increase or decrease the value between -180 and +180. For specific hue adjustment, from the Modify list, select Red, Yellow, Green, Cyan, Blue, or Magenta. Drag the Hue slider to increase or decrease the value between -10 and +10. 7 Drag each slider to adjust the Saturation, Lightness, and Contrast between 10 and +10. 8 Click OK to save the new HSL settings. Adjusting Color Balance Color balance adjusts only the relative values of the colors red, green, and blue of RGB, or cyan, magenta, and yellow of Full color. 1 In Imaging > Color mode, select Full color. 2 In the Adjustment list, select Edit. 3 In Adjustment Settings > Custom color adjustment, select Custom 1, Custom 2, or Custom 3. 4 Select Color balance. 5 Under Select Preview image, click the icon to select one of three different images. Different colors are emphasized in each of the photographs to aid in the color adjustment process. 6 Under each color bar, drag the slider to adjust the relative values of each color between -10 and +10. 7 If you want to return all Color balance settings to zero, click Reset. 8 Click OK to save the new Color balance settings. The side panel displays these new settings. Color Conversion Color conversion lets you choose how to apply color processing to your print job depending on how color data is received from the application. This feature is available if KPDL is selected in the PDL Settings dialog box. In Imaging > Color conversion, select from the following options: Printer settings Select this option to use the settings currently on the device. Speed priority Select this option if the driver receives RGB data from the application. Quality priority 7-10 User Guide
-
 1
1 -
2
-
3
-
4
-
5
-
6
-
7
-
8
-
9
-
10
-
11
-
12
-
13
-
14
-
15
-
16
-
17
-
18
-
19
-
20
-
21
-
22
-
23
-
24
-
25
-
26
-
27
-
28
-
29
-
30
-
31
-
32
-
33
-
34
-
35
-
36
-
37
-
38
-
39
-
40
-
41
-
42
-
43
-
44
-
45
-
46
-
47
-
48
-
49
-
50
-
51
-
52
-
53
-
54
-
55
-
56
-
57
-
58
-
59
-
60
-
61
-
62
-
63
-
64
-
 65
65 -
 66
66 -
 67
67 -
 68
68 -
 69
69 -
 70
70 -
 71
71 -
 72
72 -
 73
73 -
 74
74 -
 75
75 -
76
-
77
-
78
-
79
-
80
-
81
-
82
-
83
-
84
-
85
-
86
-
87
-
88
-
89
-
90
-
91
-
92
-
93
-
94
-
95
-
96
-
97
-
98
-
99
-
100
-
101
-
102
-
103
-
104
-
105
 |
 |