LG LGP990HN User Guide - Page 74
Using the advanced, settings
 |
View all LG LGP990HN manuals
Add to My Manuals
Save this manual to your list of manuals |
Page 74 highlights
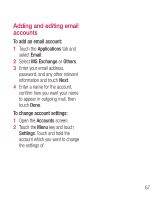
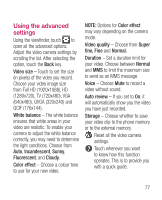
Camera Using the advanced settings In the viewfinder, touch to open all advanced options. You can change the camera setting by scrolling the list. After selecting the option, touch the Back key. Image size - Touch to set the size (in pixels) of the picture you are taking. Select a pixel value from the options: 8M (3264x2448), 5M (2560x1920), 3M (2048x1536), 2M (1600x1200), 1M (1280x960), VGA (640x480), QVGA (320x240). NOTE: Options for Image size may vary depending on the camera mode. Focus - Touch this icon to select the options menu. See Using the focus mode. Scene mode - Choose from Auto, Portrait, Landscape, Sports, Sunset and Night. ISO - The ISO rating determines the sensitivity of the camera's light sensor. The higher the ISO, the more sensitive the camera will be. This is useful under darker conditions when you cannot use the flash. Select from ISO values of Auto, 800, 400, 200 and 100. White balance - Choose from Auto, Incandescent, Sunny, Fluorescent, and Cloudy. Color effect - Choose a colour tone for your new photo. NOTE: • Options for Color effect may vary depending on the camera mode. • Solarize for Color effect is only supported in internal camera mode. • Blue, Emboss, Posterize, and Vivid for Color effect are supported only in external camera mode. 72
-
 1
1 -
2
-
3
-
4
-
5
-
6
-
7
-
8
-
9
-
10
-
11
-
12
-
13
-
14
-
15
-
16
-
17
-
18
-
19
-
20
-
21
-
22
-
23
-
24
-
25
-
26
-
27
-
28
-
29
-
30
-
31
-
32
-
33
-
34
-
35
-
36
-
37
-
38
-
39
-
40
-
41
-
42
-
43
-
44
-
45
-
46
-
47
-
48
-
49
-
50
-
51
-
52
-
53
-
54
-
55
-
56
-
57
-
58
-
59
-
60
-
61
-
62
-
63
-
64
-
65
-
66
-
67
-
68
-
 69
69 -
 70
70 -
 71
71 -
 72
72 -
 73
73 -
 74
74 -
 75
75 -
 76
76 -
 77
77 -
 78
78 -
 79
79 -
80
-
81
-
82
-
83
-
84
-
85
-
86
-
87
-
88
-
89
-
90
-
91
-
92
-
93
-
94
-
95
-
96
-
97
-
98
-
99
-
100
-
101
-
102
-
103
-
104
-
105
-
106
-
107
-
108
-
109
-
110
-
111
-
112
-
113
-
114
-
115
-
116
-
117
-
118
 |
 |
