LG LP070HED1 Service Manual - Page 17
Power Cord, 3.6 P.c.b. - appliances
 |
View all LG LP070HED1 manuals
Add to My Manuals
Save this manual to your list of manuals |
Page 17 highlights
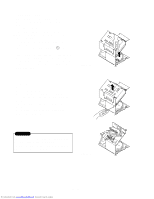
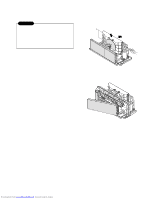
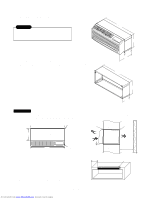
2.3.5 POWER CORD 1. Remove the control box. (Refer to section 2.1.2) 2. Disconnect the grounding screw from the control box. 3. Disconnect 2 receptacles. 4. Remove a screw which fastens the clip cord. 5. Separate the power cord from the control box. (See Figure 13) 6. Re-install the component by referring to the removal procedure, above. (Use only one ground-marked hole for ground connection.) 7. If the supply cord of this appliance is damaged, it must be replaced by an exact replacement part. (The special cord means the cord which has the same specification marked on the supply cord fitted to the unit.) Figure 13 2.3.6 P.C.B. 1. Remove the escutcheon. 2. Remove the two knobs. 3. Remove the 2 screws which fasten P.C.B. cover. 4. Disconnect all the leads which connected to the P.C.B. 5. Remove the two screws which fasten the P.C.B. board. 6. Re-install the components by referring to the removal procedure, above. WARNING After servicing control box ,make sure that AC and DC wires are separated and tied up properly. The wires should also be pressed a little downwards to prevent touching it to the display pcb. Figure 14 Downloaded from www.Manualslib.com manuals search engine -17-
-
 1
1 -
2
-
3
-
4
-
5
-
6
-
7
-
8
-
9
-
10
-
11
-
 12
12 -
 13
13 -
 14
14 -
 15
15 -
 16
16 -
 17
17 -
 18
18 -
 19
19 -
 20
20 -
 21
21 -
 22
22 -
23
-
24
-
25
-
26
-
27
-
28
-
29
-
30
-
31
-
32
-
33
-
34
-
35
-
36
-
37
-
38
-
39
-
40
-
41
-
42
-
43
-
44
-
45
-
46
-
47
-
48
-
49
-
50
-
51
-
52
-
53
-
54
-
55
-
56
-
57
-
58
-
59
 |
 |
