LG LP070HED1 Service Manual - Page 26
Unit Installation
 |
View all LG LP070HED1 manuals
Add to My Manuals
Save this manual to your list of manuals |
Page 26 highlights
3.2.3 UNIT INSTALLATION 1. Remove the shipping screw from the ventilation door. (See Figure 20) 2. Remove the front gille by pulling it out at the bottom to release it, then lift it up along the unit top front. (See Figure 21) Figure 20 3. Slide the unit into the wall sleeve and secure with 6 screws through the unit flange holes. (See Figure 22) Figure 21 4. Reinstall the front grille by hooking the top over the unit top, then pushing it in at the bottom. (See Figure 23) Figure 22 Downloaded from www.Manualslib.com manuals search engine Figure 23 -26-
-
 1
1 -
2
-
3
-
4
-
5
-
6
-
7
-
8
-
9
-
10
-
11
-
12
-
13
-
14
-
15
-
16
-
17
-
18
-
19
-
20
-
 21
21 -
 22
22 -
 23
23 -
 24
24 -
 25
25 -
 26
26 -
 27
27 -
 28
28 -
 29
29 -
 30
30 -
 31
31 -
32
-
33
-
34
-
35
-
36
-
37
-
38
-
39
-
40
-
41
-
42
-
43
-
44
-
45
-
46
-
47
-
48
-
49
-
50
-
51
-
52
-
53
-
54
-
55
-
56
-
57
-
58
-
59
 |
 |

—26—
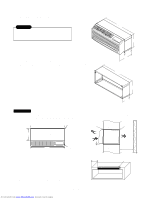
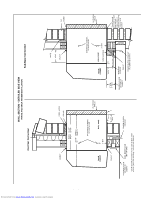
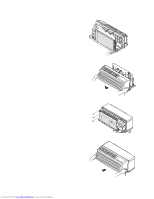
3.2.3 UNIT INSTALLATION
1. Remove the shipping screw from the ventilation door.
(See Figure 20)
2. Remove the front gille by pulling it out at the bottom to
release it, then lift it up along the unit top front.
(See Figure 21)
3. Slide the unit into the wall sleeve and secure with 6 screws
through the unit flange holes. (See Figure 22)
4. Reinstall the front grille by hooking the top over the unit top,
then pushing it in at the bottom. (See Figure 23)
Figure 20
Figure 21
Figure 22
Figure 23
Downloaded from
www.Manualslib.com
manuals search engine