LG LP070HED1 Service Manual - Page 21
Installation
 |
View all LG LP070HED1 manuals
Add to My Manuals
Save this manual to your list of manuals |
Page 21 highlights
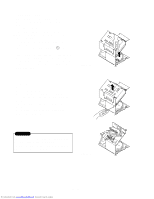
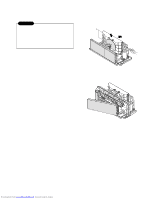
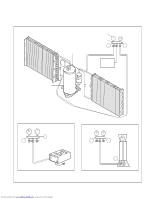
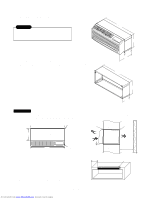
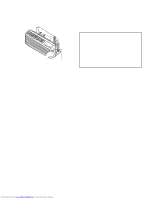
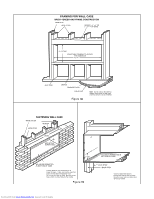
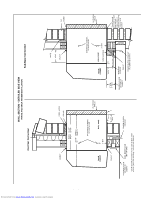
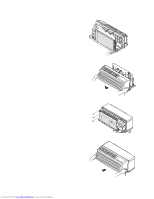
3. INSTALLATION 3.1 HOW TO INSTALL THE UNIT CAUTION • There are sharp edges that can cause serious cuts. • When lifting the air conditioner, it is HEAVY. Use 2 people to lift. For existing sleeve, you should measure the wall sleeve dimensions. Install the new air conditioner according to these installation instructions to achieve the best performence. All wall sleeves used to mount the new air conditioner must be in good structural condition and have a rear grille that securely attaches to the sleeve or the flange of the sleeve to secure the new air conditioner. • To avoid vibration and noise, make sure the unit is installed securely and firmly. Dimension of air conditioner 1,066 mm (42") 406 mm (16") 349 mm (13 3/4") 505 mm (20") Dimension of sleeve assembly (optional) 1066 mm (42") When installing the sleeve, make certain there is nothing within 20" of the back that would interfere with heat radiation and exhaust air flow. 406 mm (16") 349 mm (13 3/4") Wall opening 16-1/4"x42-1/4" Recommended Insulation strip must be attached to prevent the re-circulation of exhaust air to inward side from the either side of condenser space. The insulation strip is provided with the box. Refer to the diagram below. GRILLE INSULATION WALL SLEEVE 13-3/4" TOP VIEW COOLED AIR INTAKE AIR HEAT RADIATION 1/4" Bubble of the level 42" ROOM CABINET WALL Over 20" 1) Take out the insulation strip from the upper packing. 2) Attach the insulation strip onto the rear upper side of the wall sleeve. 3) To improve unit energy efficiency, it is recommended the change of outside grille for an unit protection and an addition of a plastic rear grille. (This is optional.) 4) Insulation strip prevents the exhaust air from re-entering from either side of condenser space which may decrease the cooling efficiency of condenser. 280 mm (11") Front Sleeve Insulation Strip Rear -21- Downloaded from www.Manualslib.com manuals search engine
-
 1
1 -
2
-
3
-
4
-
5
-
6
-
7
-
8
-
9
-
10
-
11
-
12
-
13
-
14
-
15
-
 16
16 -
 17
17 -
 18
18 -
 19
19 -
 20
20 -
 21
21 -
 22
22 -
 23
23 -
 24
24 -
 25
25 -
 26
26 -
27
-
28
-
29
-
30
-
31
-
32
-
33
-
34
-
35
-
36
-
37
-
38
-
39
-
40
-
41
-
42
-
43
-
44
-
45
-
46
-
47
-
48
-
49
-
50
-
51
-
52
-
53
-
54
-
55
-
56
-
57
-
58
-
59
 |
 |
