Lenovo NetVista A22 User guide for NetVista 2254, 2256, 2257, 6336, 6337, 6339 - Page 68
Configuring PCI adapters, Configuring startup devices
 |
View all Lenovo NetVista A22 manuals
Add to My Manuals
Save this manual to your list of manuals |
Page 68 highlights
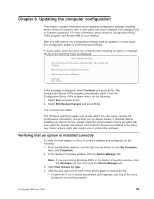
v An X over an icon indicates that the device is disabled. A circled exclamation point over an icon indicates a resource conflict. If an X or a circled exclamation point appears over an icon, click Properties to learn more about the source of the problem. v If the device is not listed, it might not be installed correctly. Make sure that the option is installed according to instructions, all cables and connections are secure, and any jumper or switch settings are correct. v If the device is listed under "Other devices," a required device driver is either missing or installed incorrectly, or the operating system was not restarted after the device driver was installed. Restart the computer and check the device again. If it is still listed under "Other devices," refer to the documentation that comes with the option, and reinstall the device driver. Note: For further information, refer to the manual for the operating system. Configuring PCI adapters Along with the documentation that comes with your adapter, use the following information to help with adapter configuration. PCI adapters generally require no user configuration. The computer and operating system work together to automatically manage the resources that are required by each device that is installed in the computer and to assign resources to new devices in a manner that avoids system conflicts. Configuring startup devices When your computer is turned on, it searches for an operating system. The order in which it searches devices for the operating system is the startup sequence. After adding new devices to the computer, you might want to change the startup sequence. You can use the Configuration/Setup Utility program to configure startup devices. For more information, see Access IBM on your desktop. Erasing a lost or forgotten password (clearing CMOS) This section applies to lost or forgotten passwords. For more information about lost or forgotten passwords, see Access IBM on your desktop. To erase a forgotten password: 1. Turn off the computer and all attached devices. 2. Unplug the power cord. 3. Remove the cover. See "Removing the cover" on page 19 (small desktop model), "Removing the cover" on page 29 (desktop model), or "Removing the cover" on page 41 (microtower model). 4. Locate the Virtual Clear CMOS/BIOS Recovery jumper (JP14) on the system board. See "Identifying parts on the system board" on page 20 (small desktop model), "Identifying parts on the system board" on page 30 (desktop model), or "Identifying parts on the system board" on page 44 (microtower model). Note: Your system board might have two similar jumpers in the location indicated. Make sure you move the jumper labelled JP14. 5. Move the jumper on JP14 from the NORMAL position to the ROM RECOVERY position. 56 User Guide
-
 1
1 -
2
-
3
-
4
-
5
-
6
-
7
-
8
-
9
-
10
-
11
-
12
-
13
-
14
-
15
-
16
-
17
-
18
-
19
-
20
-
21
-
22
-
23
-
24
-
25
-
26
-
27
-
28
-
29
-
30
-
31
-
32
-
33
-
34
-
35
-
36
-
37
-
38
-
39
-
40
-
41
-
42
-
43
-
44
-
45
-
46
-
47
-
48
-
49
-
50
-
51
-
52
-
53
-
54
-
55
-
56
-
57
-
58
-
59
-
60
-
61
-
62
-
 63
63 -
 64
64 -
 65
65 -
 66
66 -
 67
67 -
 68
68 -
 69
69 -
 70
70 -
 71
71 -
 72
72 -
 73
73 -
74
-
75
-
76
-
77
-
78
-
79
-
80
-
81
-
82
-
83
-
84
-
85
-
86
 |
 |
