Lenovo ThinkCentre A30 Hardware Maintenance Manual (HMM) for ThinkCentre 2296, - Page 57
master/slave
 |
View all Lenovo ThinkCentre A30 manuals
Add to My Manuals
Save this manual to your list of manuals |
Page 57 highlights
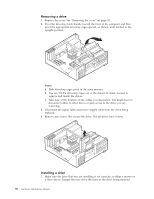
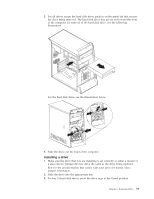
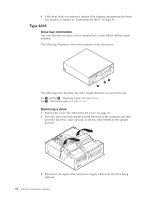
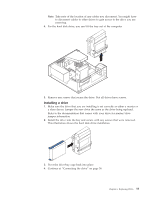
Refer to the documentation that comes with your drive for master/slave jumper information. 2. Install the drive into the bay as shown. 3. Secure the new drive (if necessary) with the screws that were removed. 4. If necessary, place the drive-bay cages back into the chassis. 5. Continue at "Connecting the drive" on page 56. Types 8198 and 8199 Drive bay information Any bay that does not have a drive installed has a static shield and bay panel installed. The following illustration shows the locations of the drive bays. Chapter 6. Replacing FRUs 51
-
 1
1 -
2
-
3
-
4
-
5
-
6
-
7
-
8
-
9
-
10
-
11
-
12
-
13
-
14
-
15
-
16
-
17
-
18
-
19
-
20
-
21
-
22
-
23
-
24
-
25
-
26
-
27
-
28
-
29
-
30
-
31
-
32
-
33
-
34
-
35
-
36
-
37
-
38
-
39
-
40
-
41
-
42
-
43
-
44
-
45
-
46
-
47
-
48
-
49
-
50
-
51
-
 52
52 -
 53
53 -
 54
54 -
 55
55 -
 56
56 -
 57
57 -
 58
58 -
 59
59 -
 60
60 -
 61
61 -
 62
62 -
63
-
64
-
65
-
66
-
67
-
68
-
69
-
70
-
71
-
72
-
73
-
74
-
75
-
76
-
77
-
78
-
79
-
80
-
81
-
82
-
83
-
84
-
85
-
86
-
87
-
88
-
89
-
90
-
91
-
92
-
93
-
94
-
95
-
96
-
97
-
98
-
99
-
100
-
101
-
102
-
103
-
104
-
105
-
106
-
107
-
108
-
109
-
110
-
111
-
112
-
113
-
114
-
115
-
116
-
117
-
118
-
119
-
120
-
121
-
122
-
123
-
124
-
125
-
126
-
127
-
128
-
129
-
130
-
131
-
132
-
133
-
134
-
135
-
136
-
137
-
138
-
139
-
140
-
141
-
142
-
143
-
144
-
145
-
146
-
147
-
148
-
149
-
150
-
151
-
152
-
153
-
154
-
155
-
156
-
157
-
158
-
159
-
160
-
161
-
162
-
163
-
164
-
165
-
166
-
167
-
168
-
169
-
170
-
171
-
172
-
173
-
174
-
175
-
176
-
177
-
178
-
179
-
180
-
181
-
182
-
183
-
184
-
185
-
186
-
187
-
188
-
189
-
190
-
191
-
192
 |
 |

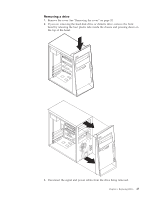
Refer
to
the
documentation
that
comes
with
your
drive
for
master/slave
jumper
information.
2.
Install
the
drive
into
the
bay
as
shown.
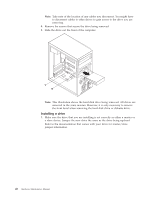
3.
Secure
the
new
drive
(if
necessary)
with
the
screws
that
were
removed.
4.
If
necessary,
place
the
drive-bay
cages
back
into
the
chassis.
5.
Continue
at
“Connecting
the
drive”
on
page
56.
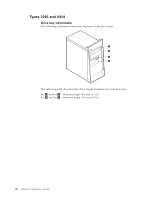
Types
8198
and
8199
Drive
bay
information
Any
bay
that
does
not
have
a
drive
installed
has
a
static
shield
and
bay
panel
installed.
The
following
illustration
shows
the
locations
of
the
drive
bays.
Chapter
6.
Replacing
FRUs
51