Lenovo ThinkPad X1 Hardware Maintenance Manual - Page 41
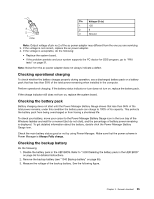
Checking operational charging, Checking the battery pack, Checking the backup battery - battery life
 |
View all Lenovo ThinkPad X1 manuals
Add to My Manuals
Save this manual to your list of manuals |
Page 41 highlights
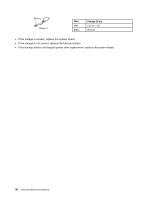
3 2 1 (20V) Pin Voltage (V dc) 1 +20 2 0 3 Ground Note: Output voltage of pin no.2 of the ac power adapter may different from the one you are servicing. 3. If the voltage is not correct, replace the ac power adapter. 4. If the voltage is acceptable, do the following: • Replace the system board. • If the problem persists and your system supports the PC doctor for DOS program, go to "FRU tests" on page 31. Note: Noise from the ac power adapter does not always indicate a defect. Checking operational charging To check whether the battery charges properly during operation, use a discharged battery pack or a battery pack that has less than 50% of the total power remaining when installed in the computer. Perform operational charging. If the battery status indicator or icon does not turn on, replace the battery pack. If the charge indicator still does not turn on, replace the system board. Checking the battery pack Battery charging does not start until the Power Manager Battery Gauge shows that less than 96% of the total power remains; under this condition the battery pack can charge to 100% of its capacity. This protects the battery pack from being overcharged or from having a shortened life. To check your battery, move your cursor to the Power Manager Battery Gauge icon in the icon tray of the Windows taskbar and wait for a moment (but do not click), and the percentage of battery power remaining is displayed. To get detailed information about the battery, double-click the Power Manager Battery Gauge icon. Check the main battery status good or not by using Power Manager. Make sure that the power scheme in Power Manager is Always Fully charge. Checking the backup battery Do the following: 1. Disable the battery pack in the UEFI BIOS. Refer to "1000 Disabling the battery pack in the UEFI BIOS" on page 58 for detailed instructions. 2. Remove the backup battery (see "1040 Backup battery" on page 65). 3. Measure the voltage of the backup battery. See the following figure. Chapter 3. General checkout 35
-
 1
1 -
2
-
3
-
4
-
5
-
6
-
7
-
8
-
9
-
10
-
11
-
12
-
13
-
14
-
15
-
16
-
17
-
18
-
19
-
20
-
21
-
22
-
23
-
24
-
25
-
26
-
27
-
28
-
29
-
30
-
31
-
32
-
33
-
34
-
35
-
 36
36 -
 37
37 -
 38
38 -
 39
39 -
 40
40 -
 41
41 -
 42
42 -
 43
43 -
 44
44 -
 45
45 -
 46
46 -
47
-
48
-
49
-
50
-
51
-
52
-
53
-
54
-
55
-
56
-
57
-
58
-
59
-
60
-
61
-
62
-
63
-
64
-
65
-
66
-
67
-
68
-
69
-
70
-
71
-
72
-
73
-
74
-
75
-
76
-
77
-
78
-
79
-
80
-
81
-
82
-
83
-
84
-
85
-
86
-
87
-
88
-
89
-
90
-
91
-
92
-
93
-
94
-
95
-
96
-
97
-
98
-
99
-
100
-
101
-
102
-
103
-
104
-
105
-
106
-
107
-
108
-
109
-
110
-
111
-
112
-
113
-
114
-
115
-
116
-
117
-
118
-
119
-
120
-
121
-
122
-
123
-
124
-
125
-
126
 |
 |