Lenovo ThinkPad X1 Hardware Maintenance Manual - Page 95
LCD bezel assembly, Removal steps of LED sub card and microphone
 |
View all Lenovo ThinkPad X1 manuals
Add to My Manuals
Save this manual to your list of manuals |
Page 95 highlights
Removal steps of LED sub card and microphone 12 3 12 Step 2 Screw (quantity) M 2 x 3 mm (2) Color Black Torque 0.181 Nm 1.85 kgfcm 2050 LCD bezel assembly For access, disable the battery pack first. Refer to "1000 Disabling the battery pack in the UEFI BIOS" on page 58 for detailed instructions. Then remove these FRUs in order: • "1010 Hard disk drive and solid state drive" on page 59 • "1020 Keyboard" on page 61 • "1090 Keyboard bezel assembly with fingerprint reader and audio sub card " on page 71 • "2010 LCD unit" on page 84 • "2020 LCD bezel cover" on page 86 • "2030 Hinges" on page 87 Chapter 8. Removing and replacing a FRU 89
-
 1
1 -
2
-
3
-
4
-
5
-
6
-
7
-
8
-
9
-
10
-
11
-
12
-
13
-
14
-
15
-
16
-
17
-
18
-
19
-
20
-
21
-
22
-
23
-
24
-
25
-
26
-
27
-
28
-
29
-
30
-
31
-
32
-
33
-
34
-
35
-
36
-
37
-
38
-
39
-
40
-
41
-
42
-
43
-
44
-
45
-
46
-
47
-
48
-
49
-
50
-
51
-
52
-
53
-
54
-
55
-
56
-
57
-
58
-
59
-
60
-
61
-
62
-
63
-
64
-
65
-
66
-
67
-
68
-
69
-
70
-
71
-
72
-
73
-
74
-
75
-
76
-
77
-
78
-
79
-
80
-
81
-
82
-
83
-
84
-
85
-
86
-
87
-
88
-
89
-
 90
90 -
 91
91 -
 92
92 -
 93
93 -
 94
94 -
 95
95 -
 96
96 -
 97
97 -
 98
98 -
 99
99 -
 100
100 -
101
-
102
-
103
-
104
-
105
-
106
-
107
-
108
-
109
-
110
-
111
-
112
-
113
-
114
-
115
-
116
-
117
-
118
-
119
-
120
-
121
-
122
-
123
-
124
-
125
-
126
 |
 |
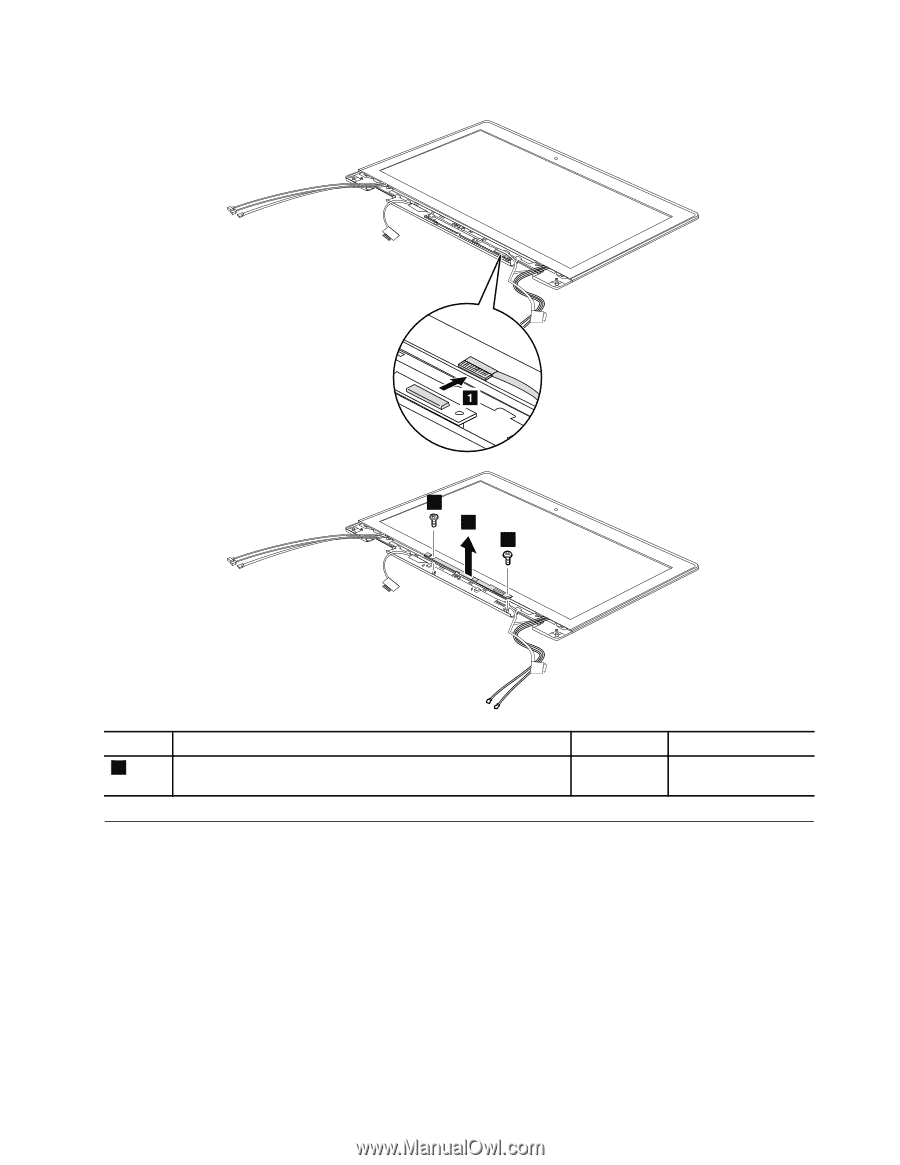
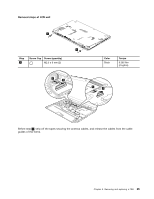
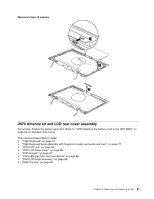
Removal steps of LED sub card and microphone
3
2
2
Step
Screw (quantity)
Color
Torque
2
M 2 x 3 mm (2)
Black
0.181 Nm
1.85 kgfcm
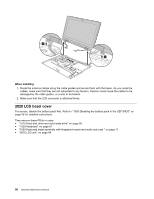
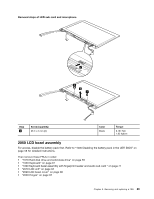
2050 LCD bezel assembly
For access, disable the battery pack first. Refer to “1000 Disabling the battery pack in the UEFI BIOS” on
page 58 for detailed instructions.
Then remove these FRUs in order:
•
“1010 Hard disk drive and solid state drive” on page 59
•
“1020 Keyboard” on page 61
•
“1090 Keyboard bezel assembly with fingerprint reader and audio sub card ” on page 71
•
“2010 LCD unit” on page 84
•
“2020 LCD bezel cover” on page 86
•
“2030 Hinges” on page 87
Chapter 8
.
Removing and replacing a FRU
89