Lenovo ThinkPad Yoga 12 (English) User Guide - ThinkPad Yoga 12 - Page 81
Installing device drivers, Using the ThinkPad Setup program, UEFI/Legacy Boot, Attention
 |
View all Lenovo ThinkPad Yoga 12 manuals
Add to My Manuals
Save this manual to your list of manuals |
Page 81 highlights
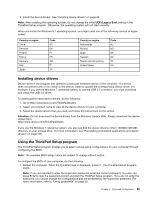
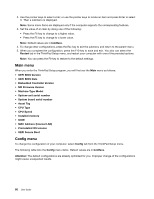
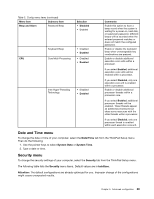
8. Install the device drivers. See "Installing device drivers" on page 65. Note: After installing the operating system, do not change the initial UEFI/Legacy Boot setting in the ThinkPad Setup program. Otherwise, the operating system will not start correctly. When you install the Windows 8.1 operating system, you might need one of the following country or region codes: Country or region China Denmark Finland France Germany Italy Japan Code SC DK FI FR GR IT JP Country or region Netherlands Norway Spain Sweden Taiwan and Hong Kong United States Code NL NO SP SV TC US Installing device drivers Device driver is the program that operates a particular hardware device of the computer. If a device does not perform well or you install a new device, install or update the corresponding device driver. For example, if you use the Windows 7 operating system, to use the USB 3.0 connector, you must download and install the USB 3.0 driver. To download the latest device drivers, do the following: 1. Go to http://www.lenovo.com/ThinkPadDrivers. 2. Select your product name to view all the device drivers for your computer. 3. Select the device drivers that you need, and follow the instructions on the screen. Attention: Do not download the device drivers from the Windows Update Web. Always download the device drivers from: http://www.lenovo.com/ThinkPadDrivers If you use the Windows 7 operating system, you also can find the device drivers in the C:\SWTOOLS\DRIVERS directory on your storage drive. For more information, see "Reinstalling preinstalled applications and device drivers" on page 105. Using the ThinkPad Setup program The ThinkPad Setup program enables you to select various setup configurations for your computer through configuring the BIOS. Note: The available BIOS setup menus are subject to change without notice. To configure the BIOS of your computer, do the following: 1. Restart the computer. When the ThinkPad logo is displayed, press F1. The ThinkPad Setup program starts. Note: If you are required to enter the supervisor password, enter the correct password. You also can press Enter to skip the password prompt and start the ThinkPad Setup program. If you do not enter the password, you cannot change the configurations that are protected by the supervisor password. For more information, refer to "Using passwords" on page 55. Chapter 5. Advanced configuration 65
-
 1
1 -
2
-
3
-
4
-
5
-
6
-
7
-
8
-
9
-
10
-
11
-
12
-
13
-
14
-
15
-
16
-
17
-
18
-
19
-
20
-
21
-
22
-
23
-
24
-
25
-
26
-
27
-
28
-
29
-
30
-
31
-
32
-
33
-
34
-
35
-
36
-
37
-
38
-
39
-
40
-
41
-
42
-
43
-
44
-
45
-
46
-
47
-
48
-
49
-
50
-
51
-
52
-
53
-
54
-
55
-
56
-
57
-
58
-
59
-
60
-
61
-
62
-
63
-
64
-
65
-
66
-
67
-
68
-
69
-
70
-
71
-
72
-
73
-
74
-
75
-
 76
76 -
 77
77 -
 78
78 -
 79
79 -
 80
80 -
 81
81 -
 82
82 -
 83
83 -
 84
84 -
 85
85 -
 86
86 -
87
-
88
-
89
-
90
-
91
-
92
-
93
-
94
-
95
-
96
-
97
-
98
-
99
-
100
-
101
-
102
-
103
-
104
-
105
-
106
-
107
-
108
-
109
-
110
-
111
-
112
-
113
-
114
-
115
-
116
-
117
-
118
-
119
-
120
-
121
-
122
-
123
-
124
-
125
-
126
-
127
-
128
-
129
-
130
-
131
-
132
-
133
-
134
-
135
-
136
-
137
-
138
-
139
-
140
-
141
-
142
-
143
-
144
-
145
-
146
-
147
-
148
-
149
-
150
-
151
-
152
-
153
-
154
-
155
-
156
 |
 |