Lenovo ThinkServer RD330 Hardware Maintenance Manual - ThinkServer RD330 - Page 161
Replacing the system board, the system board battery, you must reset passwords
 |
View all Lenovo ThinkServer RD330 manuals
Add to My Manuals
Save this manual to your list of manuals |
Page 161 highlights
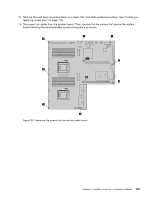
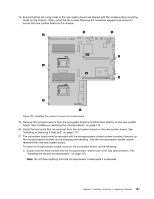
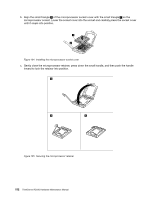
5. Remove the old system board battery. Figure 97. Removing the system board battery 6. Install a new system board battery. Figure 98. Installing the system board battery 7. If you have lifted up the riser card assembly 1, reinstall it into the chassis. See "Replacing the riser card assembly 1" on page 143. 8. Dispose of the old system board battery as required by local ordinances or regulations. What to do next: • To work with another piece of hardware, go to the appropriate section. • To complete the replacement, go to "Completing the parts replacement" on page 153. After you replace the system board battery, you must reset passwords, reset system date and time, and reconfigure the server. See Chapter 5 "Configuring the server" on page 45. Replacing the system board Attention: Do not open your server or attempt any repair before reading and understanding "Safety information" on page iii and "Guidelines" on page 67. This topic provides instructions on how to replace the system board. Note: This procedure must be performed only by trained service personnel of Lenovo. CAUTION: Hazardous moving parts. Keep fingers and other body parts away. Chapter 6. Installing, removing, or replacing hardware 147
-
 1
1 -
2
-
3
-
4
-
5
-
6
-
7
-
8
-
9
-
10
-
11
-
12
-
13
-
14
-
15
-
16
-
17
-
18
-
19
-
20
-
21
-
22
-
23
-
24
-
25
-
26
-
27
-
28
-
29
-
30
-
31
-
32
-
33
-
34
-
35
-
36
-
37
-
38
-
39
-
40
-
41
-
42
-
43
-
44
-
45
-
46
-
47
-
48
-
49
-
50
-
51
-
52
-
53
-
54
-
55
-
56
-
57
-
58
-
59
-
60
-
61
-
62
-
63
-
64
-
65
-
66
-
67
-
68
-
69
-
70
-
71
-
72
-
73
-
74
-
75
-
76
-
77
-
78
-
79
-
80
-
81
-
82
-
83
-
84
-
85
-
86
-
87
-
88
-
89
-
90
-
91
-
92
-
93
-
94
-
95
-
96
-
97
-
98
-
99
-
100
-
101
-
102
-
103
-
104
-
105
-
106
-
107
-
108
-
109
-
110
-
111
-
112
-
113
-
114
-
115
-
116
-
117
-
118
-
119
-
120
-
121
-
122
-
123
-
124
-
125
-
126
-
127
-
128
-
129
-
130
-
131
-
132
-
133
-
134
-
135
-
136
-
137
-
138
-
139
-
140
-
141
-
142
-
143
-
144
-
145
-
146
-
147
-
148
-
149
-
150
-
151
-
152
-
153
-
154
-
155
-
 156
156 -
 157
157 -
 158
158 -
 159
159 -
 160
160 -
 161
161 -
 162
162 -
 163
163 -
 164
164 -
 165
165 -
 166
166 -
167
-
168
-
169
-
170
-
171
-
172
-
173
-
174
-
175
-
176
-
177
-
178
-
179
-
180
-
181
-
182
-
183
-
184
-
185
-
186
-
187
-
188
-
189
-
190
-
191
-
192
-
193
-
194
-
195
-
196
 |
 |
