Lenovo ThinkServer RD330 Hardware Maintenance Manual - ThinkServer RD330 - Page 29
Rack Installation, Instructions, Front panel, Intelligent Diagnostics Module - hard drive tray
 |
View all Lenovo ThinkServer RD330 manuals
Add to My Manuals
Save this manual to your list of manuals |
Page 29 highlights
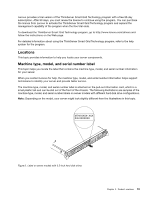
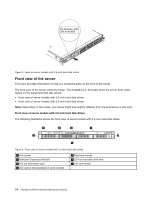
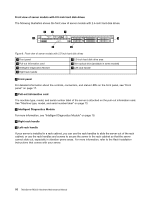
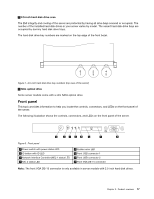
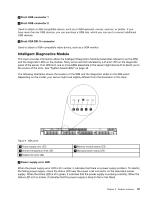
1 Front panel For detailed information about the controls, connectors, and status LEDs on the front panel, see "Front panel" on page 17. 2 Intelligent Diagnostics Module For more information, see "Intelligent Diagnostics Module" on page 19. 3 Pull-out information card The machine type, model, and serial number label of the server is attached on the pull-out information card. See "Machine type, model, and serial number label" on page 13. 4 Slim optical drive Some server models come with a slim SATA optical drive. 5 Right rack handle 7 Left rack handle If your server is installed in a rack cabinet, you can use the rack handles to slide the server out of the rack cabinet; or use the rack handles and screws to secure the server in the rack cabinet so that the server cannot slide out, especially in vibration-prone areas. For more information, refer to the Rack Installation Instructions that comes with your server. 6 3.5-inch hard disk drive area The EMI integrity and cooling of the server are protected by having all drive bays covered or occupied. The number of the installed hard disk drives in your server varies by model. The vacant hard disk drive bays are occupied by dummy hard disk drive trays. The hard disk drive bay numbers are marked on the top edge of the front bezel. Figure 5. 3.5-inch hard disk drive bay numbers (top view of the server) Chapter 3. Product overview 15
-
 1
1 -
2
-
3
-
4
-
5
-
6
-
7
-
8
-
9
-
10
-
11
-
12
-
13
-
14
-
15
-
16
-
17
-
18
-
19
-
20
-
21
-
22
-
23
-
 24
24 -
 25
25 -
 26
26 -
 27
27 -
 28
28 -
 29
29 -
 30
30 -
 31
31 -
 32
32 -
 33
33 -
 34
34 -
35
-
36
-
37
-
38
-
39
-
40
-
41
-
42
-
43
-
44
-
45
-
46
-
47
-
48
-
49
-
50
-
51
-
52
-
53
-
54
-
55
-
56
-
57
-
58
-
59
-
60
-
61
-
62
-
63
-
64
-
65
-
66
-
67
-
68
-
69
-
70
-
71
-
72
-
73
-
74
-
75
-
76
-
77
-
78
-
79
-
80
-
81
-
82
-
83
-
84
-
85
-
86
-
87
-
88
-
89
-
90
-
91
-
92
-
93
-
94
-
95
-
96
-
97
-
98
-
99
-
100
-
101
-
102
-
103
-
104
-
105
-
106
-
107
-
108
-
109
-
110
-
111
-
112
-
113
-
114
-
115
-
116
-
117
-
118
-
119
-
120
-
121
-
122
-
123
-
124
-
125
-
126
-
127
-
128
-
129
-
130
-
131
-
132
-
133
-
134
-
135
-
136
-
137
-
138
-
139
-
140
-
141
-
142
-
143
-
144
-
145
-
146
-
147
-
148
-
149
-
150
-
151
-
152
-
153
-
154
-
155
-
156
-
157
-
158
-
159
-
160
-
161
-
162
-
163
-
164
-
165
-
166
-
167
-
168
-
169
-
170
-
171
-
172
-
173
-
174
-
175
-
176
-
177
-
178
-
179
-
180
-
181
-
182
-
183
-
184
-
185
-
186
-
187
-
188
-
189
-
190
-
191
-
192
-
193
-
194
-
195
-
196
 |
 |
