Lexmark T656 User's Guide - Page 41
Linking exit bins, Verifying printer setup
 |
View all Lexmark T656 manuals
Add to My Manuals
Save this manual to your list of manuals |
Page 41 highlights
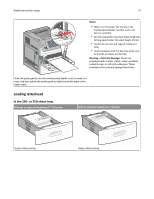
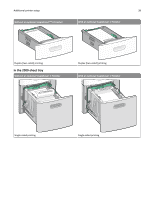
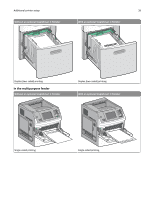
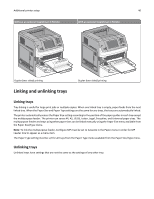
Additional printer setup 41 To unlink a tray, change the following tray settings so that they do not match the settings of any other tray: • Paper Type (for example: Plain Paper, Letterhead, Custom Type ) Paper Type names describe the paper characteristics. If the name that best describes your paper is used by linked trays, assign a different Paper Type name to the tray, such as Custom Type , or define your own custom name. • Paper Size (for example: letter, A4, statement) Load a different paper size to change the Paper Size setting for a tray automatically. Paper Size settings for the multipurpose feeder are not automatic; they must be set manually from the Paper Size menu. Warning-Potential Damage: Do not assign a Paper Type name that does not accurately describe the type of paper loaded in the tray. The temperature of the fuser varies according to the specified Paper Type. Paper may not be properly processed if an inaccurate Paper Type is selected. Linking exit bins The standard exit bin holds up to 550 sheets of 20‑lb paper. If you need additional output capacity, you can purchase other optional exit bins. Note: Not all exit bins support every paper size and type. Linking exit bins lets you create a single output source so the printer can automatically switch output to the next available exit bin. 1 Make sure the printer is on and Ready appears. 2 On the home screen, touch . 3 Touch Paper Menu. 4 Touch Bin Setup. 5 Touch the correct bin or bins. 6 Touch Configure Bins. 7 Touch Link. Verifying printer setup Once all hardware and software options are installed and the printer is turned on, verify that the printer is set up correctly by printing the following: • Menu settings page-Use this page to verify that all printer options are installed correctly. A list of installed options appears toward the bottom of the page. If an option you installed is not listed, then it is not installed correctly. Remove the option and install it again. • Network setup page-If your printer is a network model and is attached to a network, print a network setup page to verify the network connection. This page also provides important information that aids network printing configuration.
-
 1
1 -
2
-
3
-
4
-
5
-
6
-
7
-
8
-
9
-
10
-
11
-
12
-
13
-
14
-
15
-
16
-
17
-
18
-
19
-
20
-
21
-
22
-
23
-
24
-
25
-
26
-
27
-
28
-
29
-
30
-
31
-
32
-
33
-
34
-
35
-
 36
36 -
 37
37 -
 38
38 -
 39
39 -
 40
40 -
 41
41 -
 42
42 -
 43
43 -
 44
44 -
 45
45 -
 46
46 -
47
-
48
-
49
-
50
-
51
-
52
-
53
-
54
-
55
-
56
-
57
-
58
-
59
-
60
-
61
-
62
-
63
-
64
-
65
-
66
-
67
-
68
-
69
-
70
-
71
-
72
-
73
-
74
-
75
-
76
-
77
-
78
-
79
-
80
-
81
-
82
-
83
-
84
-
85
-
86
-
87
-
88
-
89
-
90
-
91
-
92
-
93
-
94
-
95
-
96
-
97
-
98
-
99
-
100
-
101
-
102
-
103
-
104
-
105
-
106
-
107
-
108
-
109
-
110
-
111
-
112
-
113
-
114
-
115
-
116
-
117
-
118
-
119
-
120
-
121
-
122
-
123
-
124
-
125
-
126
-
127
-
128
-
129
-
130
-
131
-
132
-
133
-
134
-
135
-
136
-
137
-
138
-
139
-
140
-
141
-
142
-
143
-
144
-
145
-
146
-
147
-
148
-
149
-
150
-
151
-
152
-
153
-
154
-
155
-
156
-
157
-
158
-
159
-
160
-
161
-
162
-
163
-
164
-
165
-
166
-
167
-
168
-
169
-
170
-
171
-
172
-
173
-
174
-
175
-
176
-
177
-
178
-
179
-
180
-
181
-
182
-
183
-
184
-
185
-
186
-
187
-
188
-
189
-
190
-
191
-
192
-
193
-
194
-
195
-
196
-
197
-
198
-
199
-
200
-
201
-
202
-
203
-
204
-
205
-
206
-
207
-
208
-
209
-
210
-
211
 |
 |
