Lexmark Z32 Color Jetprinter User's Guide for Windows 95, Windows 98, and Maci - Page 11
Basic printing for Macintosh
 |
View all Lexmark Z32 Color Jetprinter manuals
Add to My Manuals
Save this manual to your list of manuals |
Page 11 highlights
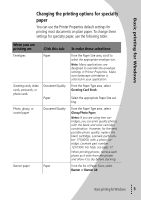
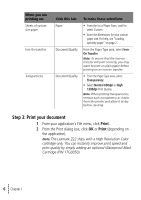
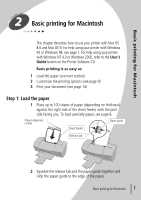
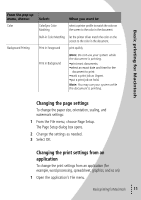
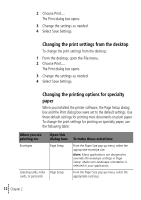
Basic printing for Macintosh 2 Basic printing for Macintosh This chapter describes how to use your printer with Mac OS 8.6 and Mac OS 9. For help using your printer with Windows 95 or Windows 98, see page 1. For help using your printer with Windows NT 4.0 or Windows 2000, refer to the User's Guide button on the Printer Software CD. Basic printing is as easy as: 1 Load the paper (see next section) 2 Customize the printing options (see page 9) 3 Print your document (see page 14) Step 1: Load the paper 1 Place up to 100 sheets of paper (depending on thickness) against the right side of the sheet feeder, with the print side facing you. To load specialty paper, see page 8. Paper alignment marks Paper guide Sheet feeder Release tab 2 Squeeze the release tab and the paper guide together and slide the paper guide to the edge of the paper. Basic printing for Macintosh • • • 7 ••
-
 1
1 -
2
-
3
-
4
-
5
-
 6
6 -
 7
7 -
 8
8 -
 9
9 -
 10
10 -
 11
11 -
 12
12 -
 13
13 -
 14
14 -
 15
15 -
 16
16 -
17
-
18
-
19
-
20
-
21
-
22
-
23
-
24
-
25
-
26
-
27
-
28
-
29
-
30
-
31
-
32
-
33
-
34
-
35
-
36
-
37
-
38
-
39
-
40
-
41
-
42
-
43
-
44
 |
 |