Linksys NMH305 User Guide - Page 52
Windows File Sharing, Remote Access Instructions, Video Playback over Remote Access
 |
UPC - 745883585885
View all Linksys NMH305 manuals
Add to My Manuals
Save this manual to your list of manuals |
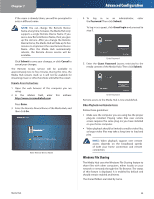
Page 52 highlights
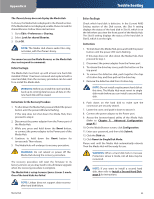
Chapter 7 If the name is already taken, you will be prompted to enter a different name. NOTE: You can change the Remote Device Name at any time; however, the Media Hub only supports a single Remote Device Name. If you save a new Remote Device Name, then you give up the old one. After you change the Remote Device Name, the Media Hub will take up to five minutes to implement the new Remote Device Name. After the Media Hub automatically reboots, the Remote Access service will be available. Click Submit to save your changes, or click Cancel to cancel your changes. The Remote Access service will be available in approximately two to five minutes. During this time, the Media Hub restarts itself, so it will not be available for streaming music or other functions until after the restart. Remote Access Instructions 1. Open the web browser of the computer you are using. 2. In the Address field, enter this address: http://www.ciscomediahub.com Press Enter. 3. Enter the Remote Device Name of the Media Hub, and then click Go. Enter Remote Device Name Advanced Configuration 4. To log in as an administrator, enter the Password. Then click Submit. To log in as a guest, click Guest login and proceed to step 5. Enter Password 5. Enter the Guest Password (access restricted to the media content of the Media Hub). Then click Submit. Enter Password Remote access to the Media Hub is now established. Video Playback over Remote Access Follow these guidelines: •• Make sure the computer you are using has the proper plug-ins installed. Playing video files over remote access requires the same plug-ins you have installed on your home computer. •• Video playback should be limited to smaller video files, as larger video files may take a long time to load and play. NOTE: Video playback support over remote access depends on the broadband speeds of both your home connection and remote connection. Windows File Sharing The Media Hub uses the Windows File Sharing feature to share files with other computers, either locally on your network or remotely through the File Browser. The status of this feature is displayed. It is enabled by default and should remain enabled at all times. The shared folders are listed by name. Media Hub 48
-
 1
1 -
2
-
3
-
4
-
5
-
6
-
7
-
8
-
9
-
10
-
11
-
12
-
13
-
14
-
15
-
16
-
17
-
18
-
19
-
20
-
21
-
22
-
23
-
24
-
25
-
26
-
27
-
28
-
29
-
30
-
31
-
32
-
33
-
34
-
35
-
36
-
37
-
38
-
39
-
40
-
41
-
42
-
43
-
44
-
45
-
46
-
 47
47 -
 48
48 -
 49
49 -
 50
50 -
 51
51 -
 52
52 -
 53
53 -
 54
54 -
 55
55 -
 56
56 -
 57
57 -
58
-
59
-
60
-
61
-
62
-
63
-
64
-
65
-
66
-
67
-
68
-
69
-
70
-
71
-
72
-
73
-
74
-
75
-
76
-
77
-
78
-
79
-
80
-
81
 |
 |
