MSI X2 User Guide - Page 39
Replacing the Chassis Cover
 |
View all MSI X2 manuals
Add to My Manuals
Save this manual to your list of manuals |
Page 39 highlights
Hardware Setup Replacing the Chassis Cover 1. Replace the front chassis cover, press its release buttons, and slide it backwards. Replace the rear chassis cover, press its release buttons, and slide it forwards. 2. Fasten the thumbscrew on the rear bezel of the system. Important Before you remove or install any components, make sure the server is not turned on or connected to the AC power. 2-19
-
 1
1 -
2
-
3
-
4
-
5
-
6
-
7
-
8
-
9
-
10
-
11
-
12
-
13
-
14
-
15
-
16
-
17
-
18
-
19
-
20
-
21
-
22
-
23
-
24
-
25
-
26
-
27
-
28
-
29
-
30
-
31
-
32
-
33
-
 34
34 -
 35
35 -
 36
36 -
 37
37 -
 38
38 -
 39
39 -
 40
40 -
 41
41 -
 42
42 -
 43
43 -
 44
44 -
45
-
46
-
47
-
48
-
49
-
50
-
51
-
52
-
53
-
54
-
55
-
56
-
57
-
58
-
59
-
60
-
61
-
62
-
63
-
64
-
65
-
66
-
67
-
68
-
69
-
70
-
71
-
72
-
73
-
74
-
75
-
76
-
77
-
78
-
79
-
80
-
81
-
82
-
83
-
84
-
85
-
86
-
87
-
88
-
89
-
90
-
91
-
92
-
93
-
94
-
95
-
96
-
97
-
98
-
99
-
100
-
101
-
102
-
103
-
104
-
105
-
106
-
107
-
108
-
109
-
110
-
111
-
112
-
113
-
114
-
115
-
116
-
117
-
118
-
119
-
120
-
121
 |
 |

2-19
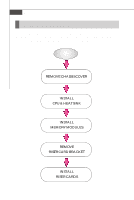
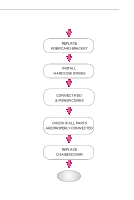
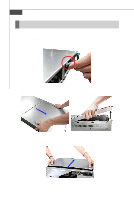
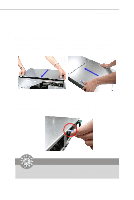
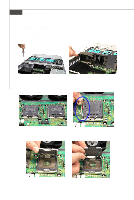
Hardware Setup
Replacing the Chassis Cover
1.
Replace the front chassis cover, press its release buttons, and slide it backwards.
Replace the rear chassis cover, press its release buttons, and slide it forwards.
2.
Fasten the thumbscrew on the rear bezel of the system.
Important
Before you remove or install any components, make sure the server is not
turned on or connected to the AC power.