MSI X2 User Guide - Page 42
MS-9273 Server
 |
View all MSI X2 manuals
Add to My Manuals
Save this manual to your list of manuals |
Page 42 highlights
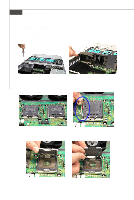
MS-9273 Server 11. Place the heat sink on top of CPU1 and secure the screws on both sides. Note: The heatsink has to be installed to prevent the CPU from overheating. 12. Follow the same procedures to install the second heatsink. Note: To ensure proper cooling, make sure the heatsinks & the fan duct are properly installed. 13. Replace the fan duct on top of the heatsinks. 14. Place the fan duct bracket on top of the fan duct. Make sure the system cable is completely covered under the bracket. 15. S c r ew to s ec ur e the f an duc t bracket. 2-22
-
 1
1 -
2
-
3
-
4
-
5
-
6
-
7
-
8
-
9
-
10
-
11
-
12
-
13
-
14
-
15
-
16
-
17
-
18
-
19
-
20
-
21
-
22
-
23
-
24
-
25
-
26
-
27
-
28
-
29
-
30
-
31
-
32
-
33
-
34
-
35
-
36
-
 37
37 -
 38
38 -
 39
39 -
 40
40 -
 41
41 -
 42
42 -
 43
43 -
 44
44 -
 45
45 -
 46
46 -
 47
47 -
48
-
49
-
50
-
51
-
52
-
53
-
54
-
55
-
56
-
57
-
58
-
59
-
60
-
61
-
62
-
63
-
64
-
65
-
66
-
67
-
68
-
69
-
70
-
71
-
72
-
73
-
74
-
75
-
76
-
77
-
78
-
79
-
80
-
81
-
82
-
83
-
84
-
85
-
86
-
87
-
88
-
89
-
90
-
91
-
92
-
93
-
94
-
95
-
96
-
97
-
98
-
99
-
100
-
101
-
102
-
103
-
104
-
105
-
106
-
107
-
108
-
109
-
110
-
111
-
112
-
113
-
114
-
115
-
116
-
117
-
118
-
119
-
120
-
121
 |
 |

2-22
MS-9273 Server
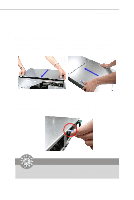
13. Replace the fan duct on top of the
heatsinks.
Note: To ensure proper cooling,
make sure the heatsinks & the
fan duct are properly installed.
14. Place the fan duct bracket on top of
the fan duct. Make sure the system
cable is completely covered under
the bracket.
15. Screw to secure the fan duct
bracket.
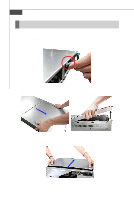
11. Place the heat sink on top of CPU1 and secure the screws on both sides.
Note: The heatsink has to be installed to prevent the CPU from overheating.
12. Follow the same procedures to in-
stall the second heatsink.