NEC DTL-6DE-1 User Manual - Page 188
Ring Tone, Illumination, Ken Kobus, Tel #4, Colleagues, Download 1, Tone Type 14, Default, Edit]
 |
UPC - 722580004475
View all NEC DTL-6DE-1 manuals
Add to My Manuals
Save this manual to your list of manuals |
Page 188 highlights
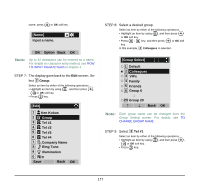
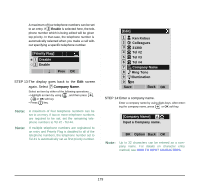
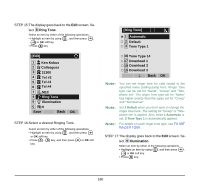
STEP 15:The display goes back to the Edit screen. Select 8 Ring Tone. Select an item by either of the following operations. • Highlight an item by using , and then press , or OK soft key. • Press 8 key. [Edit] 1 Ken Kobus 2 Gr Colleagues 3 31300 4 Tel #2 5 Tel #3 6 Tel #4 7 NEC 8 Ring Tone 9 Illumination 0 No 0 Save Back OK STEP 16:Select a desired Ringing Tone. Select an item by either of the following operations. • Highlight an item by using , and then press or OK soft key. • Press 0 - 9 key, and then press or OK soft key. [Ring Tone] 1 Automatic 2 Default 3 Tone Type 1 16 Tone Type 14 17 Download 1 18 Download 2 19 Download 3 Back OK Note: You can set ringer tone for calls routed to the specified name (calling party) here. Ringer Tone type can be set for "Name", "Group" and "Telephone set". The ringer Tone type set for "Name" has higher priority than the types set for "Group" and "Terminal set". Note: Set 2 Default when you don't want to change the ringer tone here. The setting for "Group" or "Telephone set" is applied. Also, when 1 Automatic is set, 3 Tone Type 1 is automatically applied. Note: For details on each ringer tone type, see TO SET RINGER TONE. STEP 17:The display goes back to the Edit screen. Select 9 Illumination. Select an item by either of the following operations. • Highlight an item by using , and then press , or OK soft key. • Press 9 key. 180
-
 1
1 -
2
-
3
-
4
-
5
-
6
-
7
-
8
-
9
-
10
-
11
-
12
-
13
-
14
-
15
-
16
-
17
-
18
-
19
-
20
-
21
-
22
-
23
-
24
-
25
-
26
-
27
-
28
-
29
-
30
-
31
-
32
-
33
-
34
-
35
-
36
-
37
-
38
-
39
-
40
-
41
-
42
-
43
-
44
-
45
-
46
-
47
-
48
-
49
-
50
-
51
-
52
-
53
-
54
-
55
-
56
-
57
-
58
-
59
-
60
-
61
-
62
-
63
-
64
-
65
-
66
-
67
-
68
-
69
-
70
-
71
-
72
-
73
-
74
-
75
-
76
-
77
-
78
-
79
-
80
-
81
-
82
-
83
-
84
-
85
-
86
-
87
-
88
-
89
-
90
-
91
-
92
-
93
-
94
-
95
-
96
-
97
-
98
-
99
-
100
-
101
-
102
-
103
-
104
-
105
-
106
-
107
-
108
-
109
-
110
-
111
-
112
-
113
-
114
-
115
-
116
-
117
-
118
-
119
-
120
-
121
-
122
-
123
-
124
-
125
-
126
-
127
-
128
-
129
-
130
-
131
-
132
-
133
-
134
-
135
-
136
-
137
-
138
-
139
-
140
-
141
-
142
-
143
-
144
-
145
-
146
-
147
-
148
-
149
-
150
-
151
-
152
-
153
-
154
-
155
-
156
-
157
-
158
-
159
-
160
-
161
-
162
-
163
-
164
-
165
-
166
-
167
-
168
-
169
-
170
-
171
-
172
-
173
-
174
-
175
-
176
-
177
-
178
-
179
-
180
-
181
-
182
-
 183
183 -
 184
184 -
 185
185 -
 186
186 -
 187
187 -
 188
188 -
 189
189 -
 190
190 -
 191
191 -
 192
192 -
 193
193 -
194
-
195
-
196
-
197
-
198
-
199
-
200
-
201
-
202
-
203
-
204
-
205
-
206
-
207
-
208
-
209
-
210
-
211
-
212
-
213
-
214
-
215
-
216
-
217
-
218
-
219
-
220
-
221
-
222
-
223
-
224
-
225
-
226
-
227
-
228
-
229
-
230
-
231
-
232
-
233
-
234
-
235
-
236
-
237
-
238
-
239
-
240
-
241
-
242
-
243
-
244
-
245
-
246
-
247
-
248
-
249
-
250
-
251
-
252
-
253
-
254
 |
 |
