Netgear FVS318N FVS318 Reference Manual - Page 83
r>Th4&3@#kB, Set Up the SafeNet, VPN Client Software on the PC.
 |
View all Netgear FVS318N manuals
Add to My Manuals
Save this manual to your list of manuals |
Page 83 highlights
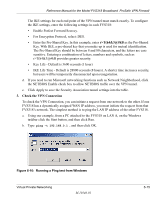
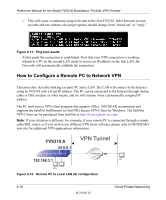
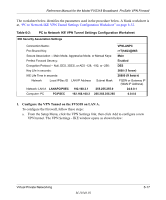
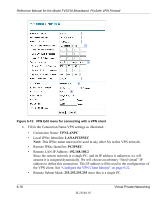
Reference Manual for the Model FVS318 Broadband ProSafe VPN Firewall • Remote WAN IP Address: 0.0.0.0 since the remote PC has a dynamically assigned IP address. Alternatively, you could use the FQDN of the PC. Note: If one side has a dynamic IP address and you do not use FQDN, that side must always initiate the connection. c. Under Secure Association, select Main Mode and fill in the settings below. • Enable Perfect Forward Secrecy. • For Encryption Protocol, select: DES • Enter the case sensitive Pre-Shared Key: r>T(h4&3@#kB This combination of letters, numbers and symbols, provides greater security. • Key Life - Default is 3600 seconds (1 hour) • IKE Life Time - Default is 28800 seconds (8 hours). A shorter time increases security, but users will be temporarily disconnected upon renegotiation. d. If you need to run Microsoft networking functions such as Network Neighborhood, click the NETBIOS Enable check box to allow NETBIOS traffic over the VPN tunnel. e. Click Apply to save the Security Association tunnel settings into the table. 2. Set Up the SafeNet VPN Client Software on the PC. Note: Before installing the SafeNet SoftRemote VPN Client software, be sure to turn off any virus protection or firewall software you may be running on your PC. a. Install the SafeNet Secure VPN Client. • You may need to insert your Windows CD to complete the installation. • If you do not have a modem or dial-up adapter installed in your PC, you may see the warning message stating "The SafeNet VPN Component requires at least one dial-up adapter be installed." You can disregard this message. • Install the IPSec Component. You may have the option to install either or both of the VPN Adapter or the IPSec Component. The VPN Adapter is not necessary. Reboot your PC after installing the client software.s Virtual Private Networking M-10146-01 6-19
-
 1
1 -
2
-
3
-
4
-
5
-
6
-
7
-
8
-
9
-
10
-
11
-
12
-
13
-
14
-
15
-
16
-
17
-
18
-
19
-
20
-
21
-
22
-
23
-
24
-
25
-
26
-
27
-
28
-
29
-
30
-
31
-
32
-
33
-
34
-
35
-
36
-
37
-
38
-
39
-
40
-
41
-
42
-
43
-
44
-
45
-
46
-
47
-
48
-
49
-
50
-
51
-
52
-
53
-
54
-
55
-
56
-
57
-
58
-
59
-
60
-
61
-
62
-
63
-
64
-
65
-
66
-
67
-
68
-
69
-
70
-
71
-
72
-
73
-
74
-
75
-
76
-
77
-
 78
78 -
 79
79 -
 80
80 -
 81
81 -
 82
82 -
 83
83 -
 84
84 -
 85
85 -
 86
86 -
 87
87 -
 88
88 -
89
-
90
-
91
-
92
-
93
-
94
-
95
-
96
-
97
-
98
-
99
-
100
-
101
-
102
-
103
-
104
-
105
-
106
-
107
-
108
-
109
-
110
-
111
-
112
-
113
-
114
-
115
-
116
-
117
-
118
-
119
-
120
-
121
-
122
-
123
-
124
-
125
-
126
-
127
-
128
-
129
-
130
-
131
-
132
-
133
-
134
-
135
-
136
-
137
-
138
-
139
-
140
-
141
-
142
-
143
-
144
-
145
-
146
-
147
-
148
-
149
-
150
-
151
-
152
-
153
-
154
-
155
-
156
-
157
-
158
-
159
-
160
-
161
-
162
-
163
-
164
-
165
-
166
-
167
-
168
-
169
-
170
-
171
-
172
-
173
-
174
-
175
-
176
-
177
-
178
-
179
-
180
-
181
-
182
-
183
-
184
-
185
-
186
-
187
-
188
-
189
-
190
-
191
-
192
-
193
-
194
-
195
-
196
-
197
-
198
-
199
-
200
-
201
-
202
-
203
-
204
-
205
-
206
-
207
-
208
-
209
-
210
-
211
-
212
-
213
-
214
-
215
-
216
-
217
-
218
-
219
-
220
-
221
-
222
 |
 |