Netgear RAX36S User Manual - Page 118
Install OpenVPN software on a Mac computer, For Mac OS X
 |
View all Netgear RAX36S manuals
Add to My Manuals
Save this manual to your list of manuals |
Page 118 highlights
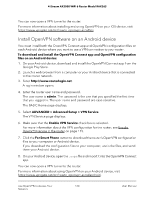
4-Stream AX3000 WiFi 6 Router Model RAX36S c. Select the local area connection and change its name (not its device name) to NETGEAR-VPN. If you do not change the VPN interface name, the VPN tunnel connection will fail. You can now open a VPN tunnel to the router. For more information about installing and using OpenVPN on your Windows-based computer, visit https://openvpn.net/community-resources/how-to/#quick. Install OpenVPN software on a Mac computer You must install both the Tunnelblick OpenVPN client utility and OpenVPN configuration files on each Mac computer where you want to use a VPN connection to your router. To download and install the Tunnelblick OpenVPN client utility and OpenVPN configuration files on a Mac computer: 1. To download the Tunnelblick OpenVPN client utility on your Mac computer, visit https://tunnelblick.net/downloads.html. 2. Download and install the Tunnelblick OpenVPN client utility on your Mac computer. You need to have administrative privileges. 3. Launch a web browser from the Mac computer, which must be connected to the router network. 4. Enter http://www.routerlogin.net. A login window opens. 5. Enter the router user name and password. The user name is admin. The password is the one that you specified the first time that you logged in. The user name and password are case-sensitive. The BASIC Home page displays. 6. Select ADVANCED > Advanced Setup > VPN Service. The VPN Service page displays. 7. Make sure that the Enable VPN Service check box is selected. For more information about the VPN configuration for the router, see Enable OpenVPN service in the router on page 115. 8. Click the For Mac OS X button to download the router's OpenVPN configuration files to your Mac computer. 9. Unzip the OpenVPN configuration files and copy them to the folder in which you installed the Tunnelblick OpenVPN client utility. Use OpenVPN to Access Your 118 Network User Manual
-
 1
1 -
2
-
3
-
4
-
5
-
6
-
7
-
8
-
9
-
10
-
11
-
12
-
13
-
14
-
15
-
16
-
17
-
18
-
19
-
20
-
21
-
22
-
23
-
24
-
25
-
26
-
27
-
28
-
29
-
30
-
31
-
32
-
33
-
34
-
35
-
36
-
37
-
38
-
39
-
40
-
41
-
42
-
43
-
44
-
45
-
46
-
47
-
48
-
49
-
50
-
51
-
52
-
53
-
54
-
55
-
56
-
57
-
58
-
59
-
60
-
61
-
62
-
63
-
64
-
65
-
66
-
67
-
68
-
69
-
70
-
71
-
72
-
73
-
74
-
75
-
76
-
77
-
78
-
79
-
80
-
81
-
82
-
83
-
84
-
85
-
86
-
87
-
88
-
89
-
90
-
91
-
92
-
93
-
94
-
95
-
96
-
97
-
98
-
99
-
100
-
101
-
102
-
103
-
104
-
105
-
106
-
107
-
108
-
109
-
110
-
111
-
112
-
 113
113 -
 114
114 -
 115
115 -
 116
116 -
 117
117 -
 118
118 -
 119
119 -
 120
120 -
 121
121 -
 122
122 -
 123
123 -
124
-
125
-
126
-
127
-
128
-
129
-
130
-
131
-
132
-
133
-
134
-
135
-
136
-
137
-
138
-
139
-
140
-
141
-
142
-
143
-
144
-
145
-
146
 |
 |
