Netgear RND4000 RND4000 User Manual - Page 27
Manage Users, Add User, Group, Apply
 |
UPC - 606449053272
View all Netgear RND4000 manuals
Add to My Manuals
Save this manual to your list of manuals |
Page 27 highlights
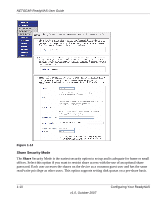
NETGEAR ReadyNAS User Guide name3,gid3,quota3,member31:member32:member33 : Please note the following: • Spaces around commas are ignored. • The name field is required. • Quota is set to default if not specified. • GID is automatically generated if not specified. • Empty fields are replaced with account defaults. • Group members are optional. Examples of acceptable formats are as follows (note that you can omit follow-on commas and fields if you wish to accept the system defaults for those fields, or you can leave the fields empty): flintstones In this example, the group flintstones is created with an automatically assigned GID and default quota. rubble,1007,5000,barney:betty In this example, the group rubble has a GID of 1007, a quota of 5000 MB, with members barney and betty. Managing Users To manage user accounts: 1. Select Manage Users from the drop-down menu. 2. Click the Add User tab to add a new user. You can add up to five users at a time. For each user, add the following information: • User name, • E-mail address • User ID • Select a group from the Group pull-down menu. • Password • Disk quota. 3. Click Apply to save your settings. Configuring Your ReadyNAS v1.0, October 2007 1-15
-
 1
1 -
2
-
3
-
4
-
5
-
6
-
7
-
8
-
9
-
10
-
11
-
12
-
13
-
14
-
15
-
16
-
17
-
18
-
19
-
20
-
21
-
 22
22 -
 23
23 -
 24
24 -
 25
25 -
 26
26 -
 27
27 -
 28
28 -
 29
29 -
 30
30 -
 31
31 -
 32
32 -
33
-
34
-
35
-
36
-
37
-
38
-
39
-
40
-
41
-
42
-
43
-
44
-
45
-
46
-
47
-
48
-
49
-
50
-
51
-
52
-
53
-
54
-
55
-
56
-
57
-
58
-
59
-
60
-
61
-
62
-
63
-
64
-
65
-
66
-
67
-
68
-
69
-
70
-
71
-
72
-
73
-
74
-
75
-
76
-
77
-
78
-
79
-
80
-
81
-
82
-
83
-
84
-
85
-
86
-
87
-
88
-
89
-
90
-
91
-
92
-
93
-
94
-
95
-
96
-
97
-
98
-
99
-
100
-
101
-
102
-
103
-
104
-
105
-
106
-
107
-
108
-
109
-
110
-
111
-
112
-
113
-
114
-
115
-
116
-
117
-
118
-
119
-
120
 |
 |
